For Part 2 of our coverage of the Star Wars: Shatterpoint — Wisdom of the Council Squad Pack, I will be going through the step-by-step process to get them out of gray and ready for play. These tutorials are meant to get your miniatures painted and make them stand out on the table.
If you would like to see the unboxing and review, check out Part 1 here where I go more into prepping these pieces for priming and painting.
PAINT LIST
I use a wide variety of paint lines, but the majority of what I use for painting is Games Workshop’s Citadel Paints, Army Painter, and Pro Acryl. I also make sure to mix in Liquitex Flow-Aid Additive to the paint pots and dropper bottles so that the paints are a little thinner and ready to add right onto my wet-pallet. For this tutorial, I have included a list of all the paints and primers I used so you have an easily-accessible list to refer to if you need to go shopping. The paints are noted on the picture and in the optional ‘Basing’ section. Many paints are used for multiple figures, so a single bottle will be more than enough.
Primers
- Rusteolum Flat Black Primer
- Army Painter Matte White Colour Primer -OR- Citadel White Scar Primer
NOTE: You don’t need to use the exact paints listed in the pictures, and can substitute with the paints and colors you have from other paint lines. Most of these colors are fairly generic, and I use them for multiple projects. I only recommend going out and buying a new paint or color if you think you’re going to use it for multiple projects in the future.
PRIMING
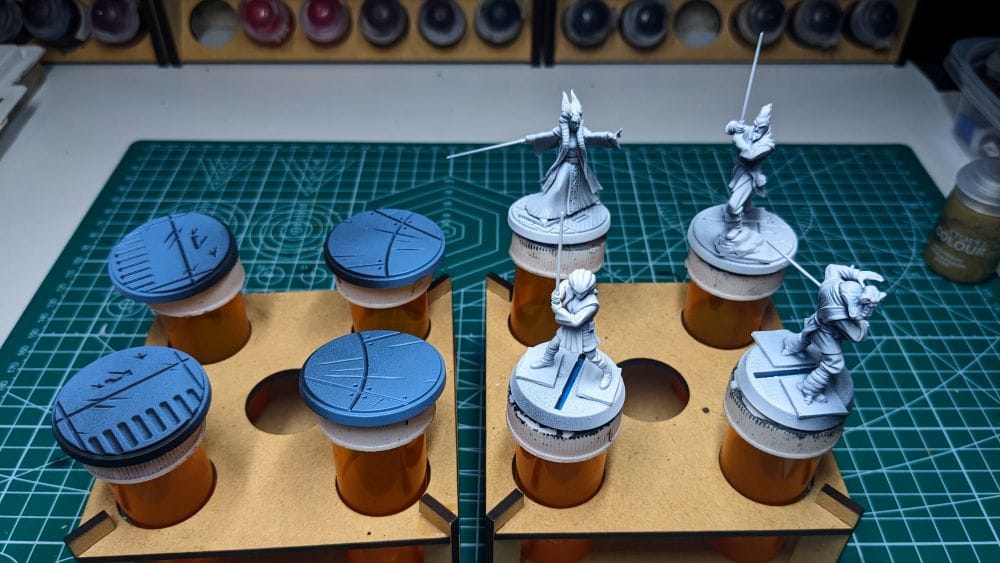
In general terms, getting the majority of a color for a model applied via a rattle can or airbrush saves a lot of time. I chose to paint the figures separate from the bases so I could paint the bases faster and keep the colors as neatly as possible. I used some old bases and affixed the figures to those bases with some Gorilla Glue Tough & Clear Mounting Tape. The tape keeps the figures held in place very well and they are easy to remove once I am done painting.
I primed all of the figures with a zenithal prime on them, using a base coat of Rustoleum Flat Black and a top coat of Army Painter White Primer.
MODEL PAINTING
For pretty much every miniature paint project I do, I start with a plan. In advance of putting the brush to model, I find photo references of the paint schemes and details I am looking for. Most times this means having a browser window up with different web pages and images next to my painting area, so I can quickly refer to them as I paint. I also come up with a paint plan, choosing what colors I am going to use and what order I apply them in.
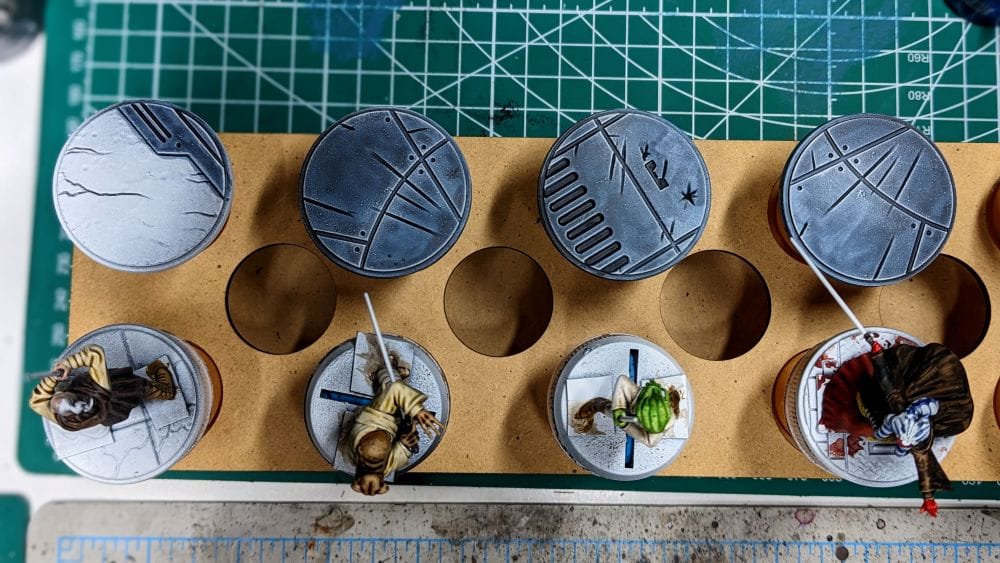
I typically start with ‘color blocking’: a technique where I apply the mid-range of the color I want to use through contrast/speed-paints, washes, and sometimes base paints. As I usually do a black and white zenithal prime, the contrast/speed paints provide a blend of color over the top of the priming, giving me a nice gradient with which to work with later for shading and highlighting (if I choose to do detailing). I do all of my color blocking first before going back in and doing the detailing. I start with the lightest tones first and then work down the range to the darkest tones. Lastly, I do the work for the bases, whether the figures are on them or separately.
Quick Paint & Detailing
In the photos below, I have included a list of the paints I’ve used for each model. The colors above the white line are meant to be the ‘Quick Paint’ colors. These are the paints that give a main, basic color to each part of the miniature (skin, clothes, gear, etc.). With zenithal priming and contrast/quick/speed paints, your model will be 80% of the way there in terms of tone, shading, and highlighting. For most tournaments, ‘battle ready’ or ‘tournament legal’ painting requires at least three colors: if you follow these guides you’ll be set. However, if you’re wanting to push your painting a little further and give these characters a little more detail, you can continue down the list of paints to add more highlights. This guide is meant to help you build confidence with miniature painting. We’re not going for gold medals on these models - this is simply a guide to get your pieces painted. Remember that done is better than perfect!
Let’s get painting!
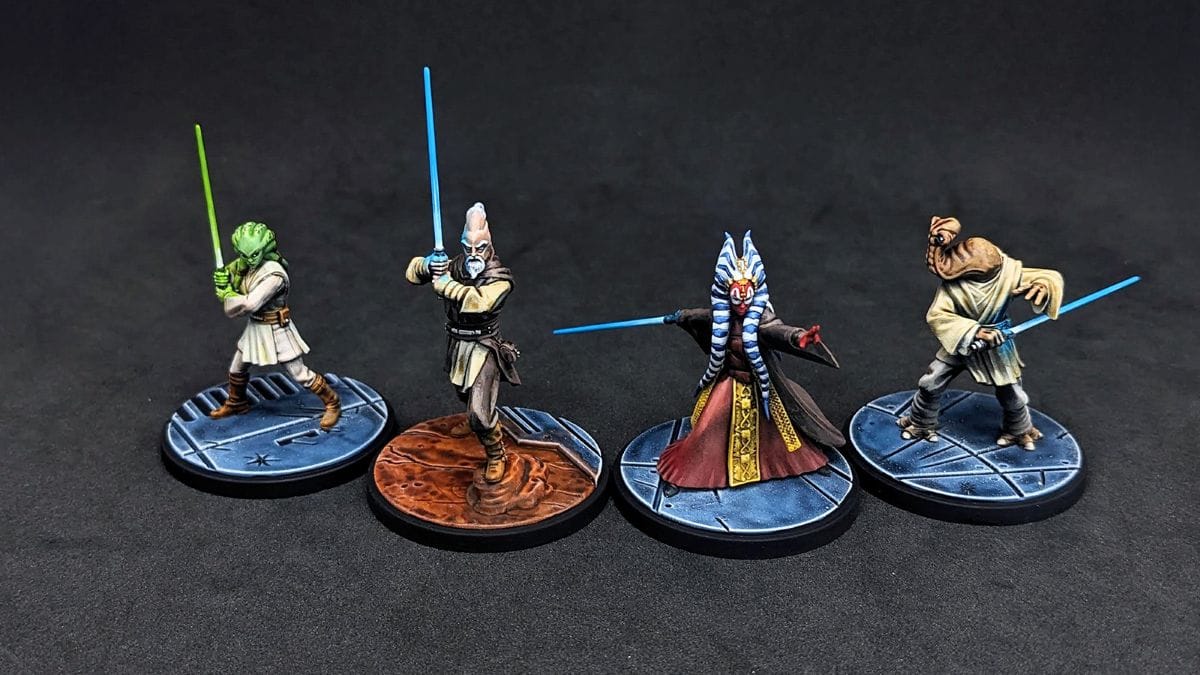
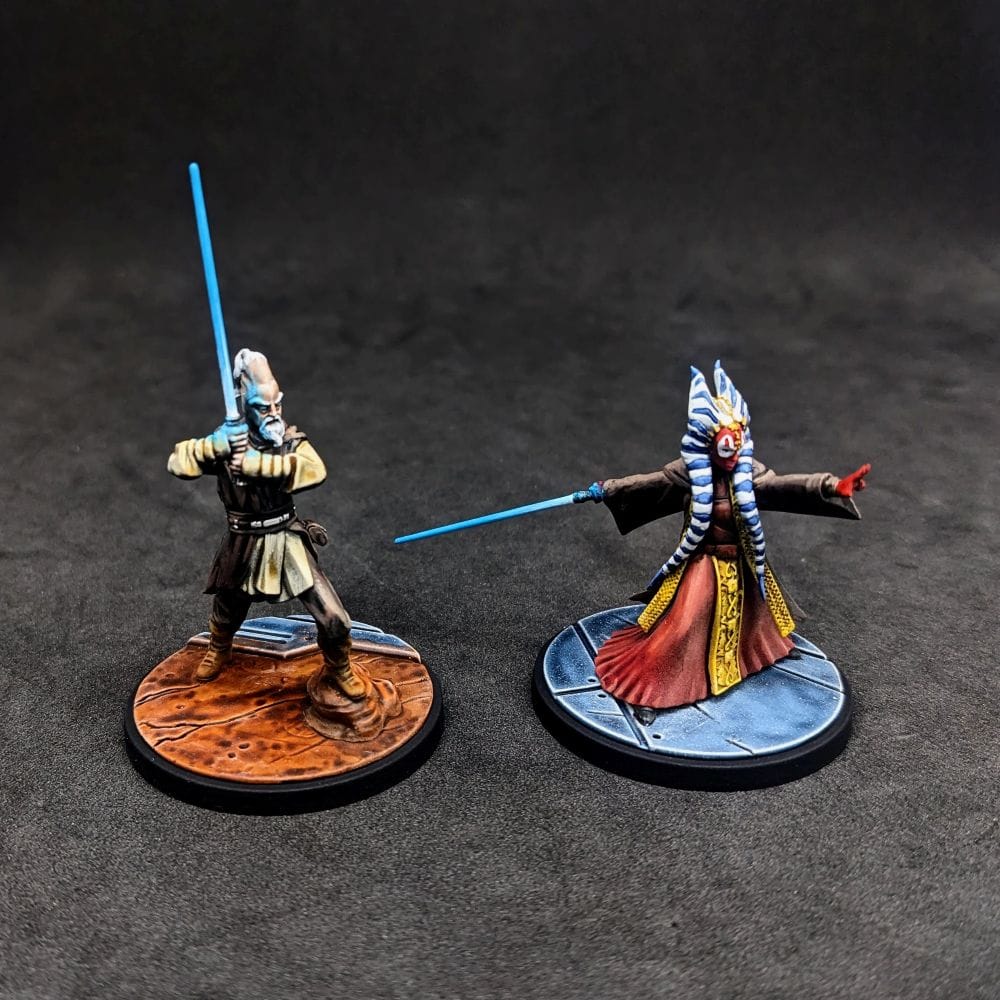
Ki-Adi-Mundi
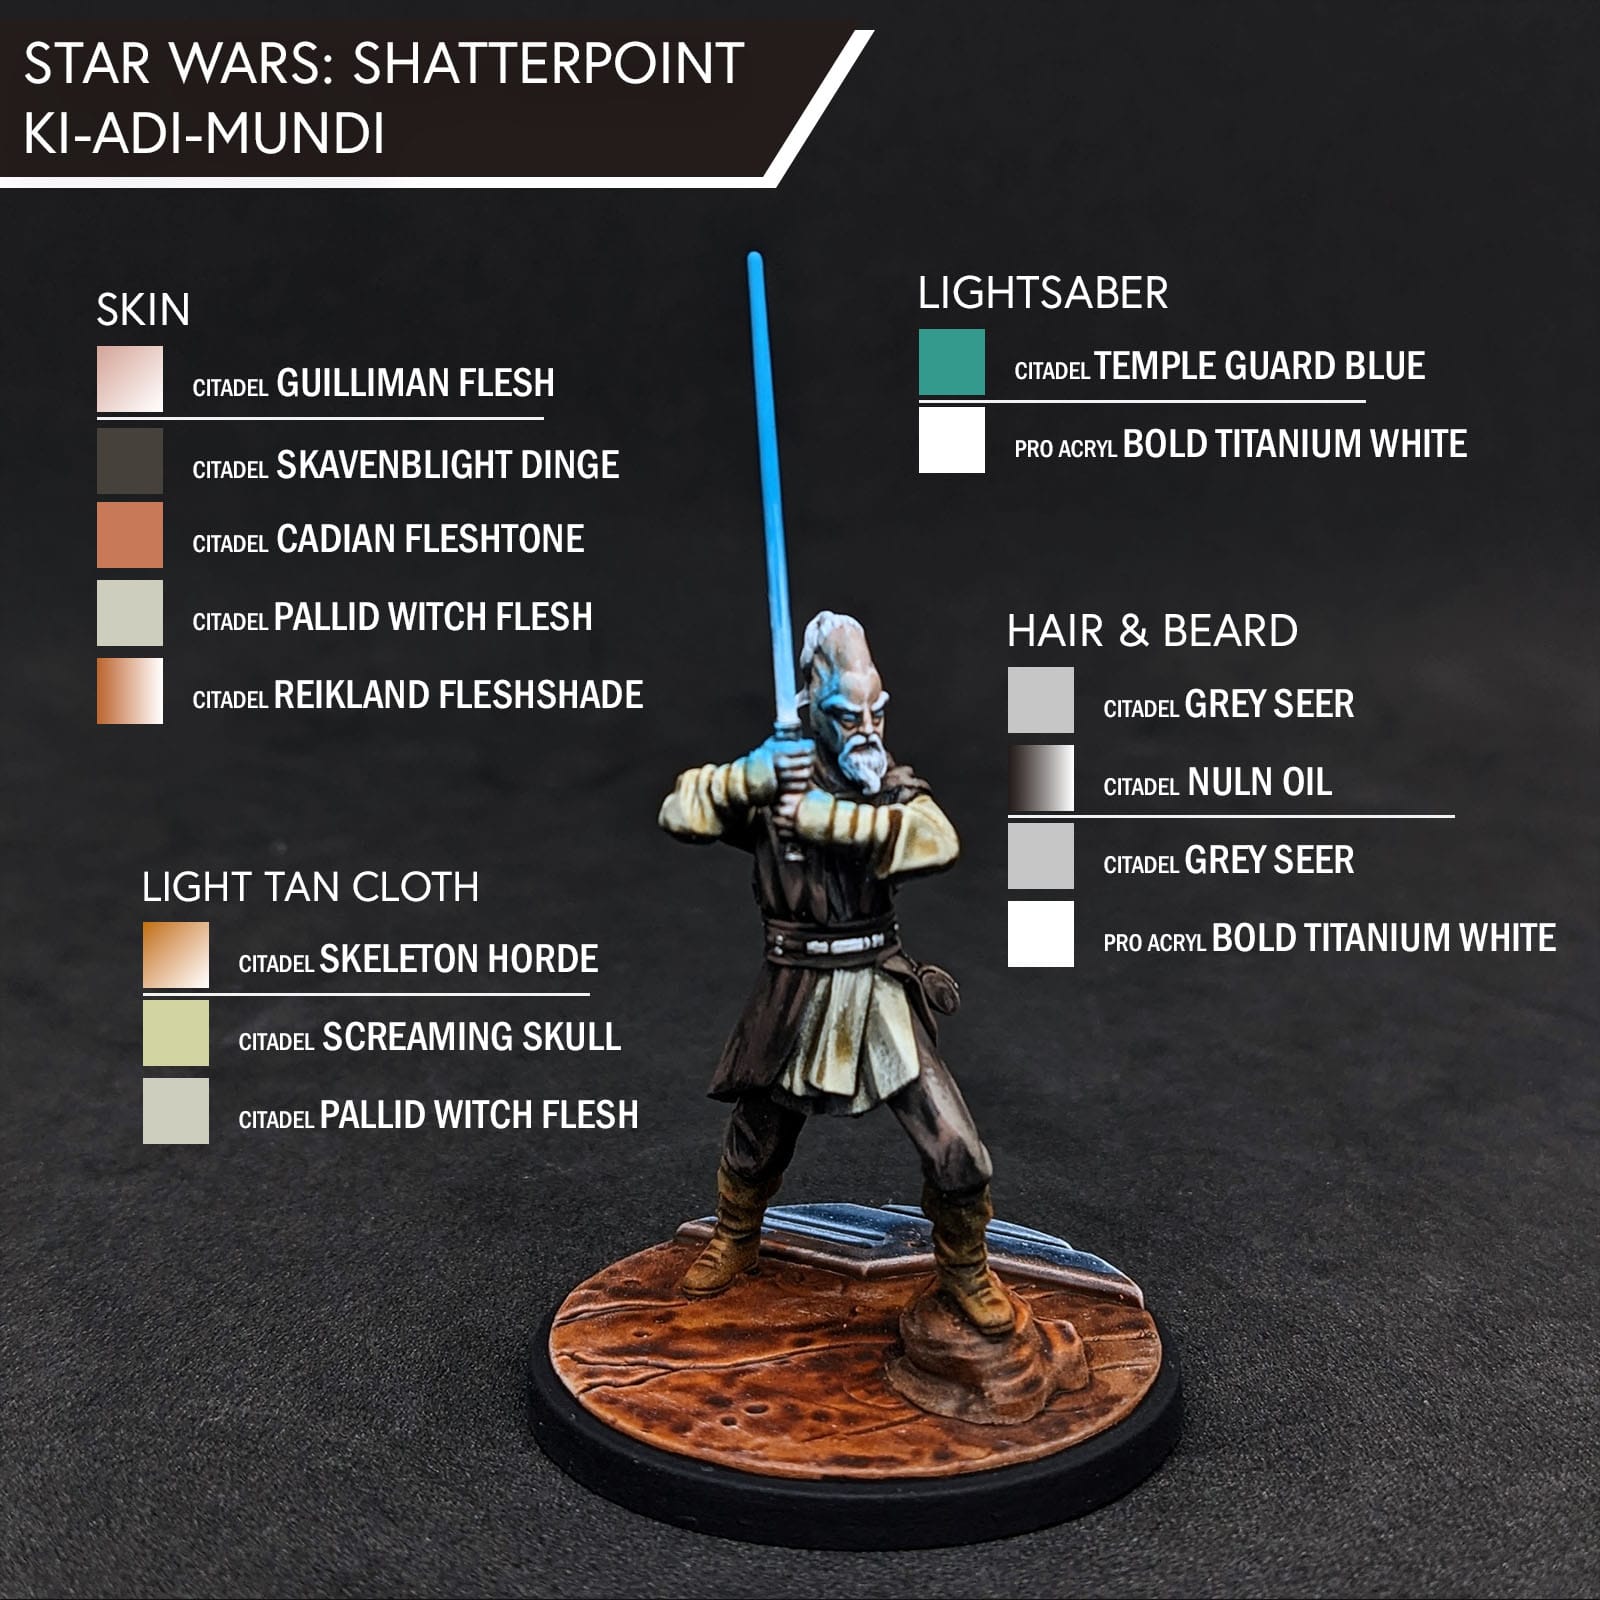
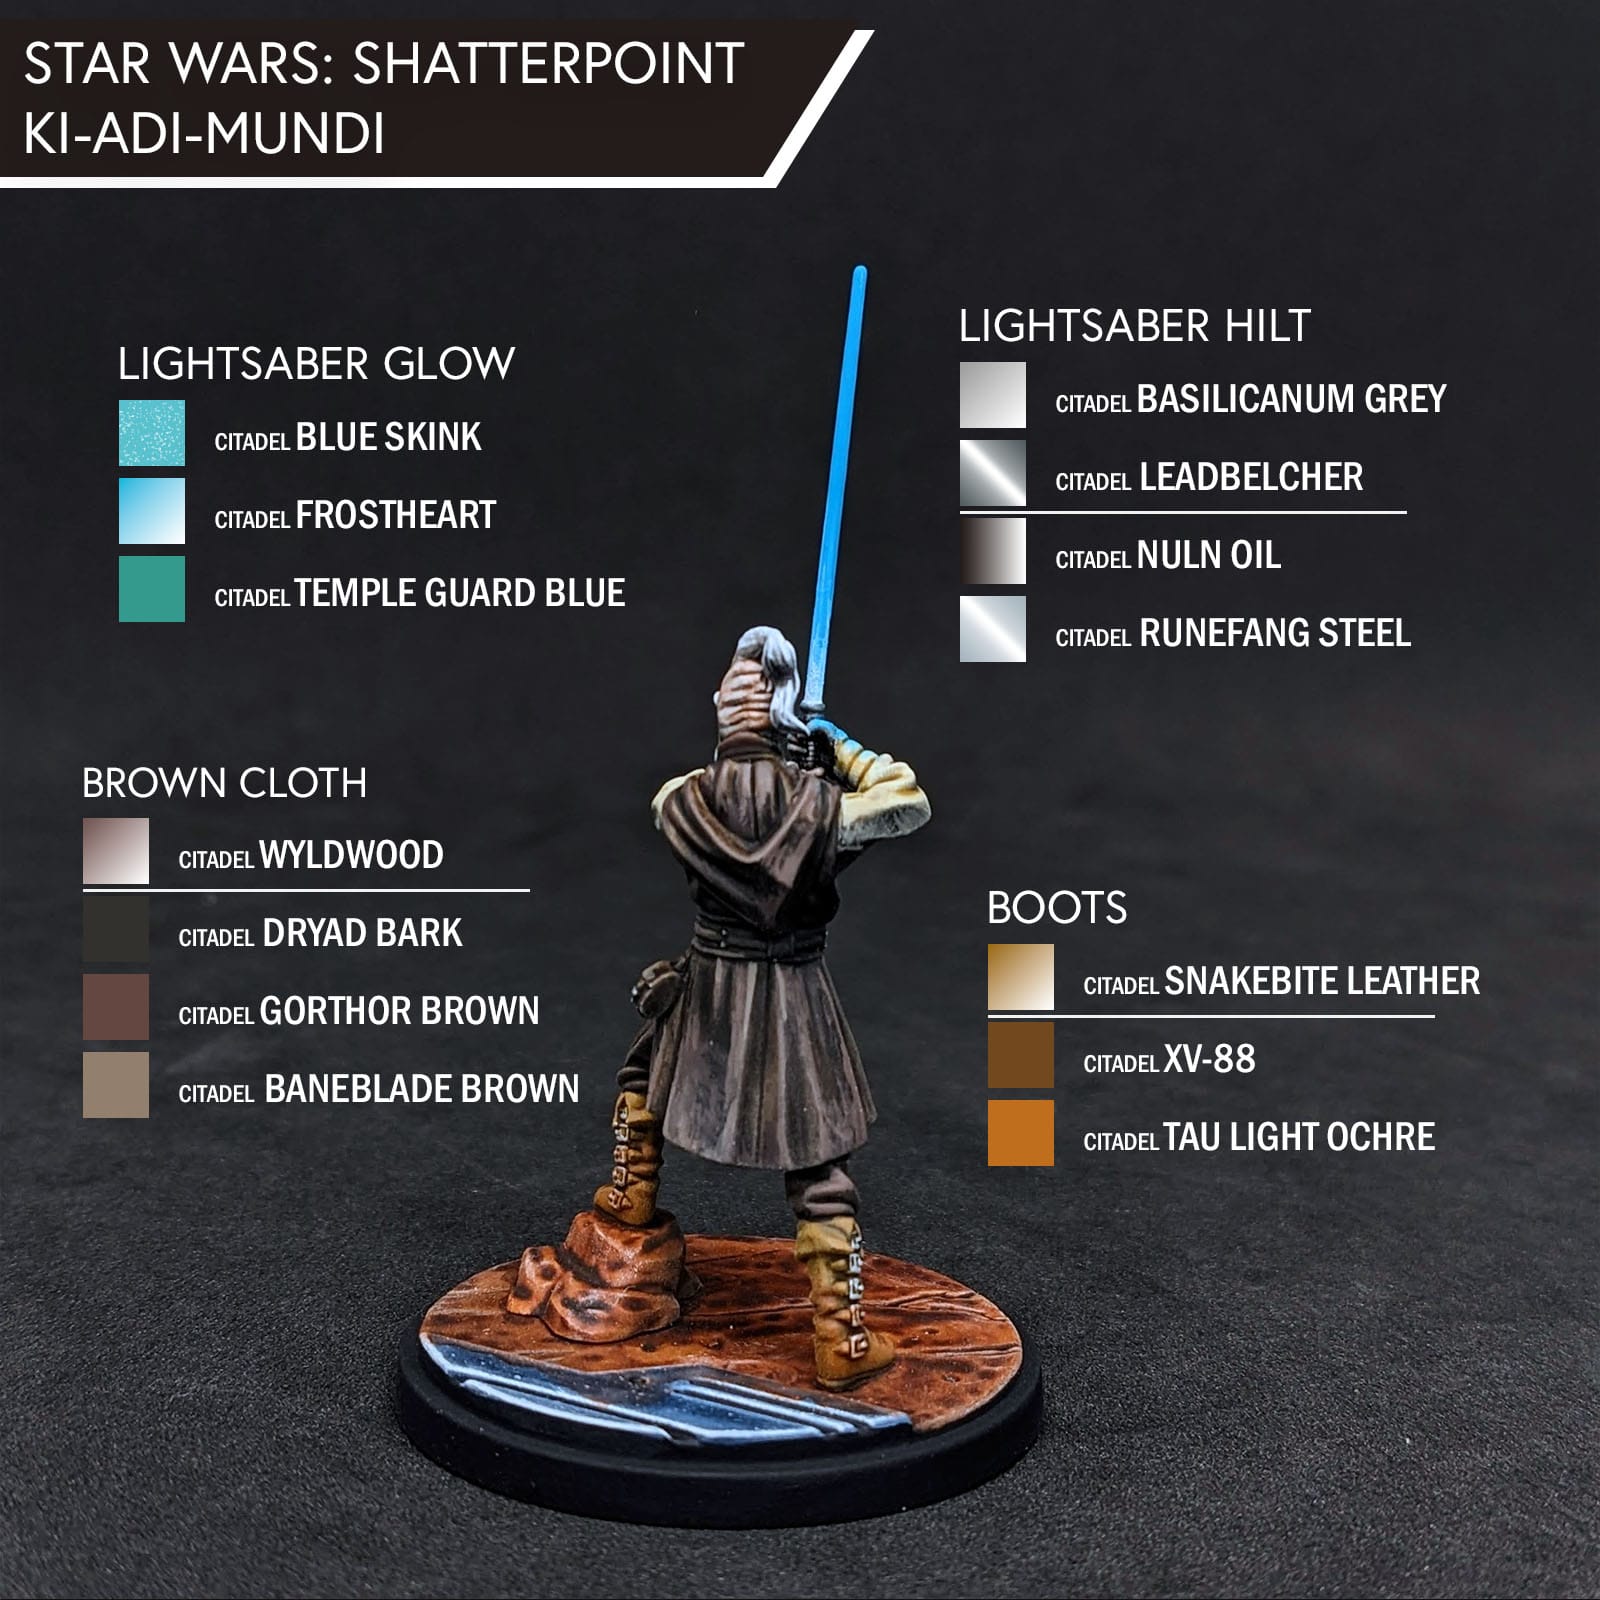
Jedi Master Ki-Adi-Mundi
His pose really captures the character and his status as Primary unit well. There is just enough space between the lightsaber blade and his face to work in some lightsaber glow to his face, which helps draw the eye to his face and lightsaber. The rest of him is really just two two tones, so it makes the lightsaber and face that much more of a focal point. The lightsaber glow I applied after all of the normal painting was done.
Note: For all metal bits, buckles, and clasps, I use a small spot of Runefang Steel.
Lightsaber Glow - The very last thing I did was paint the lightsaber glow, as the colors underneath needed to be completed before applying Object Source Lighting (OSL), which I did with a dry brushing and some thinned down contrast.
Basing (Optional)
Ki-Adi-Mundi’s base was primed white and black. I started with painting the metal in Russ Grey. Then, I filled in the engraved lines with Black Templar, let that dry, then did a coat of Drakenhoff Nightshade. After that fully dried, I applied Longbeard Drybrushing over the blue areas. I applied Gore-Grunta fur to the base, which was unevenly primed white and gave me a little more dynamic shading when I apply the contrast paints. Because I painted him separate from his base, I glued him to the base after the contrast dried, and then blended the rock to the base with some more contrast paint.
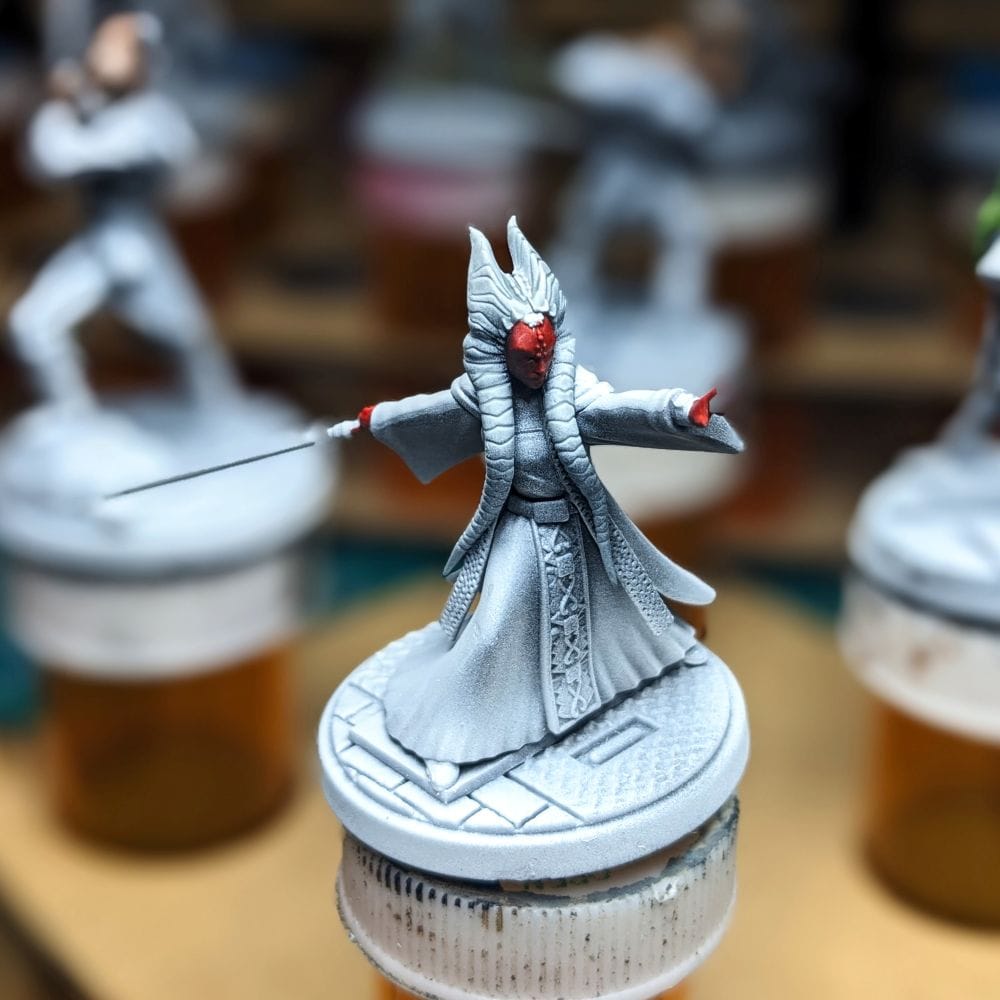
Shaak Ti
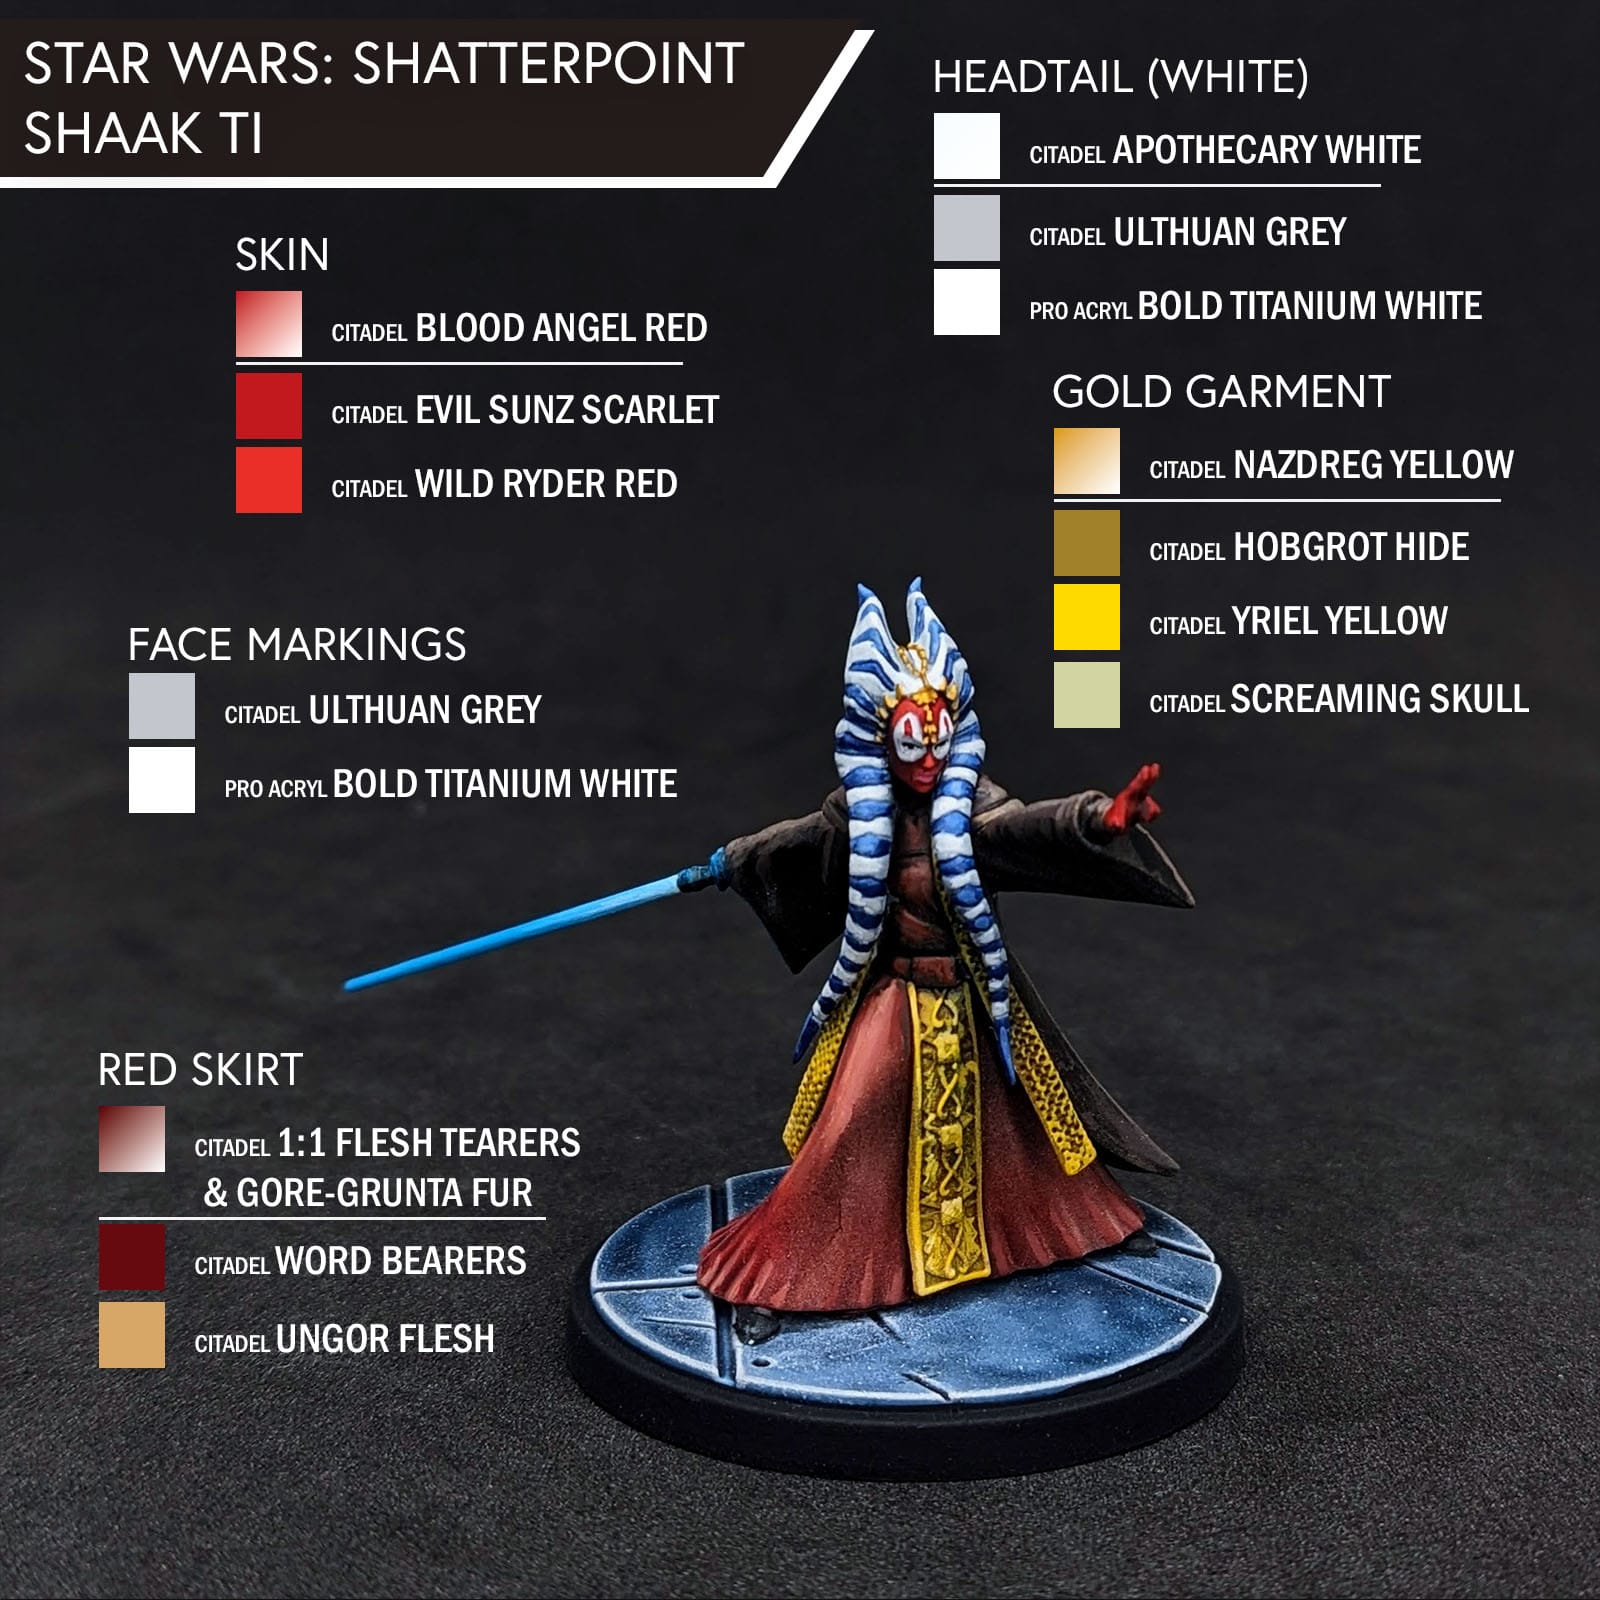
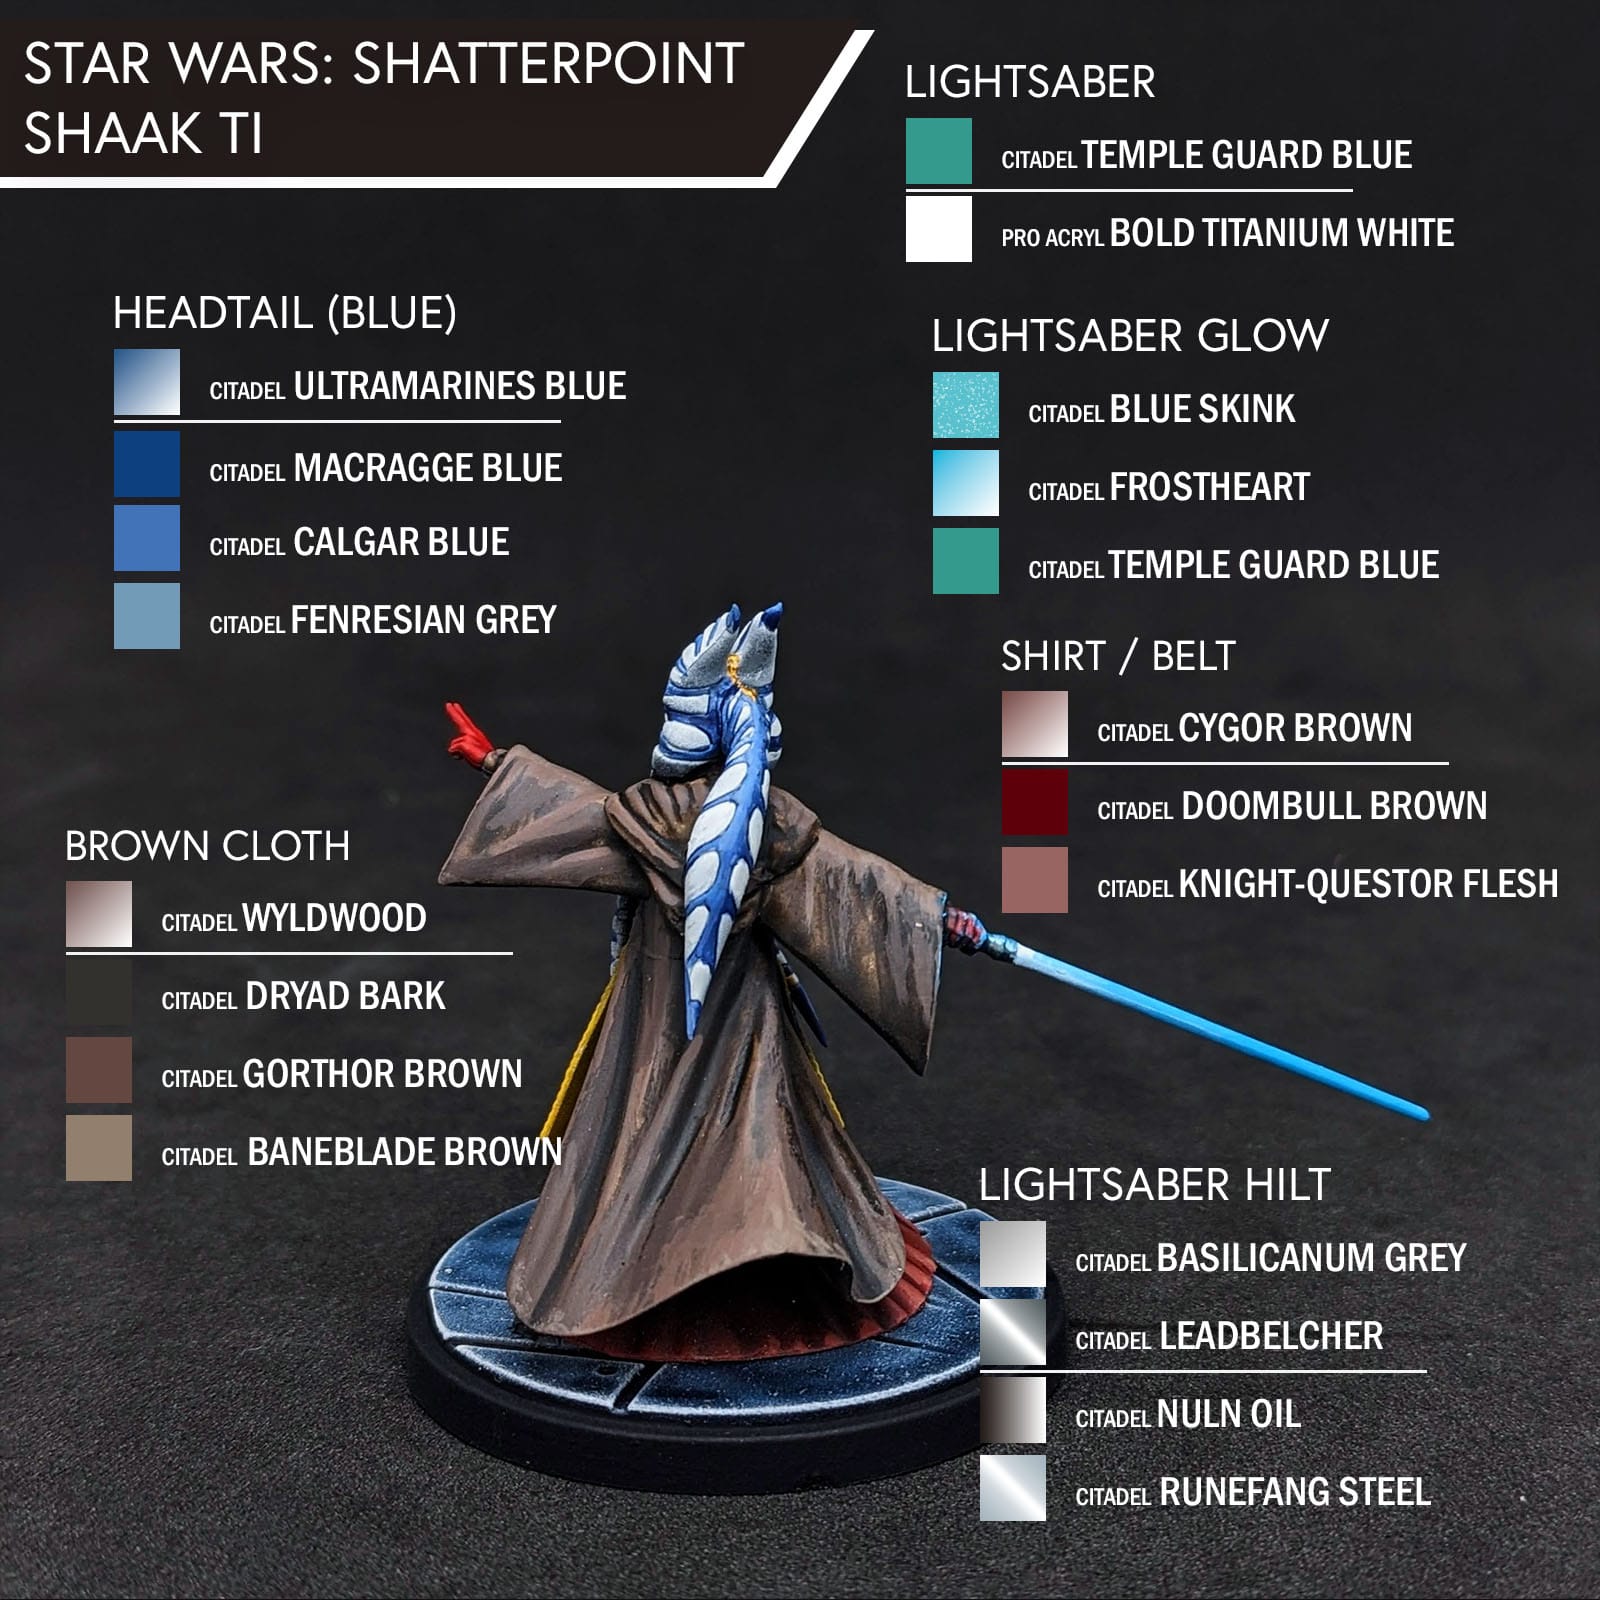
Jedi Master Shaak Ti
Shaak Ti has some amazing details of her face and torso. Like Ki-Adi-Mundi, the eye should be drawn to the lightsaber or face, which happens naturally depending on which way she is facing. For the color on her face, unlike her head tails that have the sculpted lines, I did my best to approximate the white circles over her eyes (which I painted after painting the face). The headtails themselves were really difficult, especially with the area between her head and left shoulder. I went back over them with white to touch up some overlaps a few times. I really struggled with her cloak, and felt like I was constantly adjusting the shades and highlights after applying the contrast. I think it works in the end, but I could have saved myself some effort if I was a little more careful with the contrast application. There wasn’t much on her body to showcase the lightsaber glow, so I increased the glow a little more just to add something to her wrist/hand.
Basing (Optional)
These metal bases are pretty straight-forward to paint. This base was primed with Army Painter Wolf Grey. I filled in the blast marks with Black Templar, let that dry, then did a coat of Drakenhoff Nightshade. After that dried, I applied Longbeard Drybrushing over the blue areas. Outside of the drying, the total paint for these bases will take less than 5 minutes, which is a big reason why I paint the figures and bases separately. Otherwise, I have to carefully paint around the feet/base of every figure, which just takes extra time.
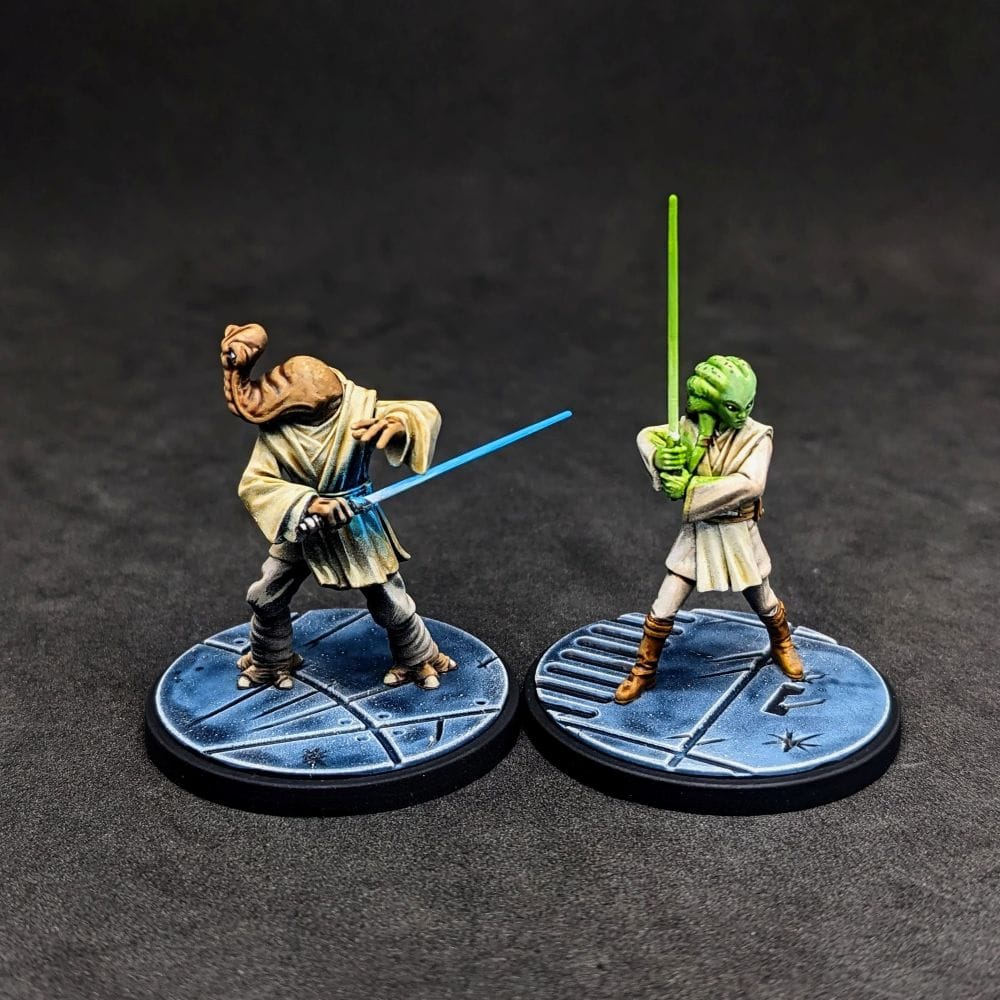
Padawan Learners
Nautolan Padawan
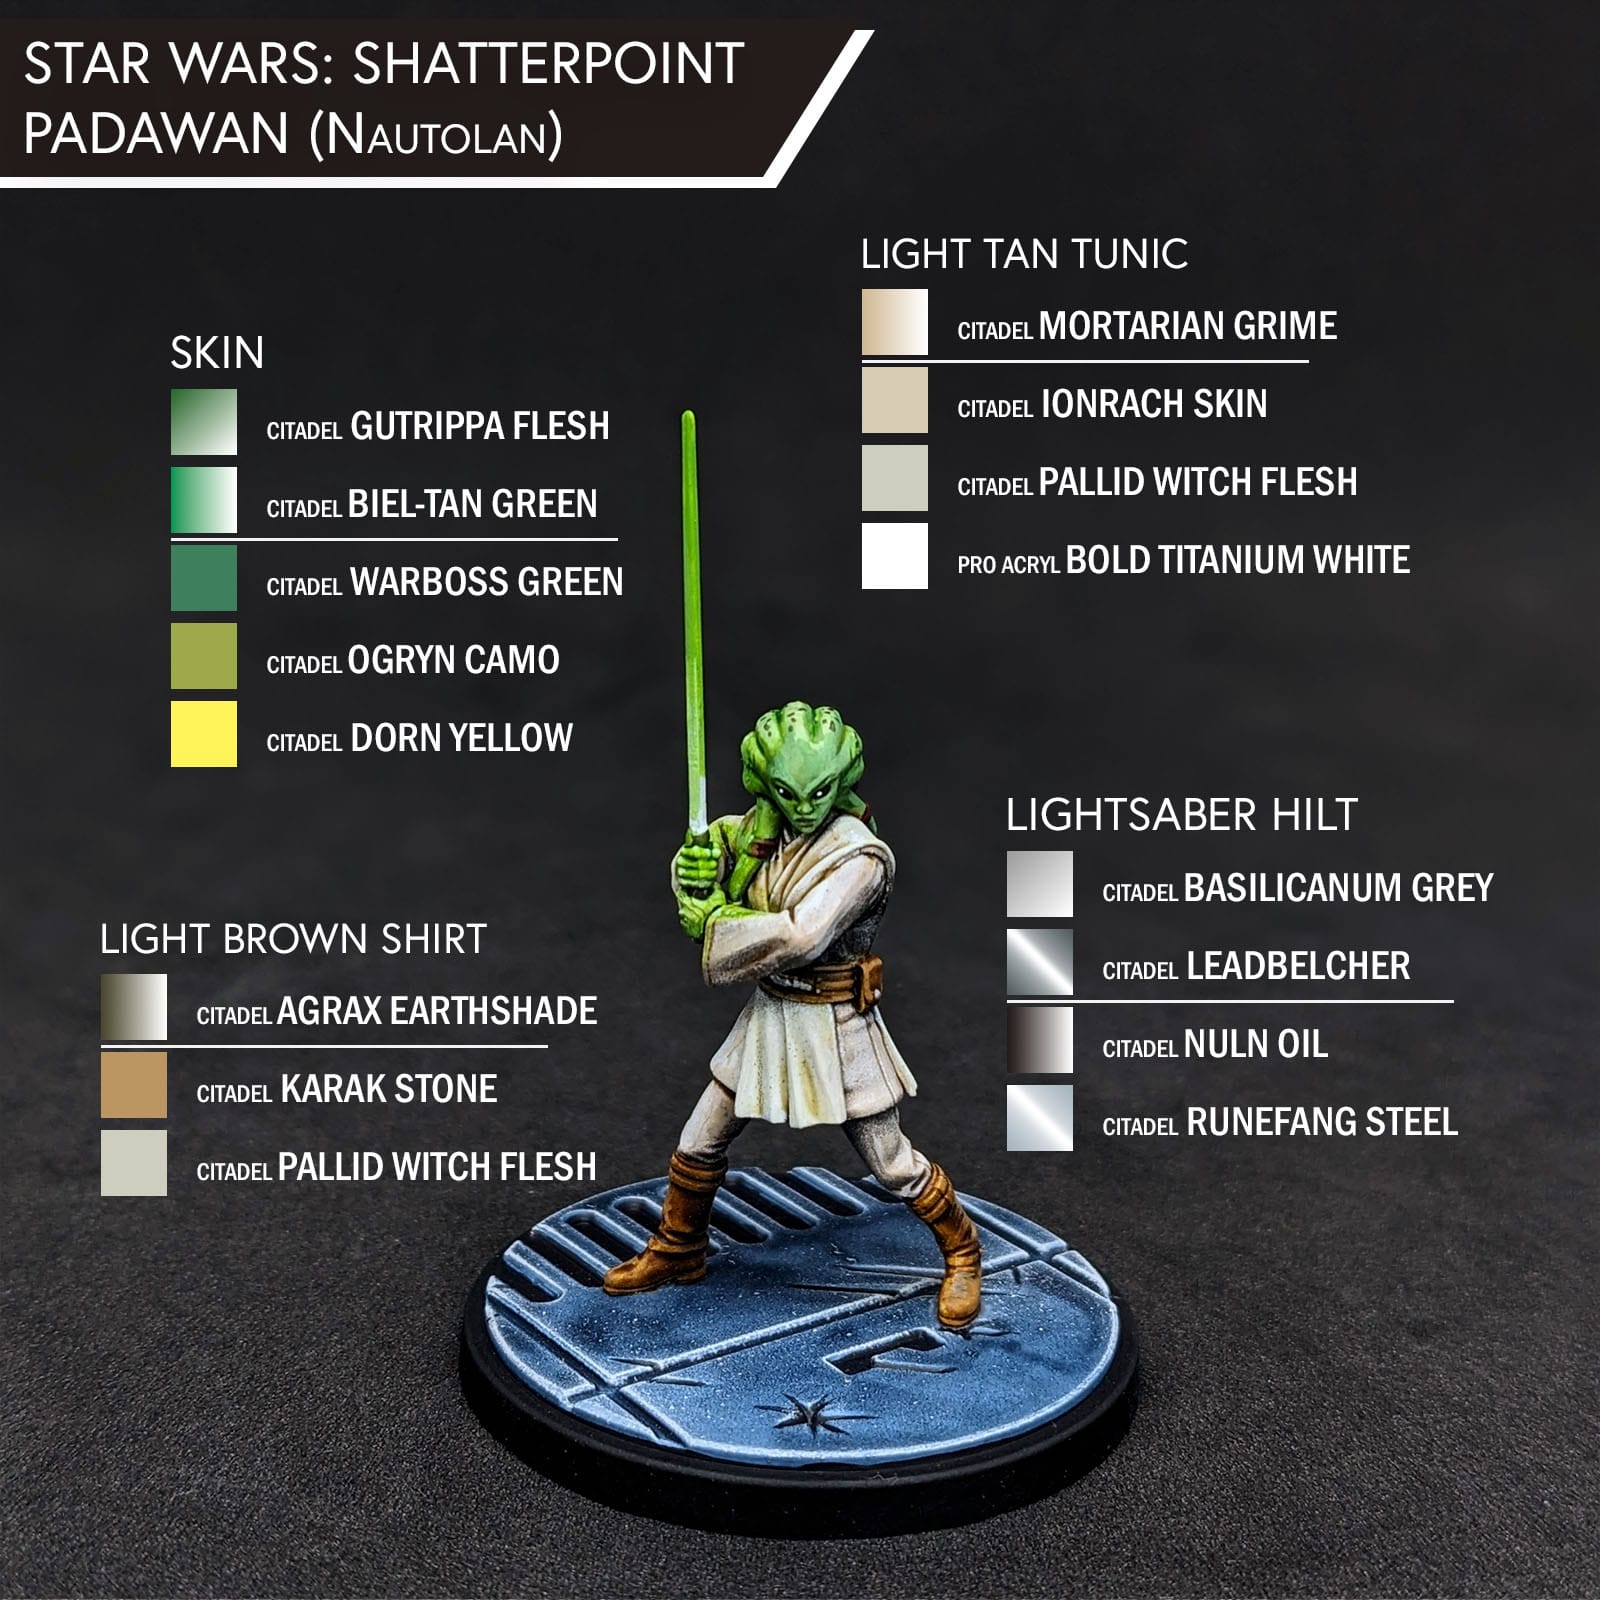
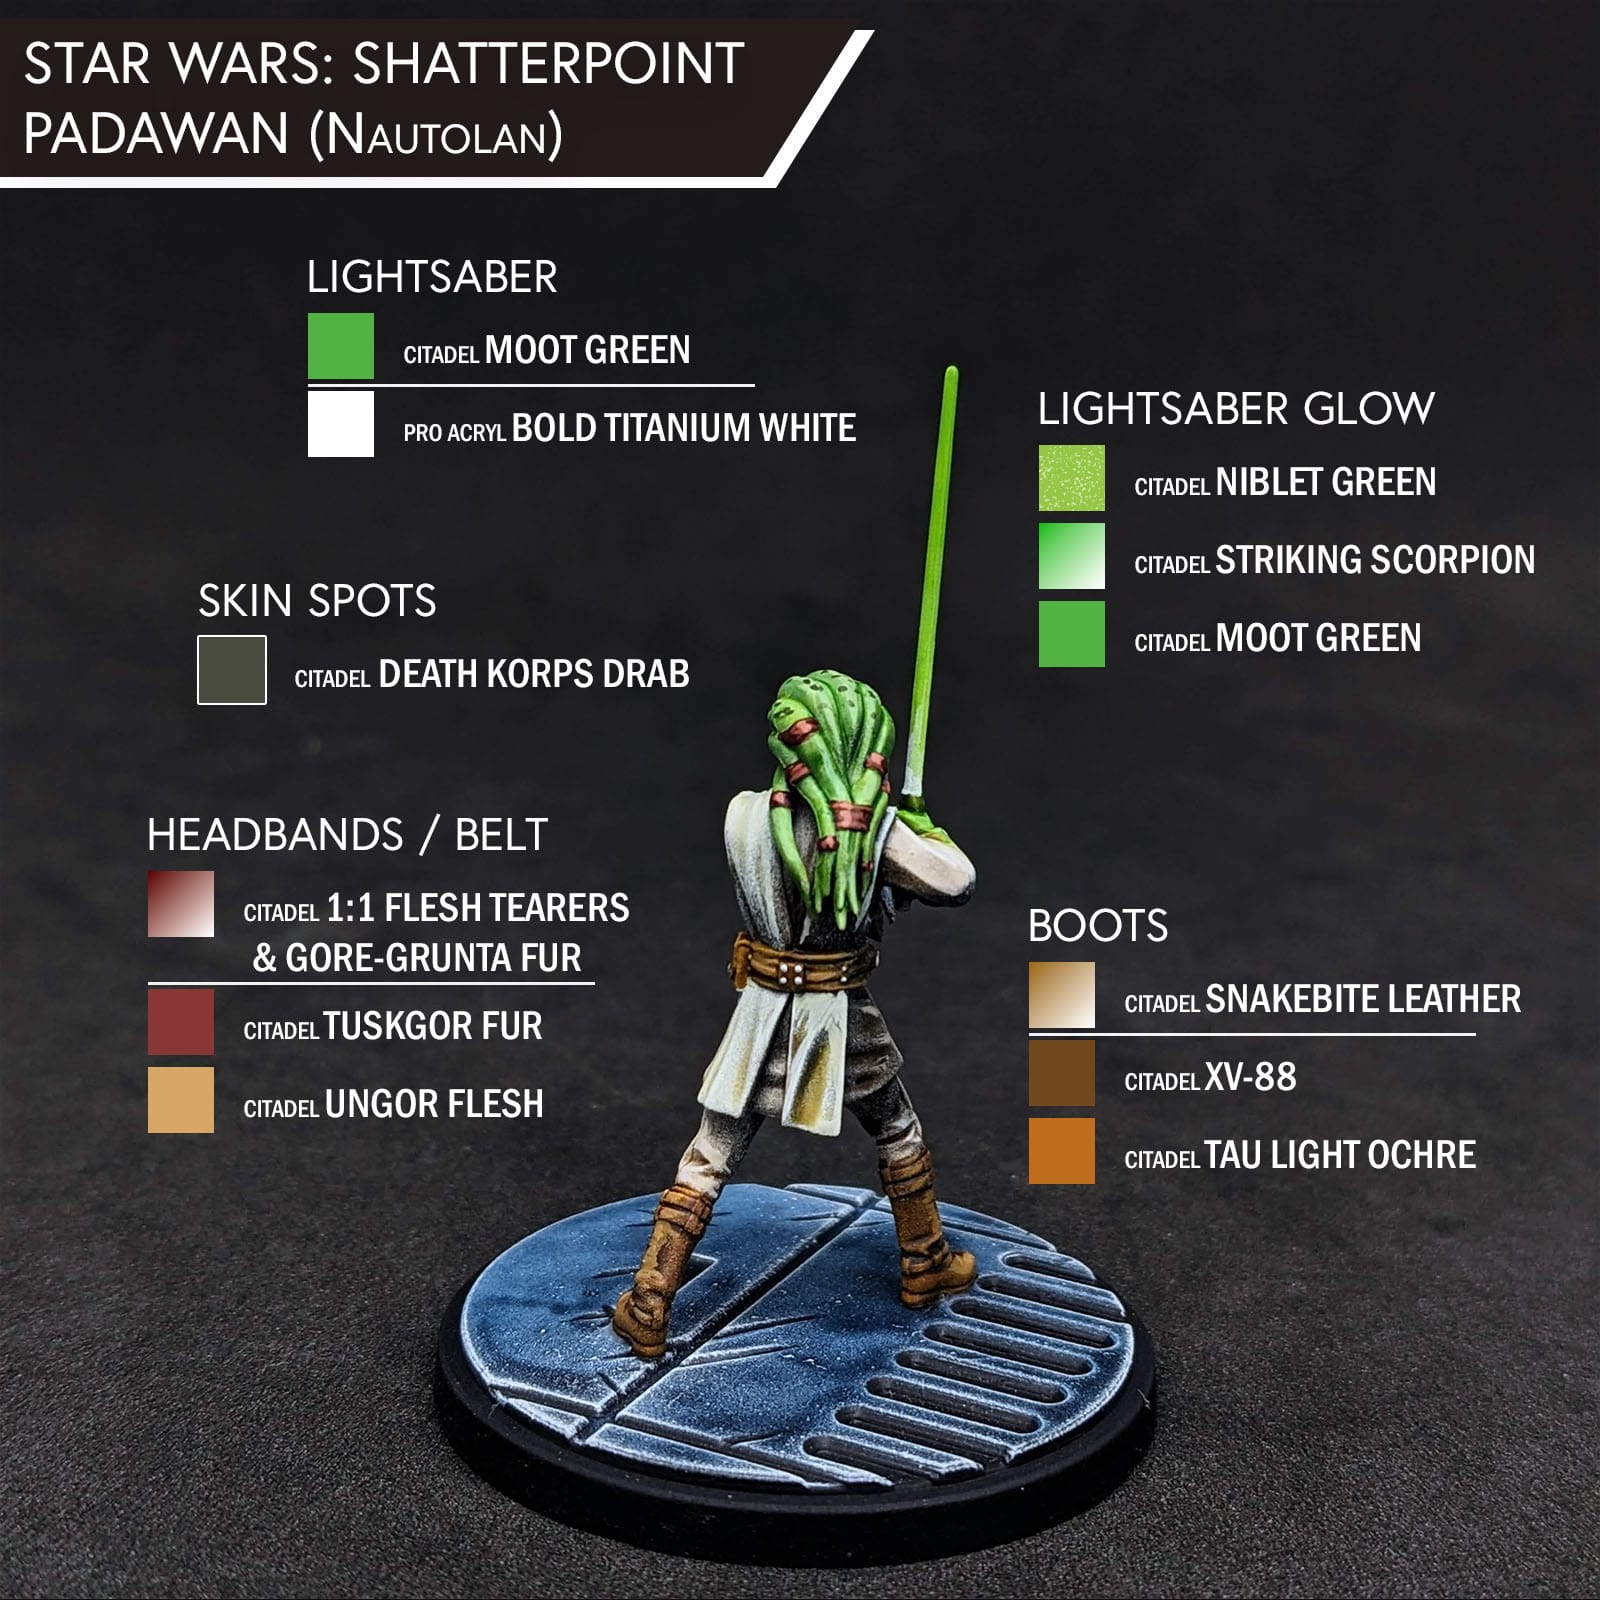
Padawan Learners - Nautolan
As I mentioned in the unboxing review, I chose the Nautolan head because I was building and painting Kit Fisto at the same time. Skin-tone wise, I chose to paint her just like I painted Kit Fisto, which I did in the Learn to Paint: Requesting Your Surrender Squad Pack review. Also like Kit, her green lightsaber glow gets lost on her skin tone, but fortunately her pose allows for the glows to pop more off of her arms and her shoulder. She’ll definitely look good on the table. Who knows, maybe I’ll pair her up with Kit at some point.
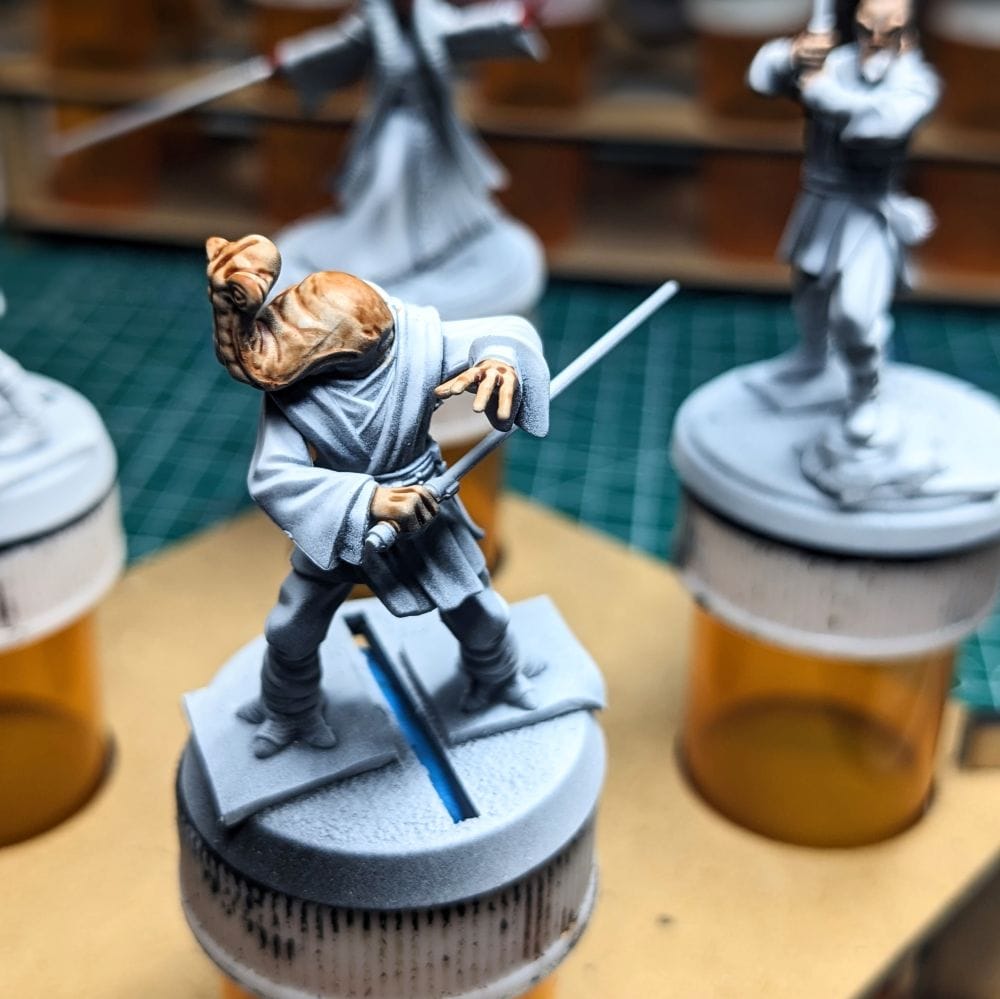
Ithorian Padawan (Roron Corobb)
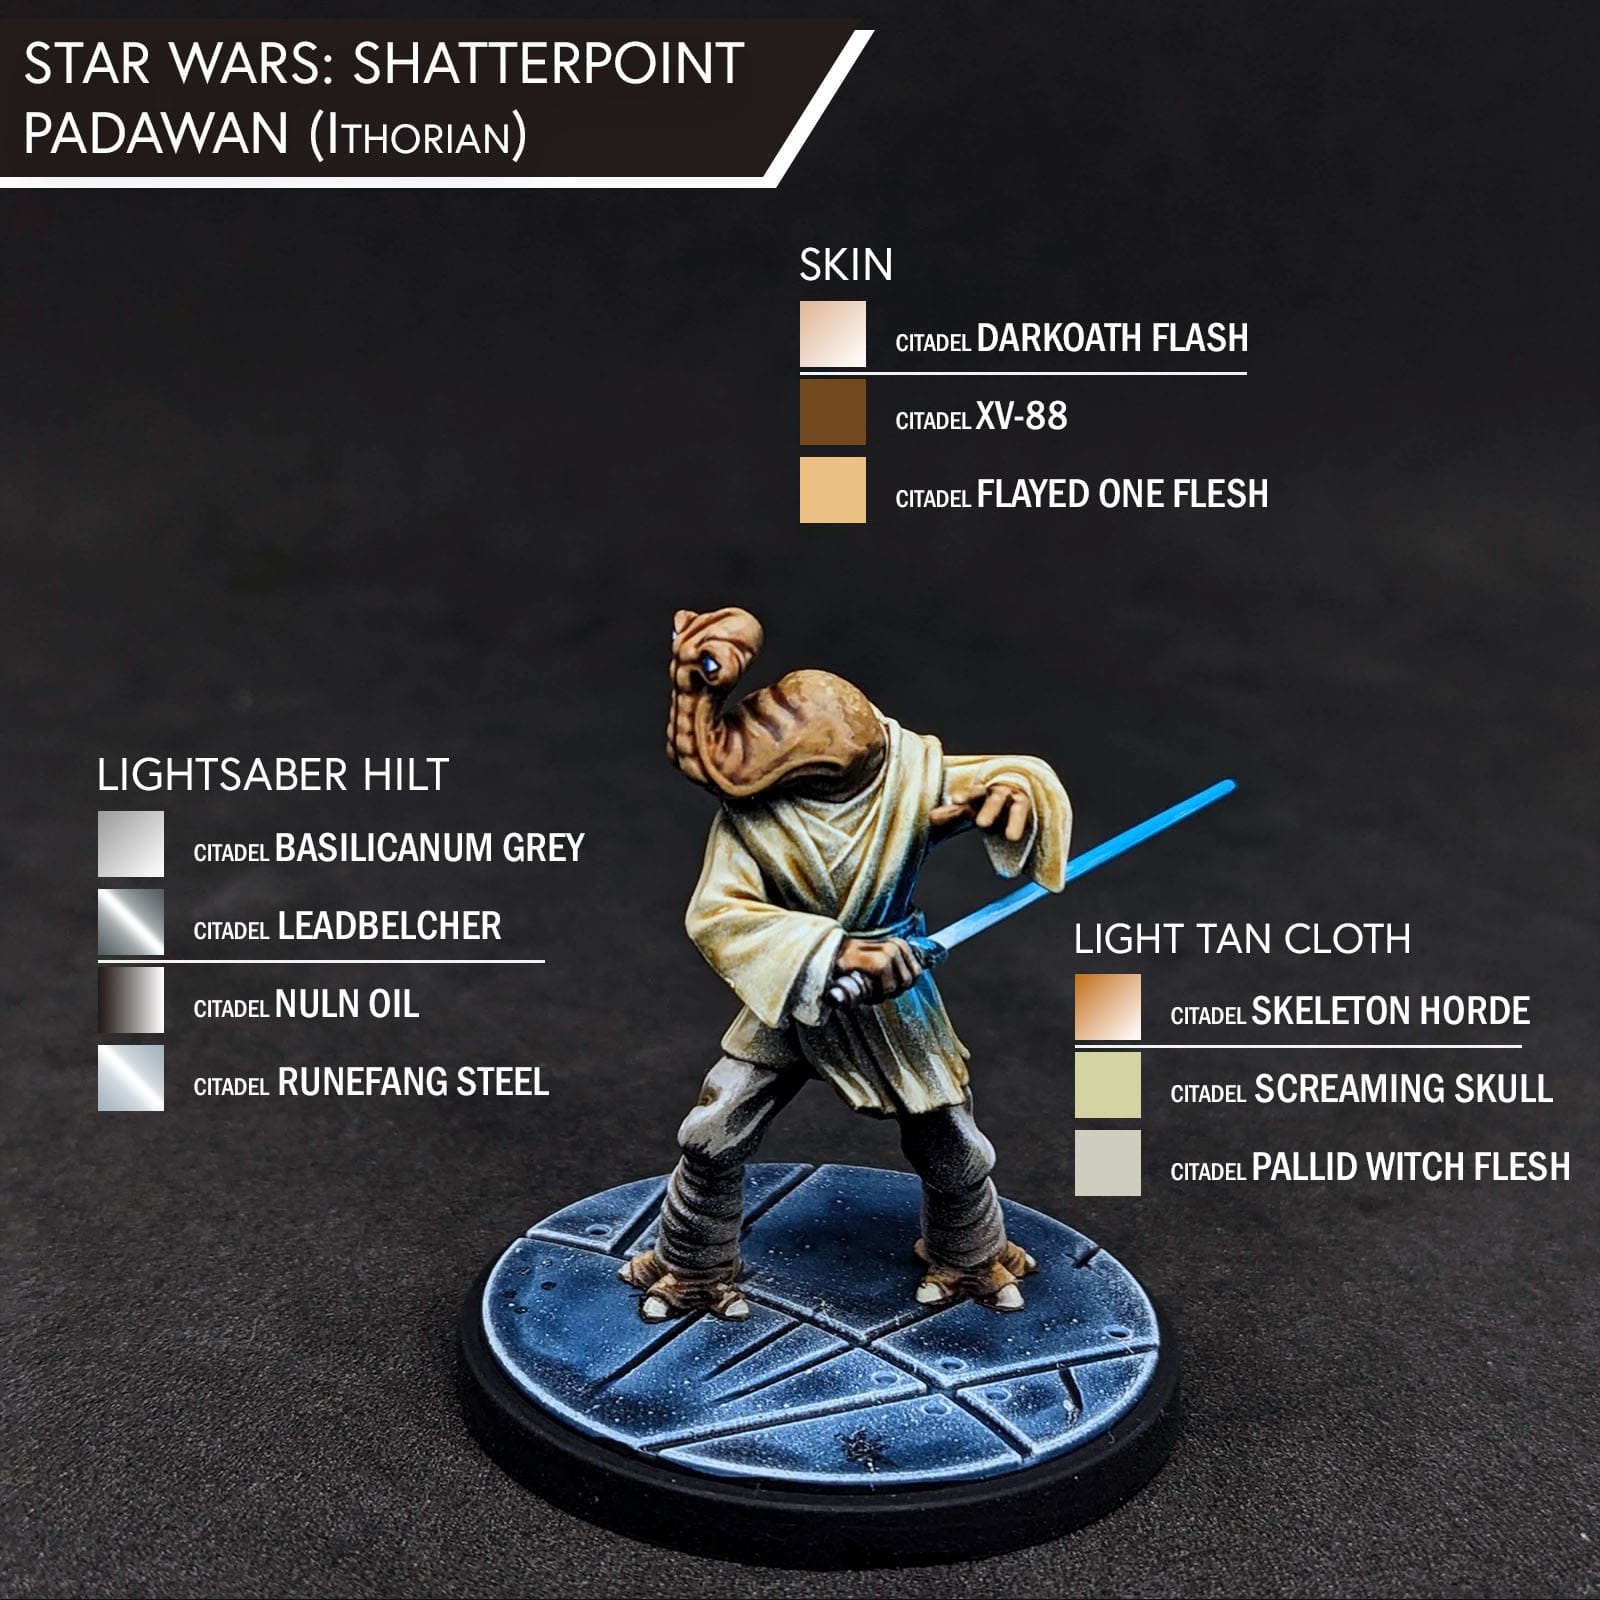
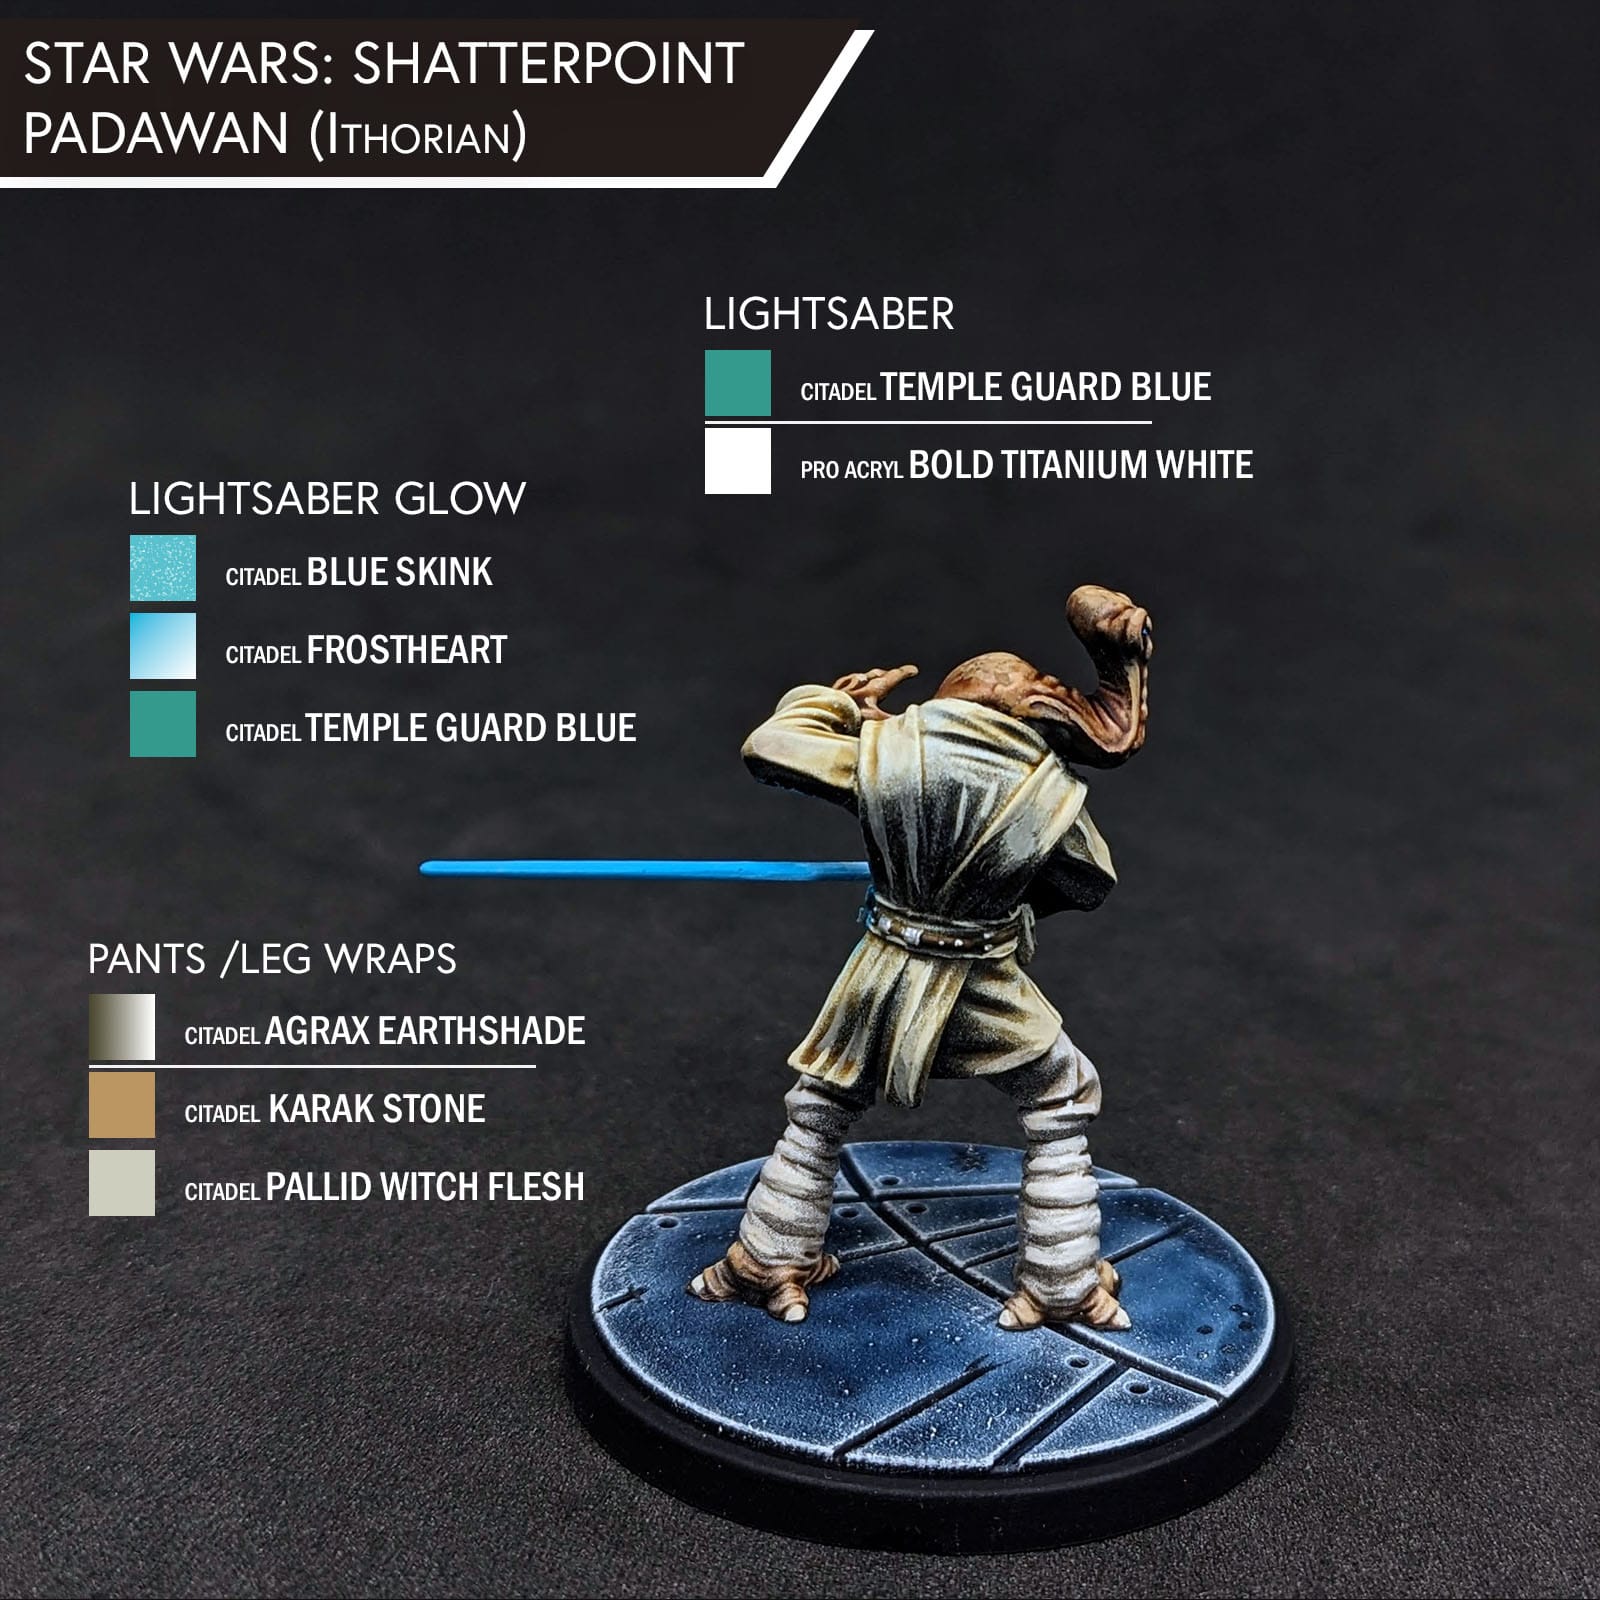
Padawan Learners - Ithorian
As I have mentioned in other articles, the 2003 Cartoon Network Clone Wars TV series is one of my favorite pieces of Star Wars media. During the series run, there was a poll to introduce a new Jedi to the series of a species that had appeared in the cantina scene in A New Hope. Even though he wasn’t the winner, Roron Corobb and another character were featured anyway in the series, and more prominently, too, during when the Jedi were tasked with protecting Palpatine during the Invasion of Coruscant. He had a very memorable moment in the series when he fended off General Grievous with a concussive throaty wail. So, you know, totally awesome.

I chose to paint the Ithorian Padawan in his style, instead of the box art. Like with the others, I fully painted him before applying the lightsaber OSL.
Basing (Optional)
Both Padawan learner bases are painted the same way as Shaak Ti’s bases are.
After all of my figures and bases are painted, I glue them together, apply a little touch up paint if needed, and then paint the base rims black.
SEALING
As I do with all of the models I paint that I also play, I apply a protective clear coating over the paint. This helps preserve the paint on the model and keeps oils from the hands from rubbing off the paint as you continuously touch the models during games. There are many different kinds of clear varnishes to use, but I typically use any matte or anti-shine varnishes, as satin, semi-gloss, and gloss tend to distort the colors of the models (not to mention that most models aren’t supposed to be shiny).
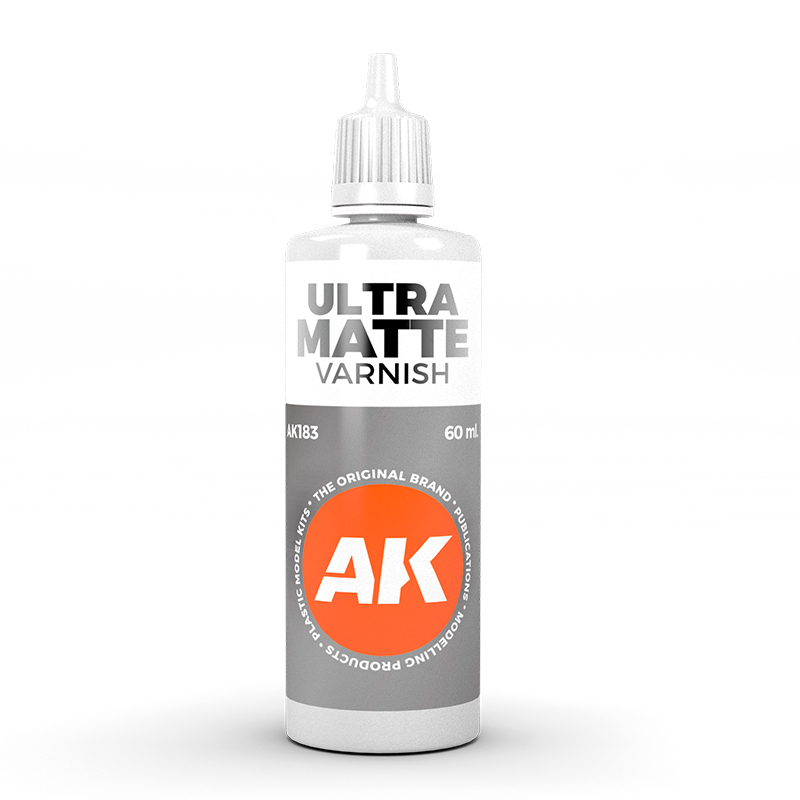
Brands that have been reliable for me are Krylon Matte Clear Spray, Rustoleum Matte Clear Coat, which is slightly glossy, and Testors Dullcote, although the latter can be expensive and difficult to find. For a coat with no shine that really enhances the colors, I use AK Interactive’s Ultra Matte Varnish, applied with an airbrush.
CONCLUSION
Painting Jedi is always a lot of fun, especially when you can apply some fun lightsaber glows to the face/arms/etc. However, because each piece has its own unique style and colors, there isn’t really an opportunity to ‘assembly line’ paint them. So, you’ll have to take a little more time to paint each character since there are a lot of little details for each.
Don’t be discouraged if the paint jobs don’t look quite the way you want it, too. Each piece you paint is more experience gained at the painting. If you’re really unhappy with the painting, you can always apply little blast marks or lines to show some battle damage.
Take your time, and go slow. Let the paints dry before moving on to the next highlight. If you need to touch up areas before moving on, that’s totally ok. With these minis especially, I found myself cleaning up spots of browns on light tans a lot.
Lightsaber OSL is always fun to try and play around with. I was really happy with how Ki-Adi-Mundi’s glow came out, especially on his face. Together, the squad looks great with all of their lightsaber glows and combat-ready stances.
Quick Paint ONLY Total Paint Time (with priming) - 1-2 hours per figure
Quick Paint & Detailing Total Paint Time (with priming) - 2-3 hours per figure
Have you painted your ‘Wisdom of the Council’ Squad Pack box yet? Let us know! Follow Gaming Trend for more Learn to Paint and Star Wars: Shatterpoint articles. We’d love to see how you painted up your models so share your work with us in the comments!