There is nothing more magical than flight to me. In my life I’ve gotten to take hops in jets, I’ve flown a prop plane, and I’ve even hung out of the back of an M-92 Superhawk helicopter when I was in the military. For me, the horizon holds the promise of an infinite future, and no matter how many times I’ve flown, it’s always thrilling. Well, I’m not made of money, so I don’t own (or even rent!) my own plane, so to get the most flight time possible I have to turn to the virtual world. The newest installment of the venerable Flight Simulator series has brought the thrill of flight closer to the real world than ever, with virtual reality support and gorgeous visuals. The only thing missing at this point is a fantastic all-in-one controller. Now, thanks to Turtle Beach, we’ve got exactly that — the VelocityOne Flight Controller. Let’s unbox it and get a closer look:
I’ve held onto the VelocityOne Flight Controller for a few weeks, playing on both PC and Xbox Series X to fully put the system through its paces. A few things I spotted during my unboxing were of concern, and only time would tell me whether they were problems or non-issues. Before we get into all that, let’s get the device set up.
Plugging in the USB cords I mentioned in the unboxing, the device is detected by MS Flight Simulator on PC as two separate devices — the Yoke and the Throttle, whereas on the Xbox Series X, it’s configured as a single device. Honestly, it doesn’t make a tremendous amount of difference, but it’s something to know if you bounce between the two devices. Within both you’ll find three default profiles — single engine, twin engine, and default. These first two profiles are useful, but the default is a bit of a “choose your own adventure” as many buttons are unbound. Since the setup is entirely plug and play, let’s focus on getting it to stay put.
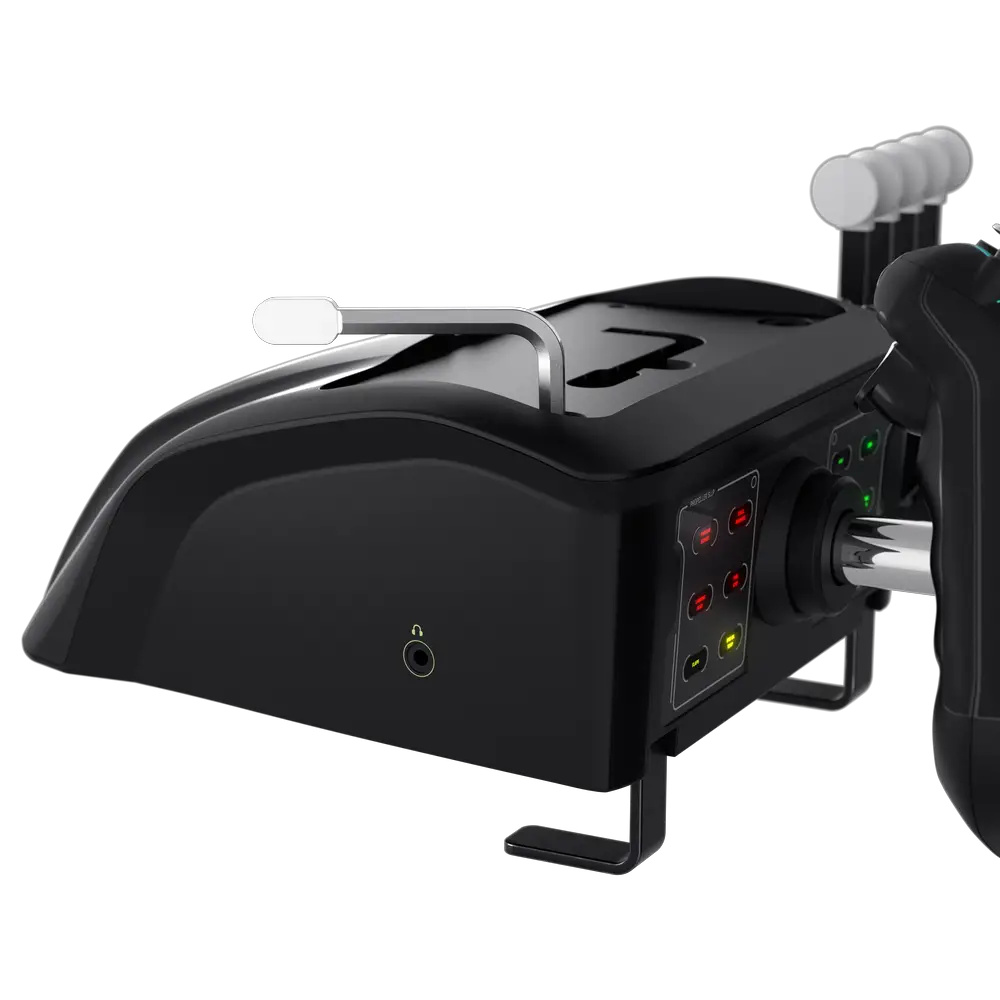
Underneath the device lies two metal arms. Underneath a panel on top lies a bespoke allen key you’ll use to lower these metal arms so you can lock them onto just about any desk. Rather than a massive clamp that sticks down, these little feet are just U-shaped feet that, when combined with the rubber feet underneath, ensure that the device will not move at all. It’s a slick solution that is miles ahead of other flight sticks I have — a sign of things to come when it comes to the overall engineering of the VelocityOne. With the device locked down and stable it’s time to fly.
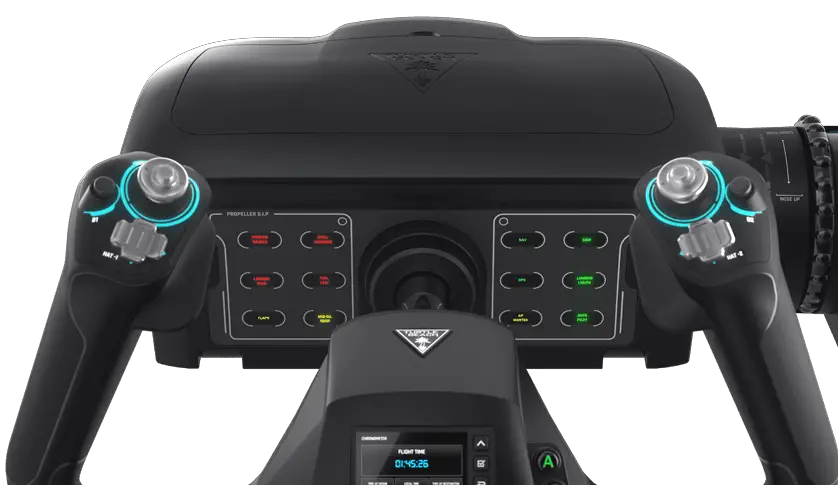
Performing a ground test checklist is a very important part of flying as you don’t want to discover that things aren’t working as intended when you are at 7,000 feet. With the single engine profile tested and a Cessna 152 on the runway, I pull back on the yoke, seeing the elevators on the tail tilt up and down. Turning the yoke left and right raises and lowers the appropriate ailerons on the tips of the wings. That covers pitching up or down, as well as banking and rolling, so it’s time to move onto the remainder of the controls. The triggers on the yoke actuate the tail section, allowing me to rudder left and right. A quick check of the rightmost throttle controls (the white topped ones) shows the two stages of my flap controls — crucial if I’d like to land anything but the hard way. Pushing the vernier control knob (the black throttle knob) all the way in makes the engine rev up to maximum, and pulling back on that same knob reduces throttle. Everything checks out here, so let’s hop into the cockpit for a few more checks.
Using the castles on top of the yoke lets me look around the cockpit, which is important for our next few steps as we’ll want to confirm we see buttons and levers move when we do the same on the flight controller. The two bumpers on the yoke are my differential brakes (meaning you can close the right or left brake independently of one another), which are kinda important when you want to…you know, stop. A dash light indicates they are working as intended. A quick check of the blue and red knobs shows that my fuel / air mixture controls are working properly. Looking between the seats I can see the trim wheel in the cockpit, and when I actuate it on the VelocityOne, it rolls here as well — love this attention to detail! Checking my flaps once again, I also see the lever move between the seats. From here, there’s nothing else to do but throttle up, release our brakes, and take to the skies.
Hitting roughly 75 knots, I slightly pull back on the yoke and slip free of the ground. Reaching over to the rightmost top button on the throttle controls, I raise my landing gear. At around 500 feet I slide the rightmost throttle knob forward, raising my flaps completely. Just below it, I adjust the blue and black vernier knobs to adjust the fuel/air mixture and throttle so as to not overspeed the engine. Rather than using the yoke and “bumping” the horizon to climb, I use the trim wheel instead, executing the sort of gentle climb any flight instructor would be proud of.
I’m not doing a transatlantic flight today, so I turned and headed back to the landing strip. Adjusting my throttle I lined up with the flightline and lowered my flaps and gear. Pulling on the yoke to get the nose in the right position I encountered one of the few perceived issues with the VelocityOne — the “stickyness” of the yoke. Pushing the yoke forward or pulling it backward can cause a jerkiness to the motion as the spring in the device, or perhaps the bushing around it, are brand new. In my first flights I was convinced that this was going to be a problem. After more than two dozen (and probably closer to three) flights, I was happy to say that this hitch worked itself out almost completely. If you unbox one of these beautiful beasts, just know that the yoke being a bit stiff will work itself out. On the other hand, let’s talk about those throttle controls.
The throttle vernier knobs work perfectly, and they have sufficient resistance to make them feel very real. The four control levers that will let you control four engines on a larger craft, or operate as flaps and throttle for smaller ones tend to move too easily. There is a detent at the bottom to give you a multi-stage flap feeling, for instance, but they seem to slide way too easily. A small bit of foam to give it the smallest bit of resistance would give me confidence that this won’t loosen up in the future. It hasn’t so far, but it’s something to note for the future.
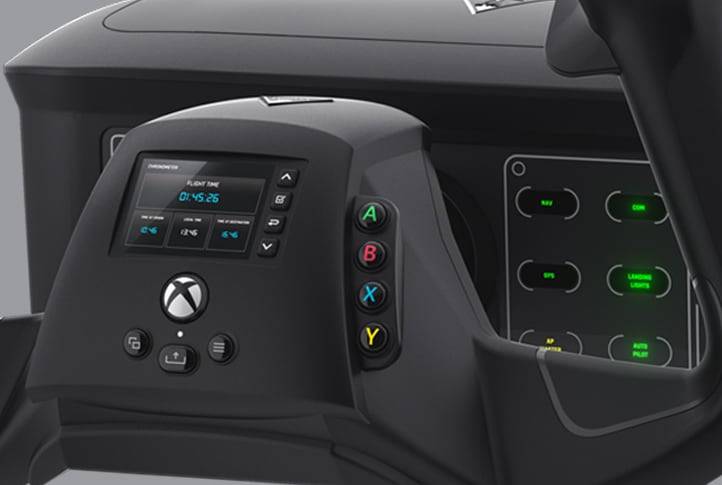
There are a great many options to show on the screen on the front of the control system, and one of my favorite functions is the “Learning” mode. Rather than having to keep your flight sheet of all your buttons hanging up near your PC, the on-screen display shows you what the button you just pressed does, as well as any range for things like throttle or yoke. Until you get the hang of the controls, this is extraordinarily helpful. Beyond this, you can also change the colors of the display. Turtle Beach could have easily gone with a single LED color and called it good, but depending on your lighting (or in my case, having had Lasik — I struggle with blue LED lighting), the ability to adjust it is a godsend.
There is another item that I want to mention. It’s not a con, but a temporary limitation of sorts. On the current firmware, the warning lights on the annunciator panel just stay lit. The annunciator panel is what normally shows the various warning lights that are normally on the dashboard. I don’t know if any other controller, especially in this price range, that has a functional annunciator so if they are able to patch this in (they say they are looking into it for the next firmware update) it’d be a massive coup. Here’s hoping that the team gets these updated as they can really drive the immersion.
Heading over from the PC to the console, I was surprised to see that there’s absolutely no difference beyond the way the panel is initially configured. Functionally it is precisely the same, which is great if you have both and switch back and forth between them. I have a powerful Pro Flight X-56 Rhino H.O.T.A.S. System from Saitek, and frankly, configuring it for MS Flight Simulator is equal parts memorization and torture. “Which button was my brakes? Where’d I map the left and right throttle? Didn’t I put the freelook on this castle?” The Turtle Beach VelocityOne Flight Controller is a one stop shop. I didn’t have to reach over and tap a button on my keyboard or fiddle with mappings — the VelocityOne is ready to go straight out of the box. It means that you can fully immerse yourself into the game. The controls become natural and realistic, regardless of which platform you choose.
Taking a quick jaunt to the left here, there is a feature that is exclusive to the PC that you should know about – REX AccuSeason. REX AccuSeason is an automated global seasons utility addon for Microsoft Flight Simulator that raises realism in the same way this controller does – immersion. Telemetry data was captured for the game at a specific moment in time, so seeing seasonal changes isn’t really a thing. With AccuSeason installed I was able to enable automatic seasonal changes to the trees and foliage based on the current date and time in the real world. Sure, you can also change these by hand, but just having a realistic representation of the greenery as I flew over was another notch in that realism ladder. If you are like me and aiming for the highest possible realism, you might check into it. Let’s get back on course.
The VelocityOne Flight controller has a 3.5mm port on the side to allow you to hook up a wired headset. This is handy if you want total audio immersion to go with your control immersion. There are plenty of flight clubs that do far longer (and even international) flights in real time, so a headset becomes a must at that point. It’s also worth mentioning that you can use a standard run-of-the-mill USB extension cable to allow you to place your flight controls further away from where your console or PC lives.
It’s odd to pick a single feature on a device so packed full of them, but I do have a favorite — the trim wheel. Again, using my Saitek controller as an example, it has no trim wheel so I’m having to constantly feather the joystick up and down to try to hold the horizon. It’s unnatural and I can only imagine my passengers throwing up constantly. Here there is a trim wheel like you’d find on a real plane that lets you dial in the horizon precisely, helping you smoothly climb or descend as you see fit. Combine that with the precision of the vernier throttle knobs and you’ll find flying to be a far more pleasurable experience than any HOTAS you could buy.


