Other World Computing PlayStation 4 HDD upgrade kit review

You throw down your cash, the clerk rings up your game and inevitably tries to sell you a guide. You shake your head no, snap up the bag and your change and race home. Ripping through the plastic, you slip that 50GB Blu Ray into your PlayStation 4 only to be greeted with something you’d never expect to see on your shiny new console — you are out of hard drive space.
Rather than play your shiny new game, you get to play the hard choices game, deciding which games get the axe and which get to stay. The PlayStation 4 shipped with a remarkably small 500GB hard drive installed. Sure, it’s a huge upgrade over the launch PlayStation 3’s meager 20GB drive, but when compared to even the most basic of PCs, the 408GBs left after OS chews up a fifth of it, won’t carry you as far as you might think. NBA 2K15 takes up nearly 42GB, Call of Duty: Ghosts eats 32GB, Wolfenstein: The New Order demands 44GB, and Killzone: Shadowfall swallows 40GB after patches. That’s nearly 40% of your overall space in just four games. With over a year since launch at this point, it’s hard to imagine many PS4 owners only have four titles in their library, so this issue is only going to get more frequent as time passes.
Thankfully, you can solve this problem pretty easily, even if you aren’t the type to tinker inside of a PC case.
Other World Computing, or OWC for short, has created a DIY upgrade kit aimed squarely at those who aren’t used to cracking the case on their consoles or home computers. While the Xbox 360 Slim hard drives are ridiculously simple to swap (open the side, slide one out, slide the other in), and upgrading the Xbox One is as simple as plugging in an external USB hard drive, the PlayStation 4 requires a little more finesse.
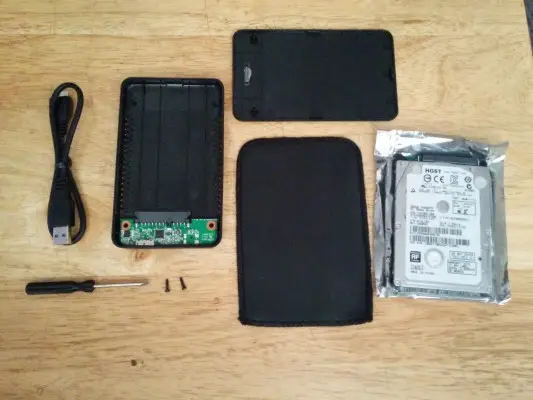
OWC’s DIY kit (they come in a 1TB or 2TB variety – and trust me, you should just spring for the larger drive) comes with a bevy of goodies to make this as seamless a process as possible. That means it comes with a 2.5” SATA hard drive enclosure, an 8GB USB 2.0/3.0 thumb drive, a USB 3.0 double-shielded connecting cable, and your selected hard drive. It even comes with a Phillips #1 Screwdriver and a carrying sleeve for storing your old drive safely.

Everything you might need to complete this upgrade.
I’ve been building and repairing my own systems since I busted open my Commodore 64’s floppy drive and figured out how to clean the read heads with a Q-Tip. That’s a whole lot of time under the hardware hood, and I’ve never heard of the Hard Drive manufacturer HGST. For some reason, that’s who Sony chose for their drives. Not Western Digital, not Seagate, not Samsung, not even the IBM DeskStar (better known as the DeathStar series, for all the reasons you might imagine), but instead completely unknown hardware builder HGST. They saddled the original system with a SATA II 3Gbps hard drive. SATA II was a standard in 2005. In case you aren’t paying attention, it’s not 2005 any more. SATA III came out in 2009. SATA 4 is on the horizon. Why Sony chose to go with what is, in technology parlance, an antique technology is beyond me. Thankfully, OWC is having none of that.
The hard drive, whether you pick the 1 or 2 TB model, are both Seagate/Samsung 5400RPM hard drives in the 2.5” (aka laptop size) size standard. These drives utilize the SATA III standard, enabling 6Gbps of throughput, even though it still runs at 5400RPM.

The stock hard drive is tiny in more ways than one.
Sony magnanimously allows users to upgrade their hard drives without voiding their system warranty. Essentially, that means if you can find a 2.5” hard drive you can likely stuff it in the box. That opens the door to SSDs, SAS, hybrid hard drives, and high-speed server-level drives. The problem with all of those options is the balance between price and speed. You can get a 10,000 RPM SAS hard drive from Western Digital, but it’ll come in at less than a Gig in size (900mb) and will cost you almost as much as the PlayStation 4 console itself! Similarly, a 1TB SSD from Samsung will run you $439.99 when it’s on sale. The ST2000LM003 that OWC has chosen is, by a very wide margin, the best value balance for speed, size, and price.
Upgrading your Hard Drive
First and foremost, take a deep breath – OWC has made this extremely easy. I’ve picked up quite a few “upgrade kits” only to find them incomplete, missing screws, cables, instructions, or worse. My first stop in this process was the included upgrade instruction sheet.
Step 1 – back up your data
We don’t need to grab every scrap of data out of the PlayStation 4’s original drive to successfully migrate our save games. This means the included 8GB thumbdrive is able to handle the job easily. By hitting Settings and then Applications, I found the Save Data Management section. Toggling the check boxes next to the titles I wanted to move across, I selected “Copy to USB Storage Device” and let the system pull my precious save states across. Given that I was well over 150 hours into Dragon Age Inquisition, it was imperative this work as advertised. Just a word of warning – if you save as obsessively as I do, this is going to take a while — Dragon Age Inquisition’s files took over 20 minutes for my 39 save files alone. I recommend a Kindle Fire to pass the time, but expect frequent interruptions as there is no “select all” option — you’ll be doing these one at a time.
Step 2 – swap out the drive
To ensure the system isn’t damaged, I powered down my system completely and unplugged power from the back, giving it a good minute for everything to come to a resting state. The hard drive is located underneath the shiny top of the PlayStation 4’s case. The case slides off easily if you pull it evenly towards the left side of the system. With the case removed you should see this:

It’s not complicated under the hood.
As you can see, there is a retaining screw holding the mounting bracket. This bracket ensures the drive stays secure when the system is run in a vertical orientation, so keep it and the retaining screw safe.

The custom Sony screw is a nice touch.
This will reveal the four screws that hold the drive into the drive caddy. See how that included Phillips screwdriver is suddenly very, very handy? With the hard drive removed, the process in reverse puts the new hardware safely in place. After a quick doublecheck of the connection tightness and that all the screws and brackets were safely in place, I closed up the system and prepared for the more time consuming portion — installing the operating system.
Step 3 – Preparing your software
If you’ve ever upgraded your PlayStation 3 manually via a thumbdrive, you know exactly what to expect for the operating system install. Popping the thumbdrive into my PC, I created a new folder named “PS4” (without the quotes, of course) on it. Inside of that folder I created another folder named “UPDATE”.
Jumping over to the official Sony site, I nabbed the OS from the official download section found here: http://www.playstation.com/en-us/support/system-updates/ps4/ (If you are one of our readers from outside of North America, you’ll obviously navigate to a similar URL for your region) Be absolutely certain you grab the update file from the section that says “Perform a new installation of the system software” — it should come in just shy of 800mb. If your file is roughly 300mb, you have the wrong update software.
The update size is quite a bit smaller than I expected. The .PUP file, once downloaded, goes into the aforementioned UPDATE folder on the thumbdrive.
Step 4 – Loading the operating system
To get the system back up and running on your new hard drive, I’d need to boot it with the thumbdrive. To do this, I plugged in the thumbdrive and put the system into Safe Mode. This is accomplished by holding my finger on the power button button for seven seconds. If you do it correctly, you should hear a beep when you start the process and another beep as the system moves into the selected mode. If you do not see anything on your screen once the normally blue bar on top of the PlayStation 4 turns white, ensure that your TV is capable of switching to 480p, as that is the resolution of Safe Mode.
At this point you should see the screen below:

Welcome to the PlayStation 4’s safe mode menu.
Selecting “Initialize PS4 (Reinstall System Software)” will format the hard drive to work with the system, resetting it to factory default, but allowing you to use the full size of your shiny new 2TB hard drive. Pointing the PS4 at the thumbdrive to pick up the .PUP file and then confirming my selection set the process in motion.
When the system is ready to go it’ll reboot on its own, placing you back at the XMB (cross media bar) of the operating system.
Step 5 – Restoring the precious
Since I still had the thumbdrive plugged in, reversing the data copy we started with was as easy as selecting “Settings” and then “Application Save Data Management”. In there I selected “Save Data on Storage Device” and “Copy to System Storage”. Selecting the titles I wanted to restore (and why not do all of them, given that I now had four times the hard drive space?), I sat back for a brief moment as my save data made its way onto the new drive.
Step 6 of this process is nice and easy – simply let the PlayStation 4 tackle your game reinstallations and patching. Throwing Dragon Age Inquisition back into the system, it immediately installed to the hard drive, allowing me to boot into the game on that fresh real estate as if nothing had happened.
As you can see from this simple anecdote/instruction set, OWC has made a process that would be somewhat daunting for somebody who has never swapped out a hard drive and made it incredibly simple. But wait…what is that included 2.5” OWC Express 2.5″ SATA drive enclosure for? Well, you just turned your 500GB original hard drive into an externally usable rig for holding whatever you’d like to store, such as movies, videos, music, and more. Taped inside the case you’ll find two small screws to secure your the two case pieces together. The enclosure comes with a 1-year warranty with a 48-hour turnaround guarantee, though there isn’t a great deal to go wrong here. As you can see, it really is that simple:

A simple PCB that seats with the hard drive.
The only problem I ran into during this whole process came from Sony. For some reason they continue to have a problem posting the most recent update on their site. When the system failed to recognize the UPDATE.PUP file I mentioned above, I contacted OWC’s technical team. I reached someone immediately and they were more than willing to help. They went so far as to replicate the conditions I faced and we worked through it together. This level of support is fairly rare in the tech industry, so it was a welcome surprise. In the end, it was simply a matter of finding the correct update on a site outside of Sony where the update had been mirrored. It’s a shame to have to reach out elsewhere, but Sony has since updated their own site. Hopefully they can manage to keep their own site up to date so consumers don’t continue to run into this issue in the future.