
The Call of Duty Blog has been a plethora of knowledge with their recent countdown to the launch of Call of Duty: Black Ops 6. Today has been the motherload, as a HUGE blog on what’s coming to Zombies has dropped. There is so much information here, but you’ve got a week until release, so take your time to pour over all of the juicy details. If you want to know more about how Zombies plays, check out our preview from COD NEXT.
Prevail Against the Dark Aether Undead Hordes with Proper Zombies Prep: Ensure you’ve got intel on each major point of interest across both launch maps, learn your Zombies Loadout, how to access Equipment, and learn all the launch GobbleGums, Augments, as well as additional launch updates to expect.
Round Based Zombies: Overview and Recap
With two Round-Based Zombies maps at launch, and a third map arriving before the end of the year, the time has come to fully prepare for tackling the terrors of Terminus, Liberty Falls, and this extensive game mode!
Past Blogs have covered many aspects, gameplay systems, and innovations in Zombies. Here’s a recap related to all of this, before we confirm all the launch content, including a Loadout Overview, unlockable Augments, Equipment, and full list of GobbleGums available at launch.
Links to Previous Zombies Intel
Click on the following links for more information on:
- An Overview of Round-Based Zombies. Includes:
- The Gameplay of Round-Based Zombies. Includes:
- The Enemies of Round-Based Zombies. Includes:
- The Wonder Weapons of Round-Based Zombies. Includes:
This blog also contains intel regarding updates and changes to the game confirmed for launch. Read on for all the details.
Zombies Launch Updates from Treyarch
Liberty Falls Updates
Since the debut of early gameplay footage at Call of Duty NEXT back in August, the Zombies team at Treyarch has continued to iterate on the look, feel, and sound of Liberty Falls to crank up the map’s creepiness factor. Heading into launch, players can expect a moodier visual tone to the map, along with gorier set dressings and new environmental audio to more intensely reflect the chaos of a very recent dimensional breach.
Additional atmospheric elements related to the map’s Main Quest will also be present throughout Liberty Falls as players begin to solve the mysteries waiting for them in the wake of the undead incursion. And of course, there might be a brand-new Easter Egg song from Treyarch’s Kevin Sherwood to discover along the way…
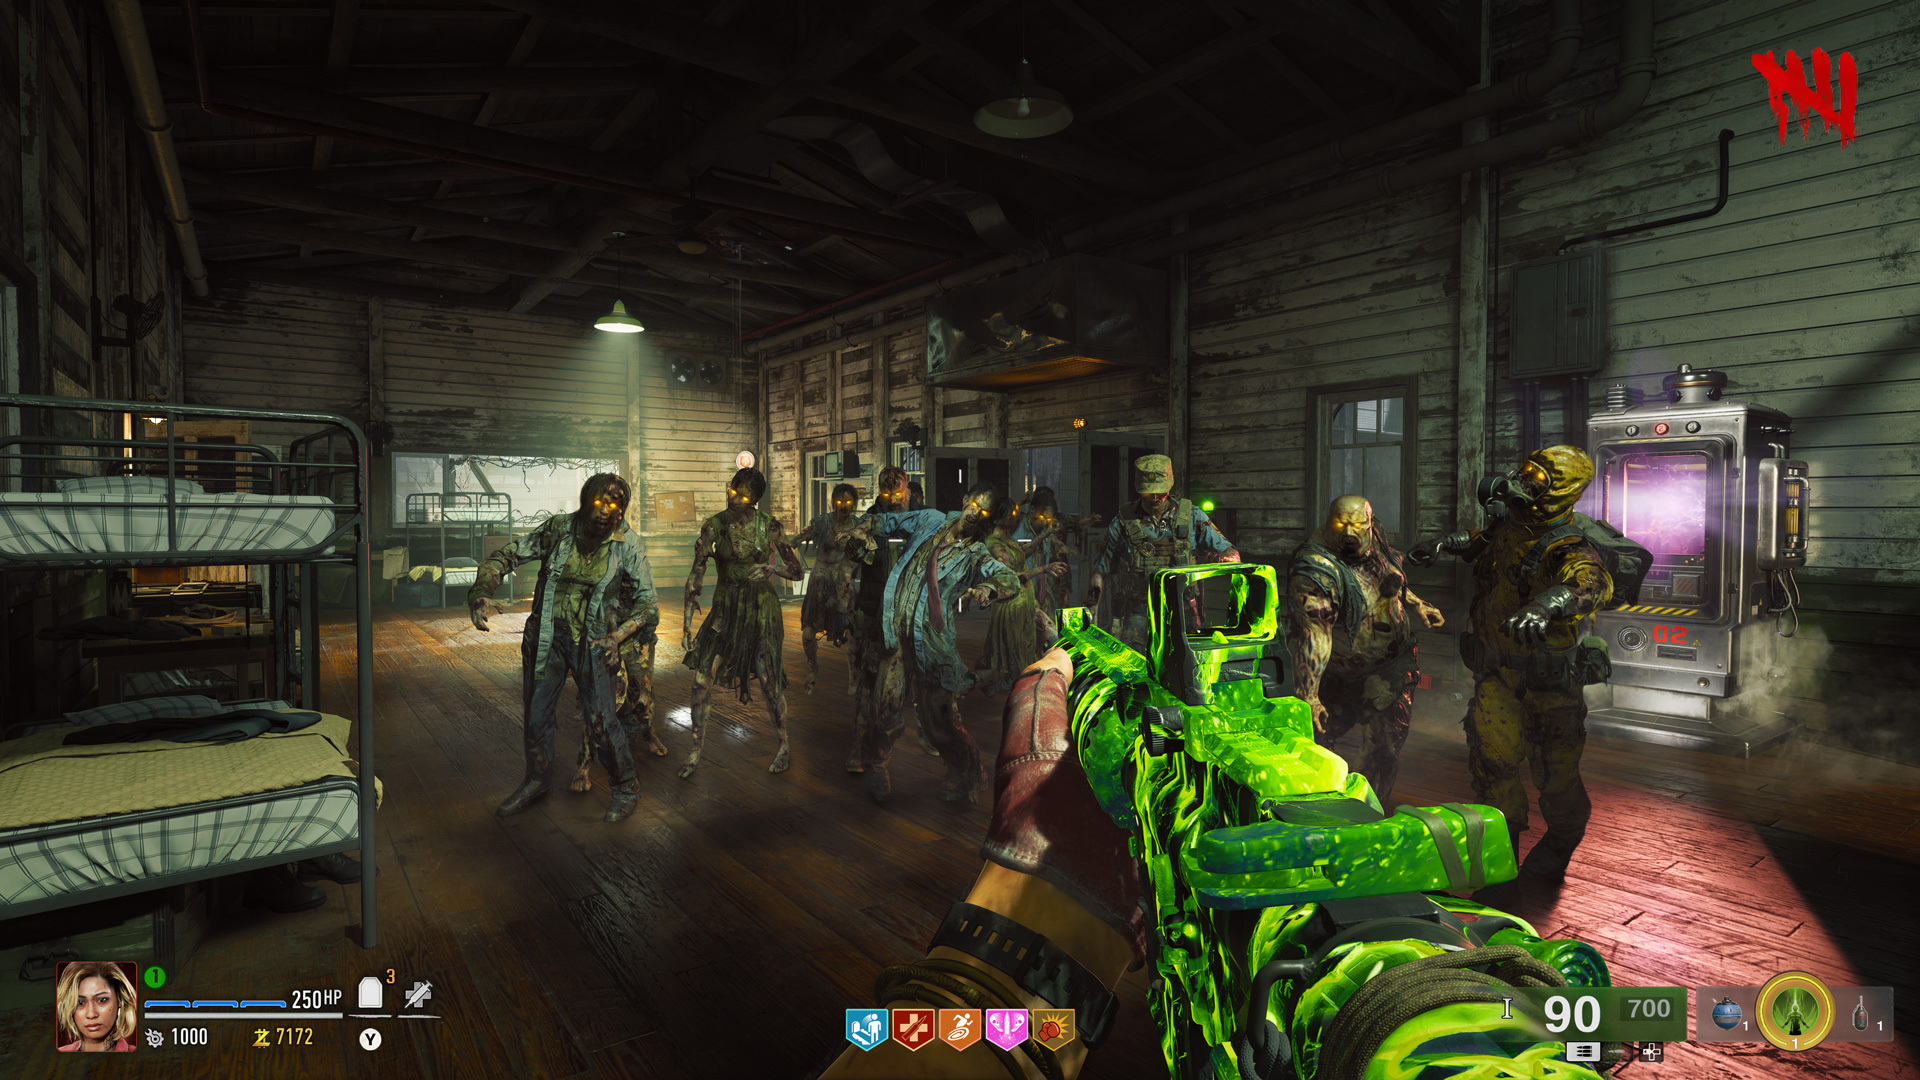
HUD Touch-ups
The UI team has also continued to update the game’s modular HUD, touching up some of the Zombies-specific elements that can appear across most HUD preset options and adding new settings. These updates include:
- Character portraits added to the lower-left corner by default
- General alignment and color adjustments made across the entire HUD
- Perk icons now positioned closer together
- Zombies-specific widgets added for certain in-game actions
- In-game GobbleGum reward animation added
- Visibility sliders added to allow players to fine-tune or completely disable additional HUD elements, including Score Feed, Medals & Notifications, Minimap Opacity, Weapon & Equipment Information, and more.
From the long disused mining tunnels to its use as a WWII resupply depot, to the structures built as part of a shuttered CIA Blacksite, there’s a wealth of discoveries to be made across Terminus Island. Given the more recent evidence of heinous biological experimentations led by the nefarious Project Janus group, our newly freed Requiem crew will need to stay on their toes.
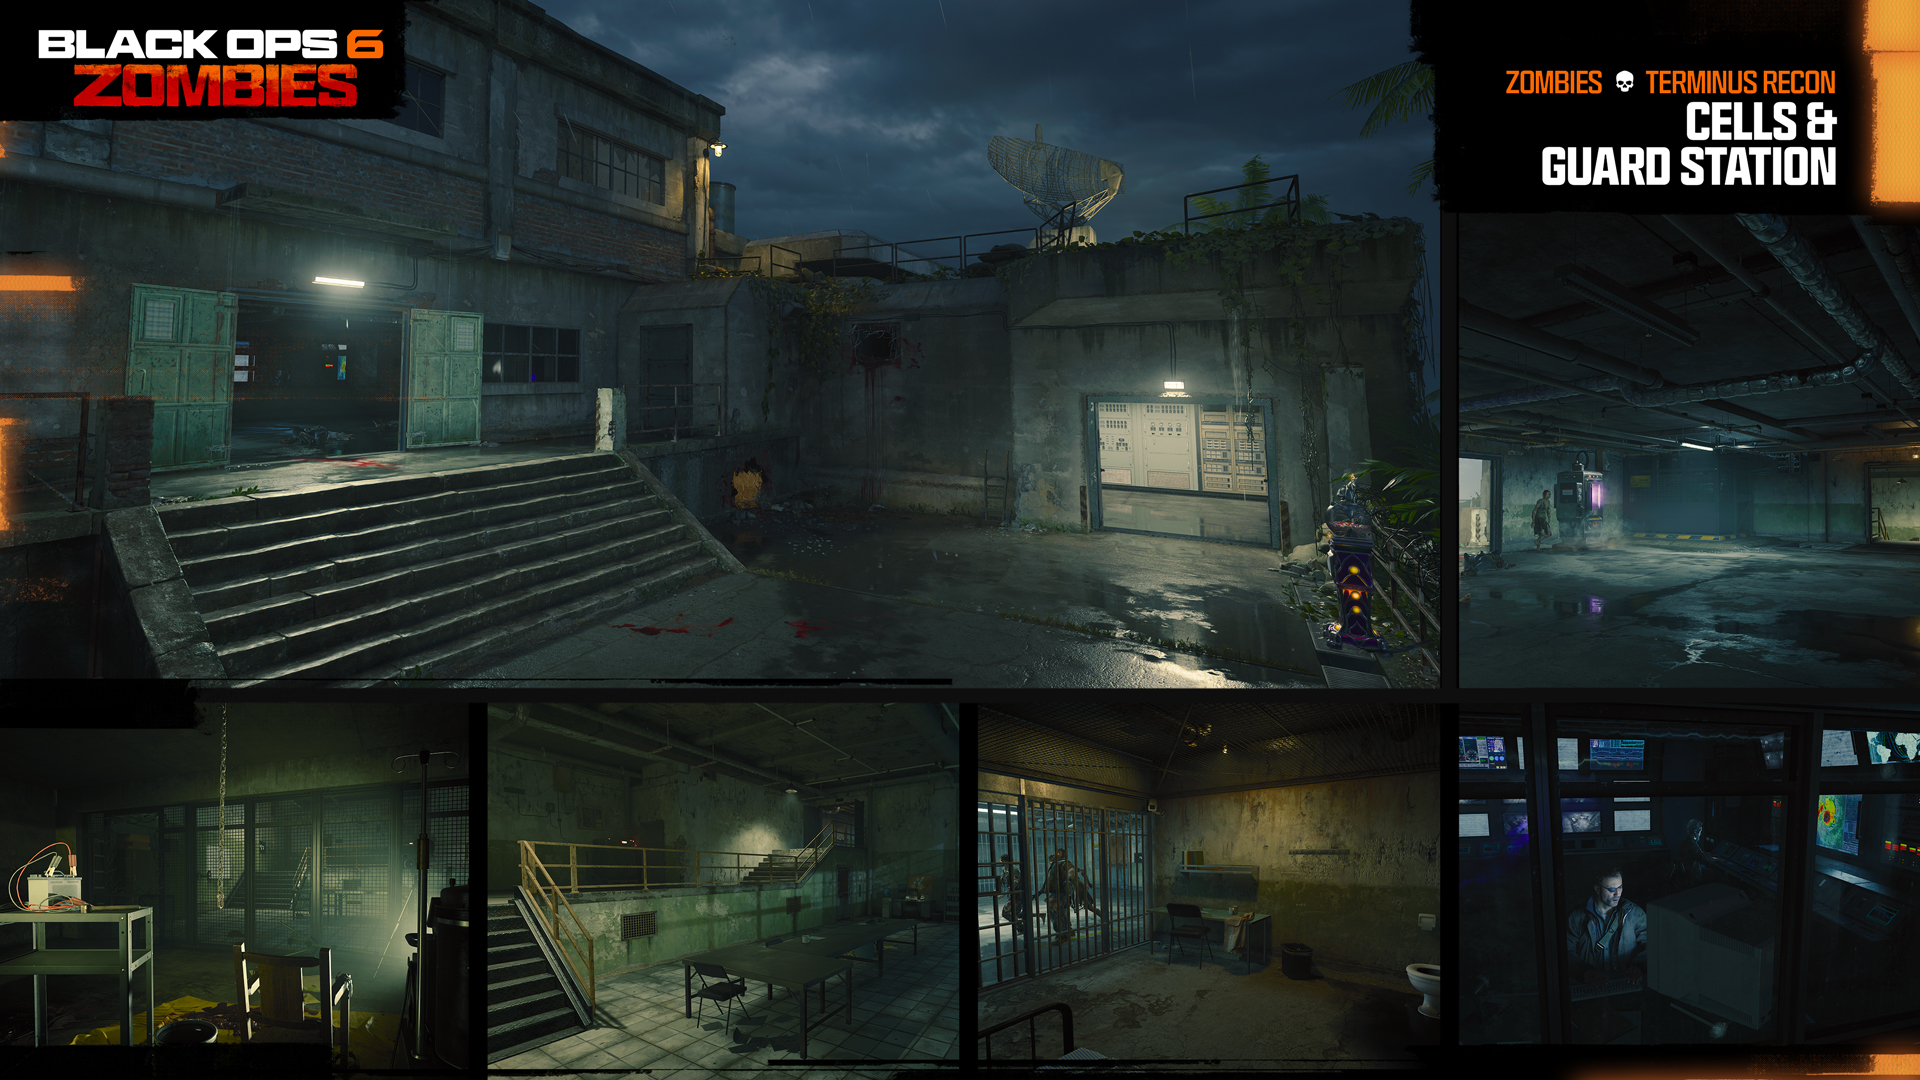
Cells and Guard Station
At the top of the prison sits a series of Holding Cells where the Requiem crew have been biding their time for the last half decade. The paint is peeling, the ducts are rusting, and there’s an odd smell coming from one of the air vents. Adjacent is the Guard Station where your handlers (Peck and Strauss) have barricaded themselves, as well as a lower interrogation room, with the remnants of a torture session still visible.
Security Overlook and Control Center
A cracked concrete overlook lies below a guard tower, which leads to a two-level control center with monitor banks and a well-stocked armory. Further down the embankment the prison is built on, the remains of a Project Janus Communications structure seem to have been well-maintained, until the recent incursion.
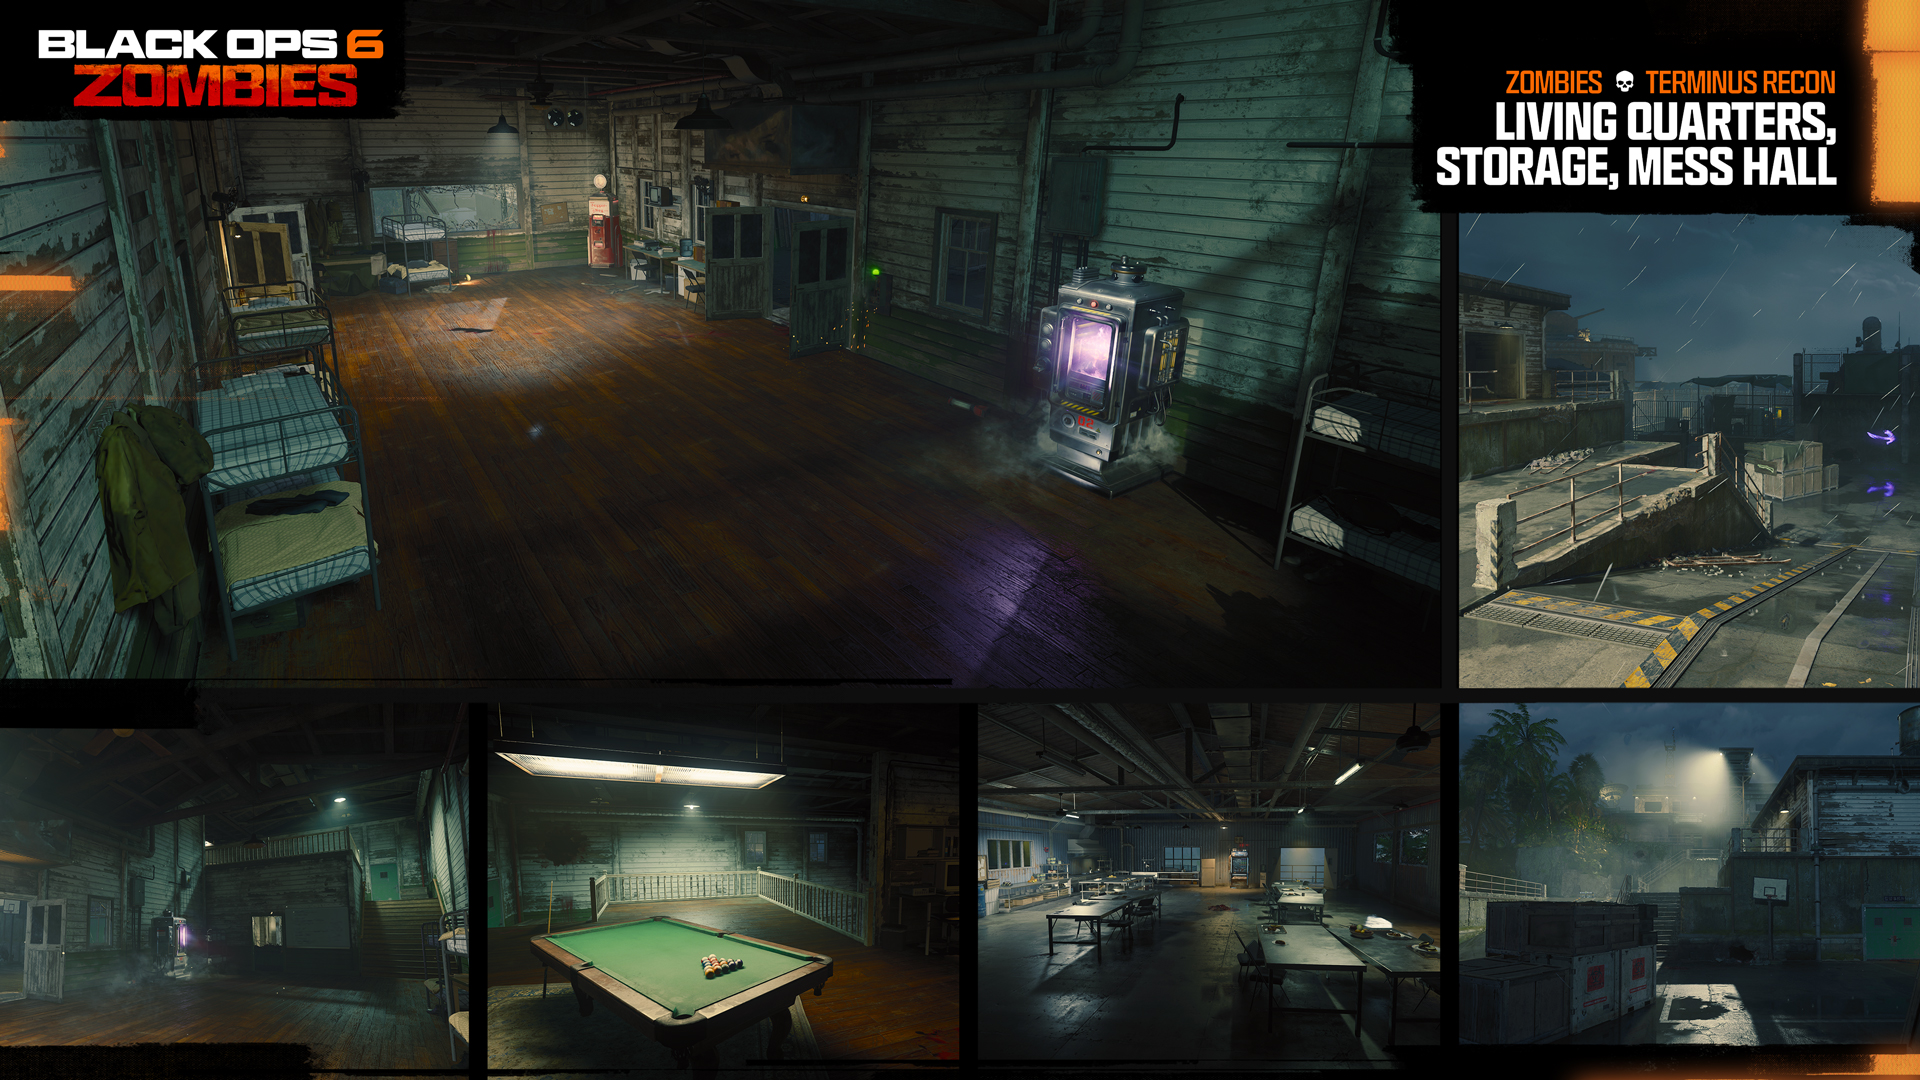
Living Quarters, Storage, and Mess Hall
The large storage area leads down an unloading ramp to the Rec yard, and on either side is an older structure built in 1942, when the U.S. Navy established a Resupply Base on the island. Nearby is an Engineering room, stocked with electronics and tables to tinker on.
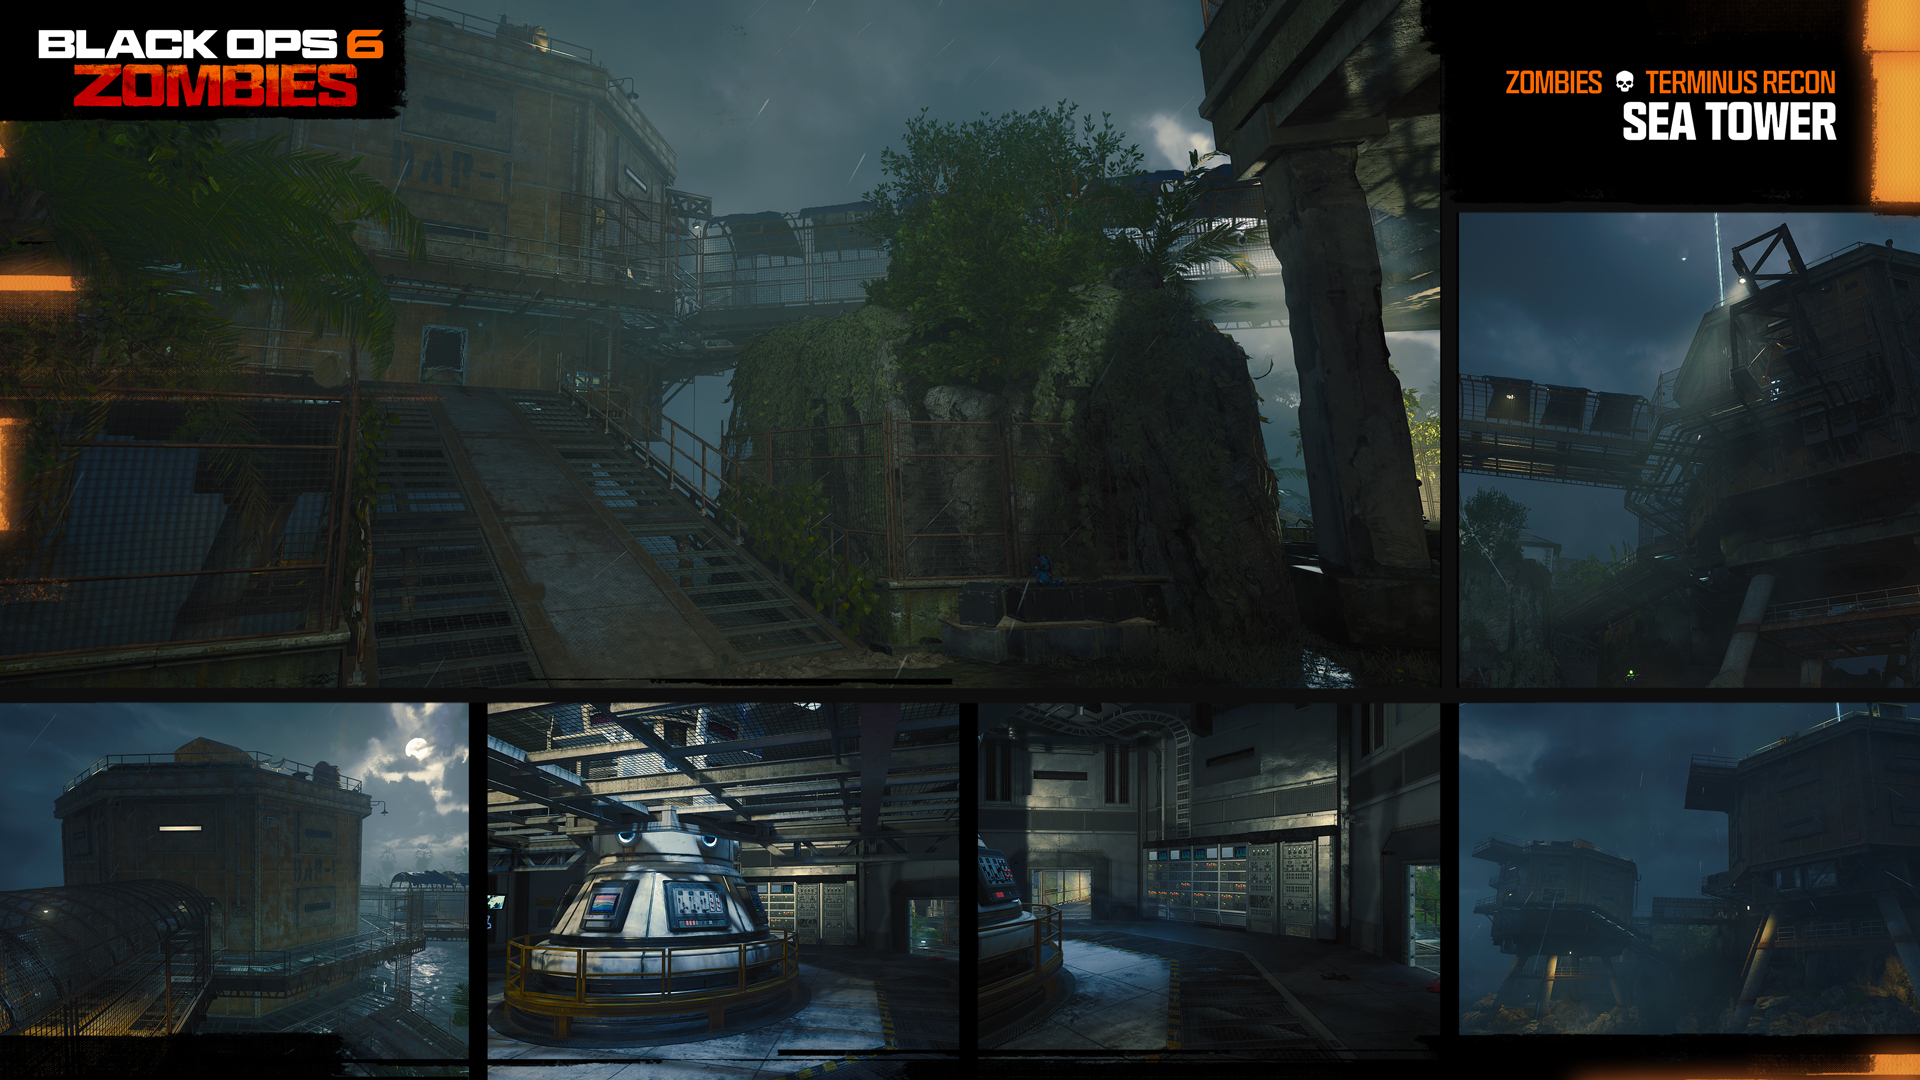
Sea Tower
Explore the Dark Aether Reactor (DAR) Sea Tower, a gun emplacement atop an octagonal tower, with attached metal ramps and gantries (and an ascender) all the way down to the gigantic concrete footings.
Gun Battery Platform
A massive WWII vintage gun emplacement rests atop a thick concrete platform, seemingly modified by Project Janus in recent years as part of an unusual experiment.
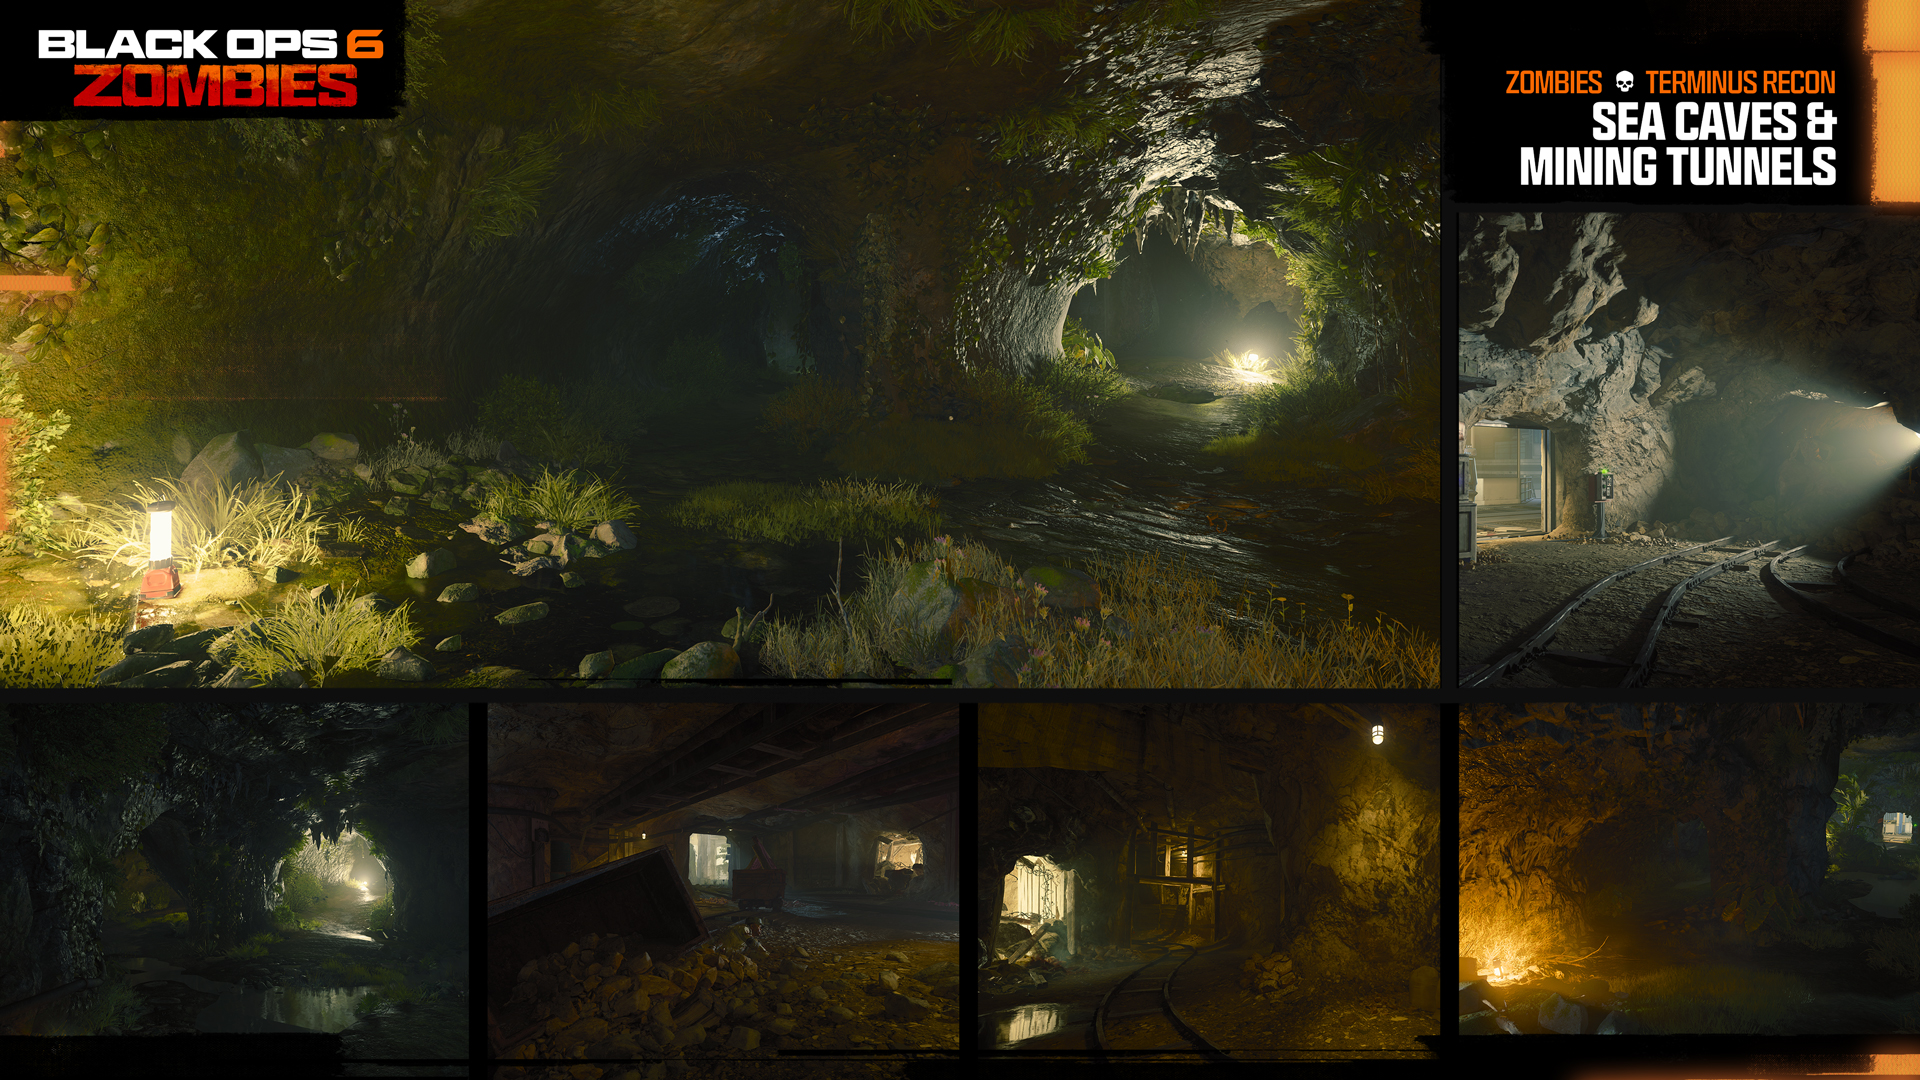
Sea Caves and Mining Tunnels
Below the outer areas of the island prison are a pair of subterranean tunnels, one naturally occurring, and the other man-made, dug out toward the end of the 19th century, when the island’s long-mined out coal reserves were being greedily exploited.
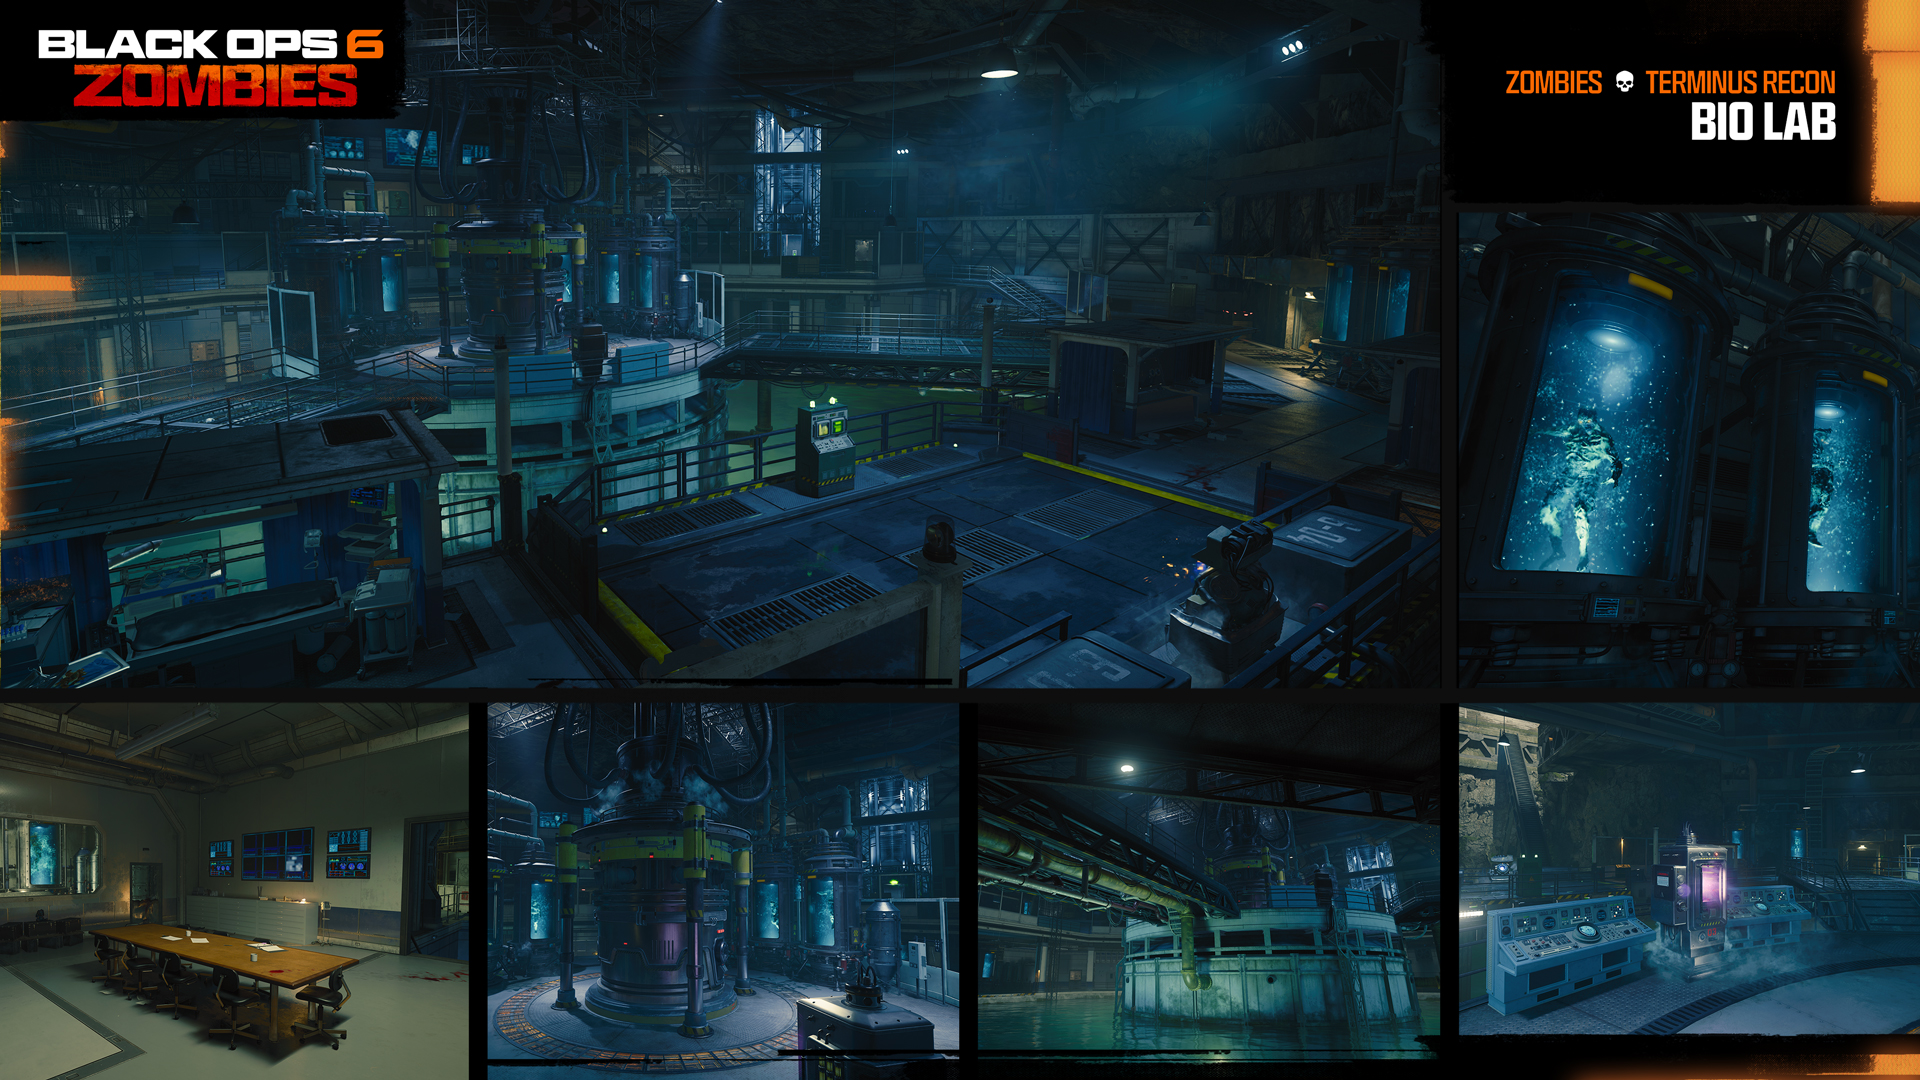
Bio Lab
An impressive feat of engineering awaits on the island; a large sea cave has been completely hollowed out, and a large-scale secret research facility has been constructed within the cavern walls. Multi-level gantry walkways and stairs are clamped to the outer walls, and what appears to be an experimentation chamber lies within.
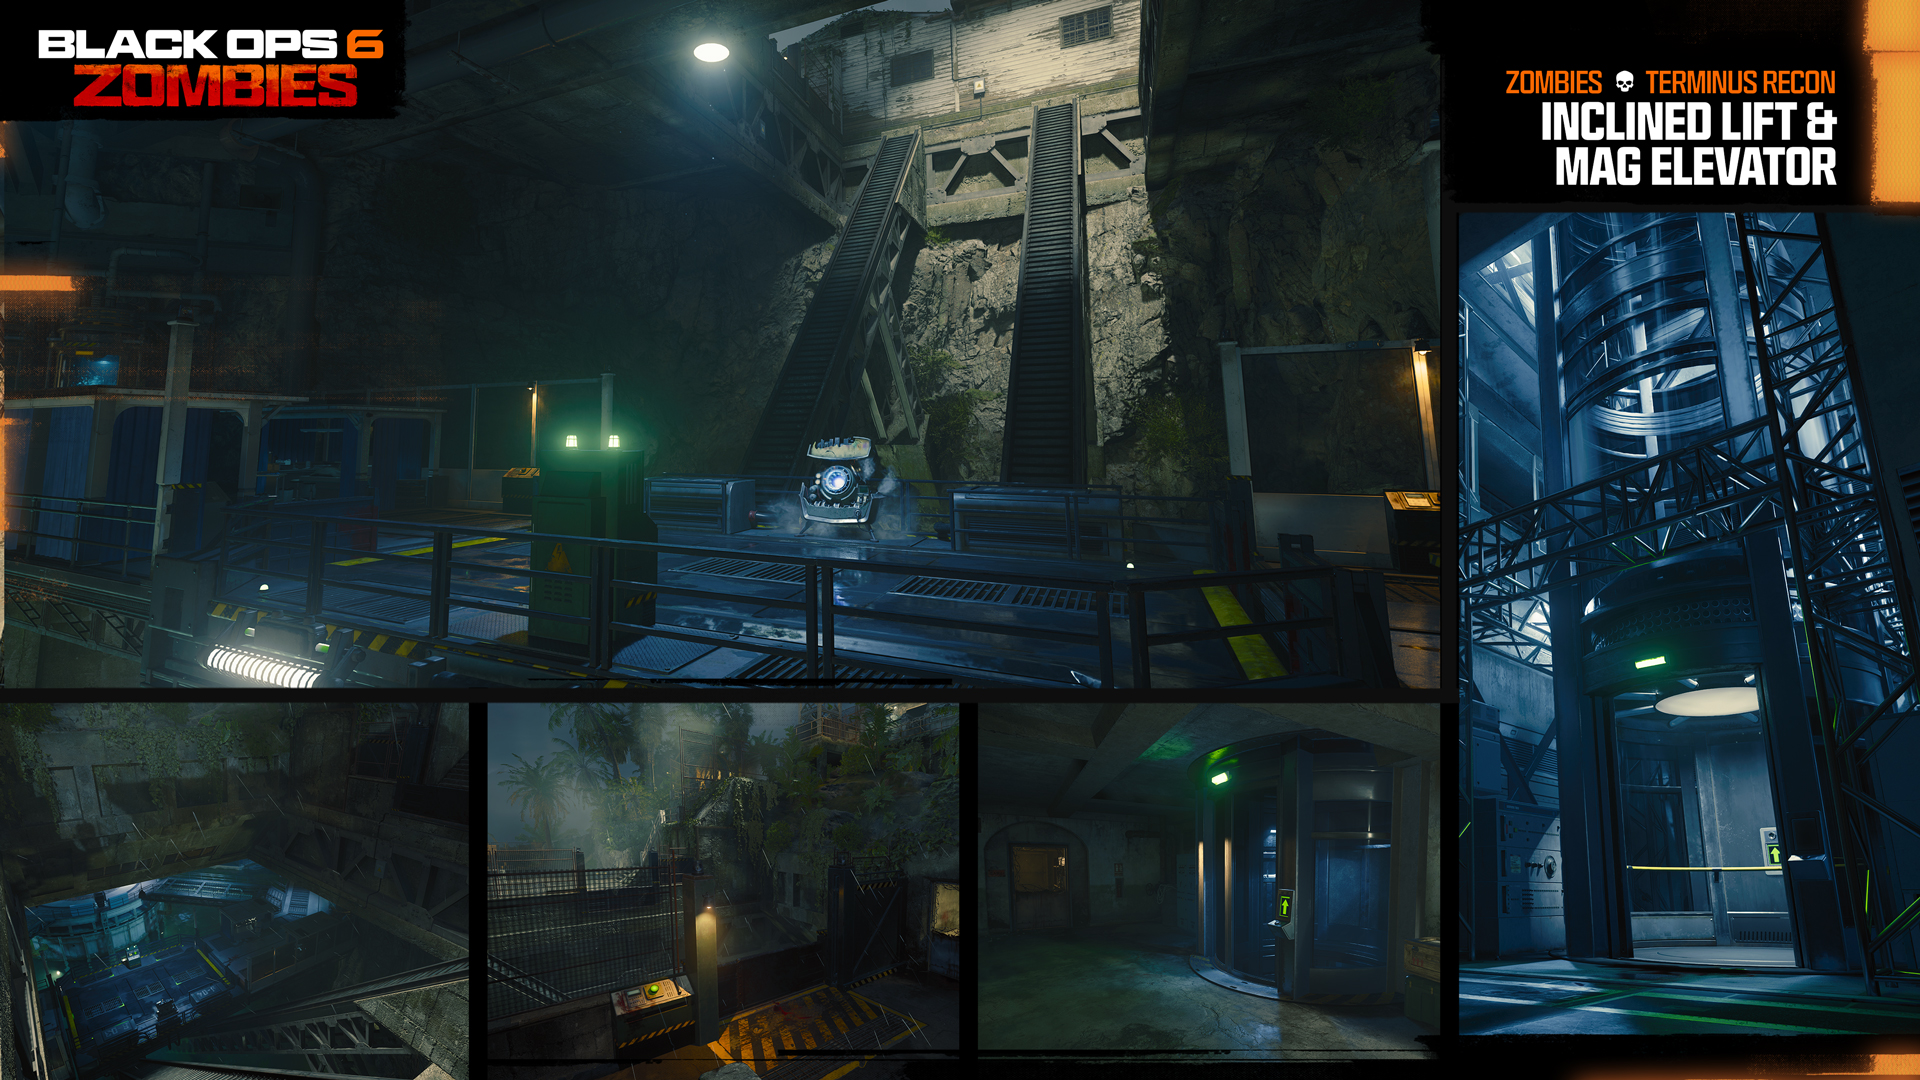
Inclined Lift and Maglev Elevator
Though the Bio Lab is set within a huge cavern, it has multiple pathways outward thanks to an Inclined Lift that periodically trundles up to the top level behind the living quarters. Further around the Bio Lab gantries is an operational Project Janus-constructed Maglev Elevator.
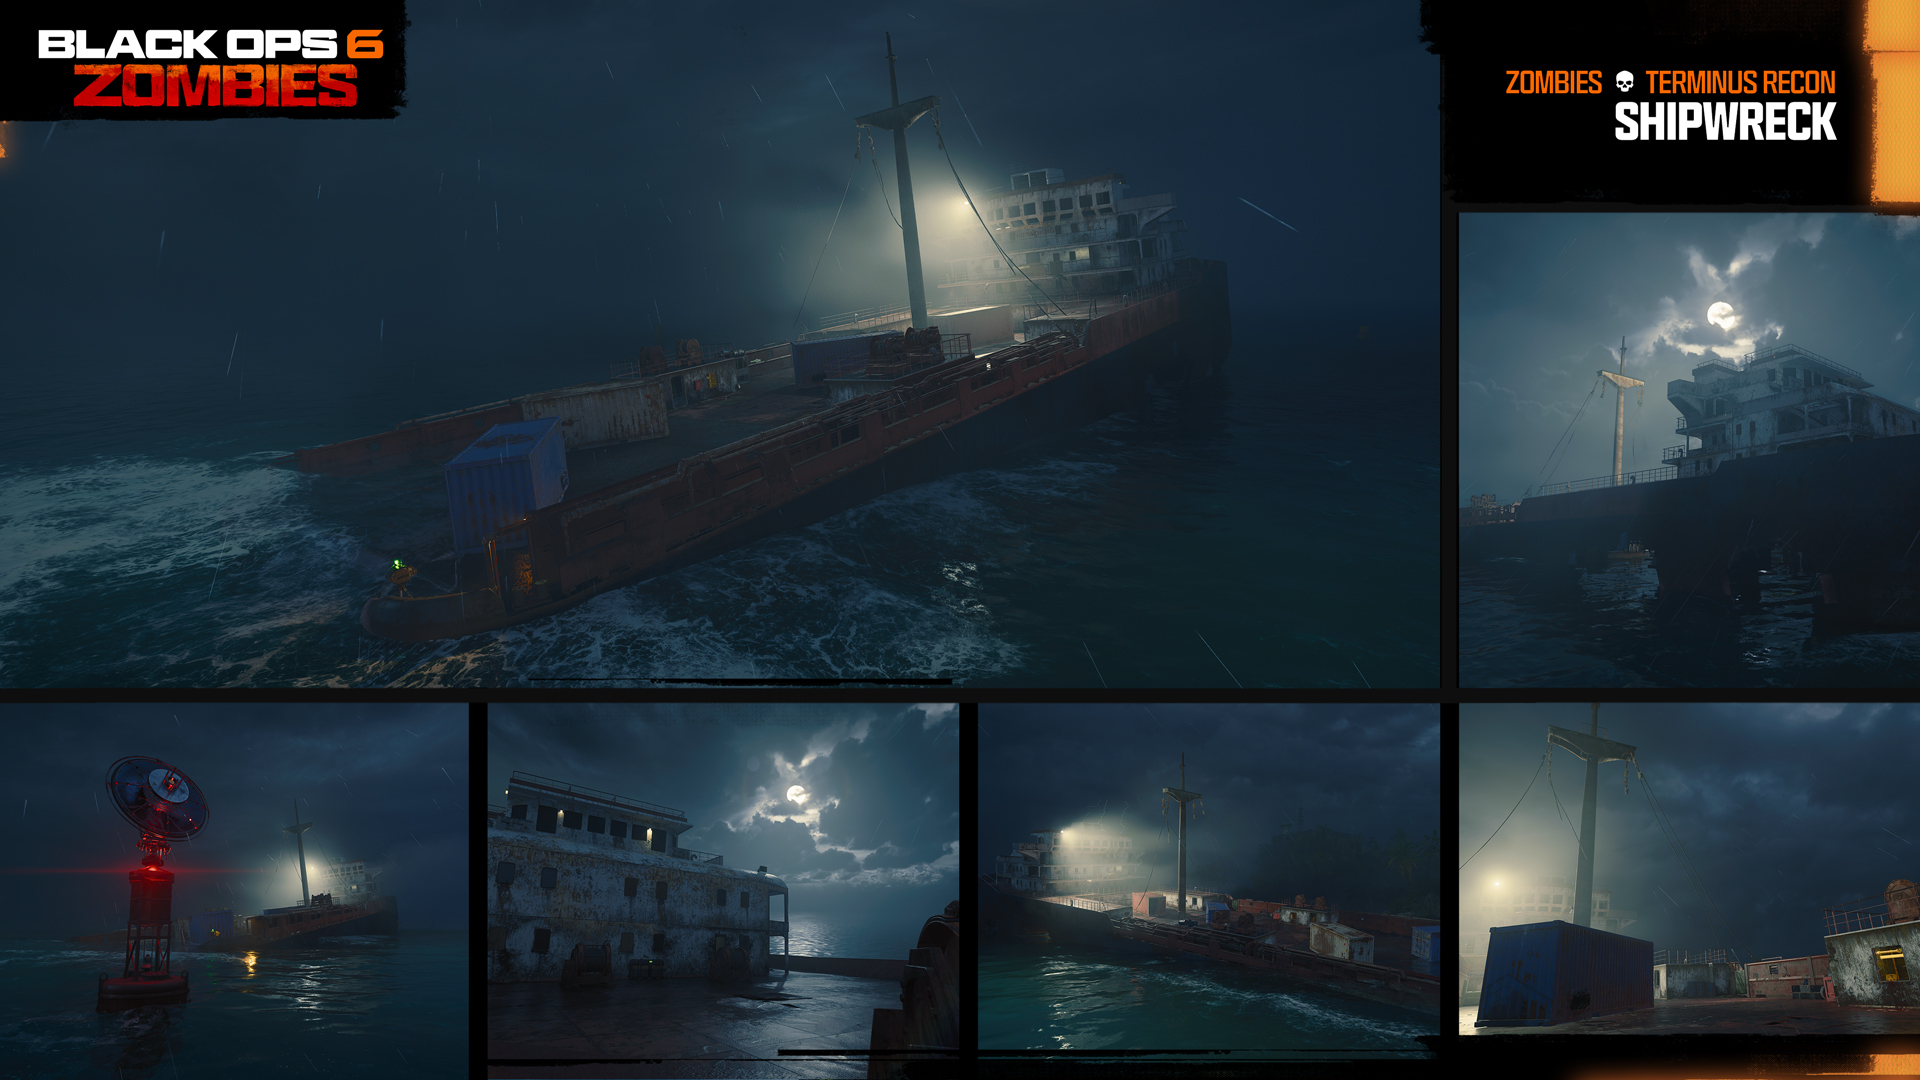
Shipwreck
Despite the radar buoys in close proximity, the remains of a shipping tanker indicate just how treacherous the waters around Terminus Island are. Slowly rusting from stern to prow, the salt waters have eaten away at the hull, though the main deck is still seemingly accessible.
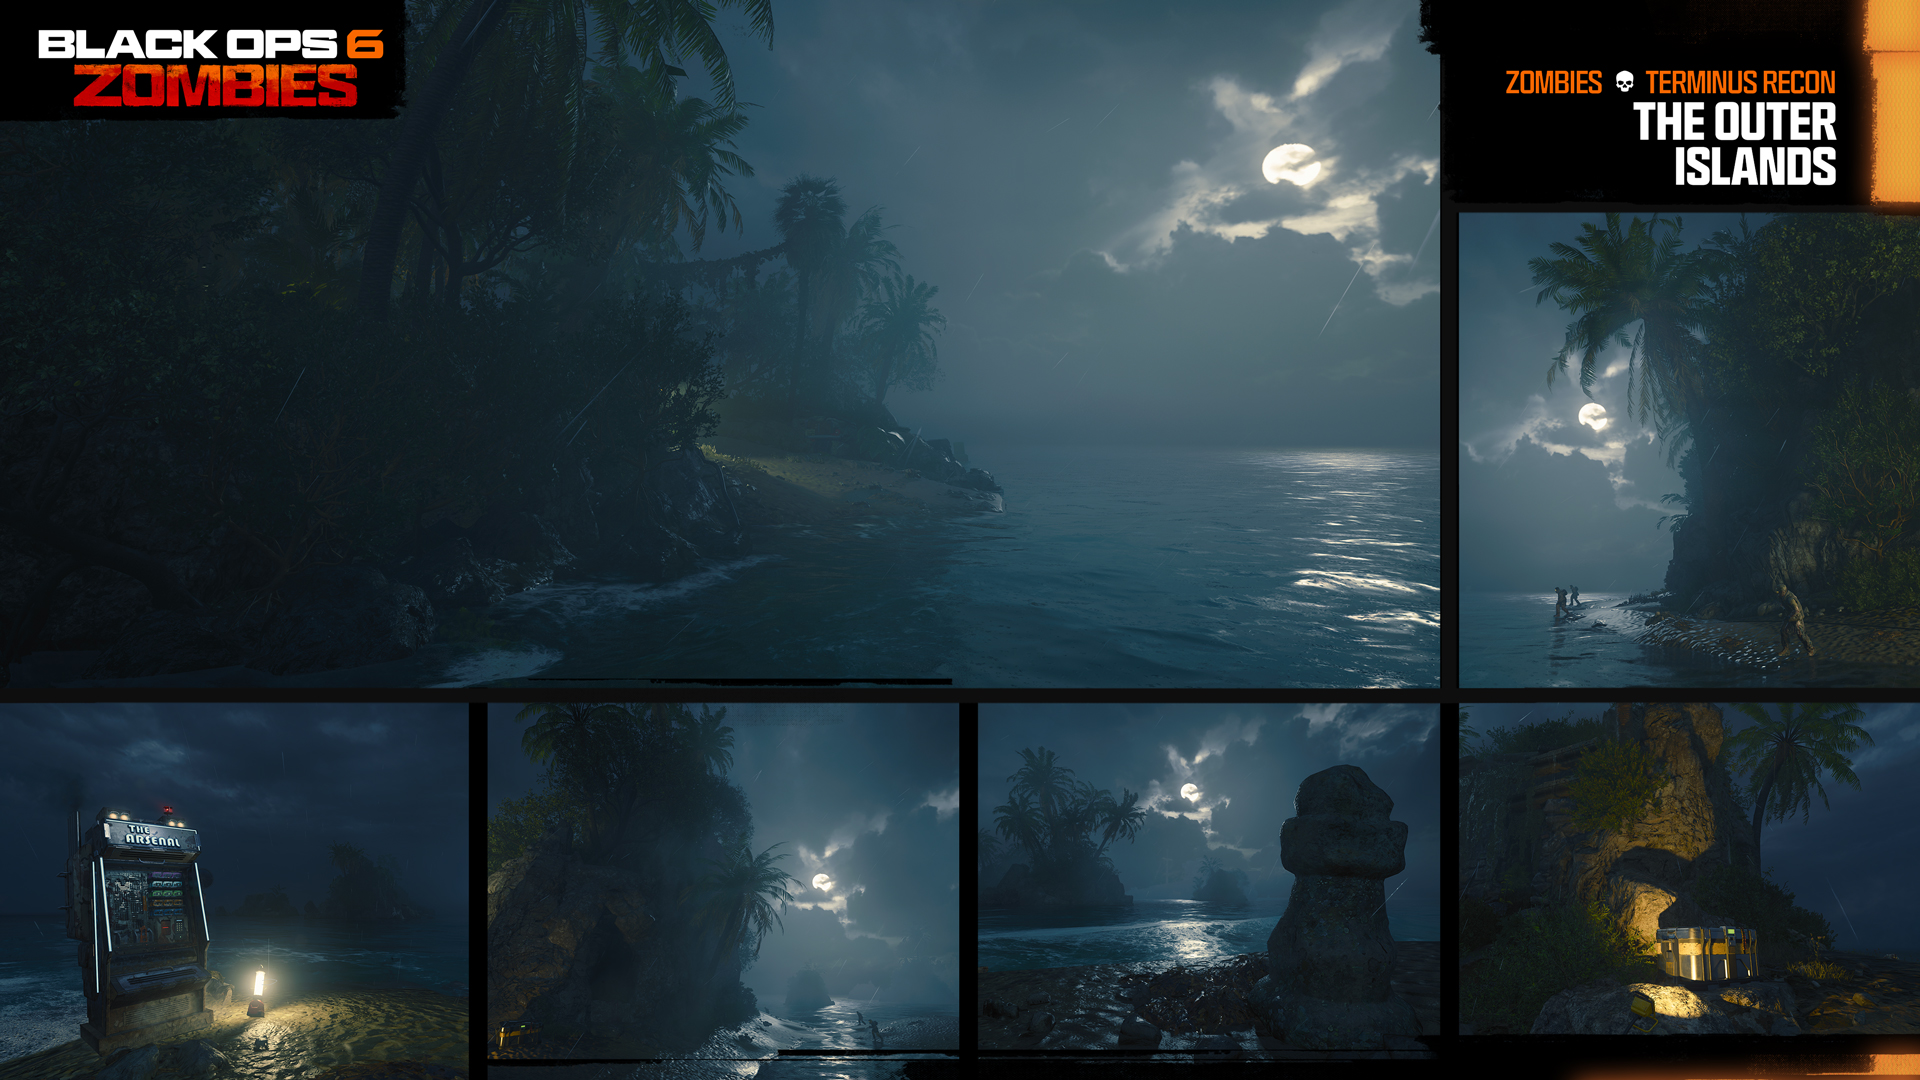
The Outer Islands
To the northwest is Temple Island, with its odd pillar-like carvings. Due east is Castle Rock Island, named after the natural stone edifice jutting from the tidal sands that appears to be an old fortification. The largest of the three outcrops is Crab Island, where Project Janus disposal crews would discard the remains of their science team’s unwholesome experiments.
The seas around Terminus Island are also home to something more foreboding: a terror in the water, writhing up from an irradiated cloud and violently attacking those that remain outside the confines of the prison for too long…
Liberty Falls Recon
Almost Hell, West Virginia: A Tour of Liberty Falls
The atmosphere of Liberty Falls, which takes place concurrently with the aftermath of the dimensional breach over on Terminus Island, feels a world away from the dark, stormy waters of the Philippine Sea and the massive concrete prison Grigori Weaver and his crew are fighting to escape from.
Players must explore the once-idyllic, now horrific small West Virginian town of Liberty Falls, whose residents have either fled or barricaded themselves into the settlement in a last desperate attempt to survive. By the time you arrive – under the watchful eye of Project Janus Security Chief John Blanchard – the town is overrun, and the battle seems well and truly lost.
Here’s a closer look at the Liberty Falls locations you’ll be able to explore:
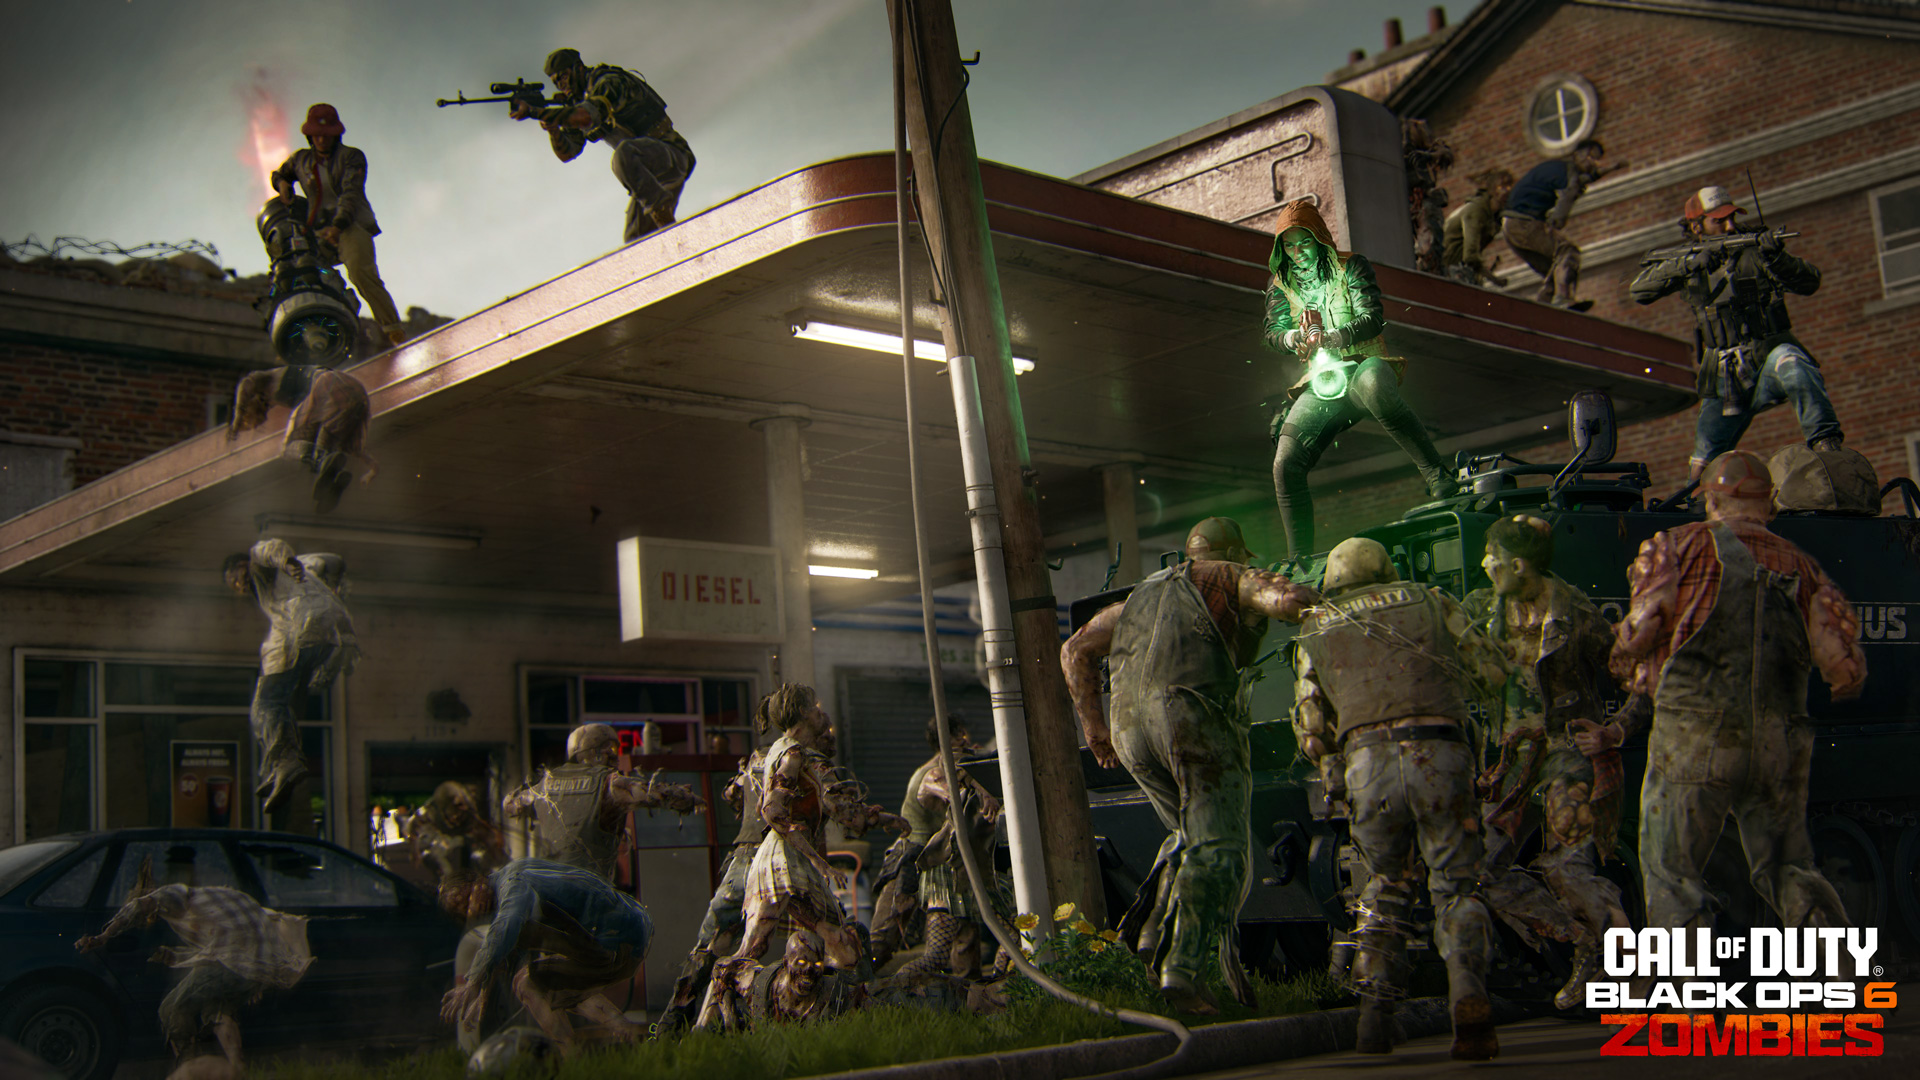
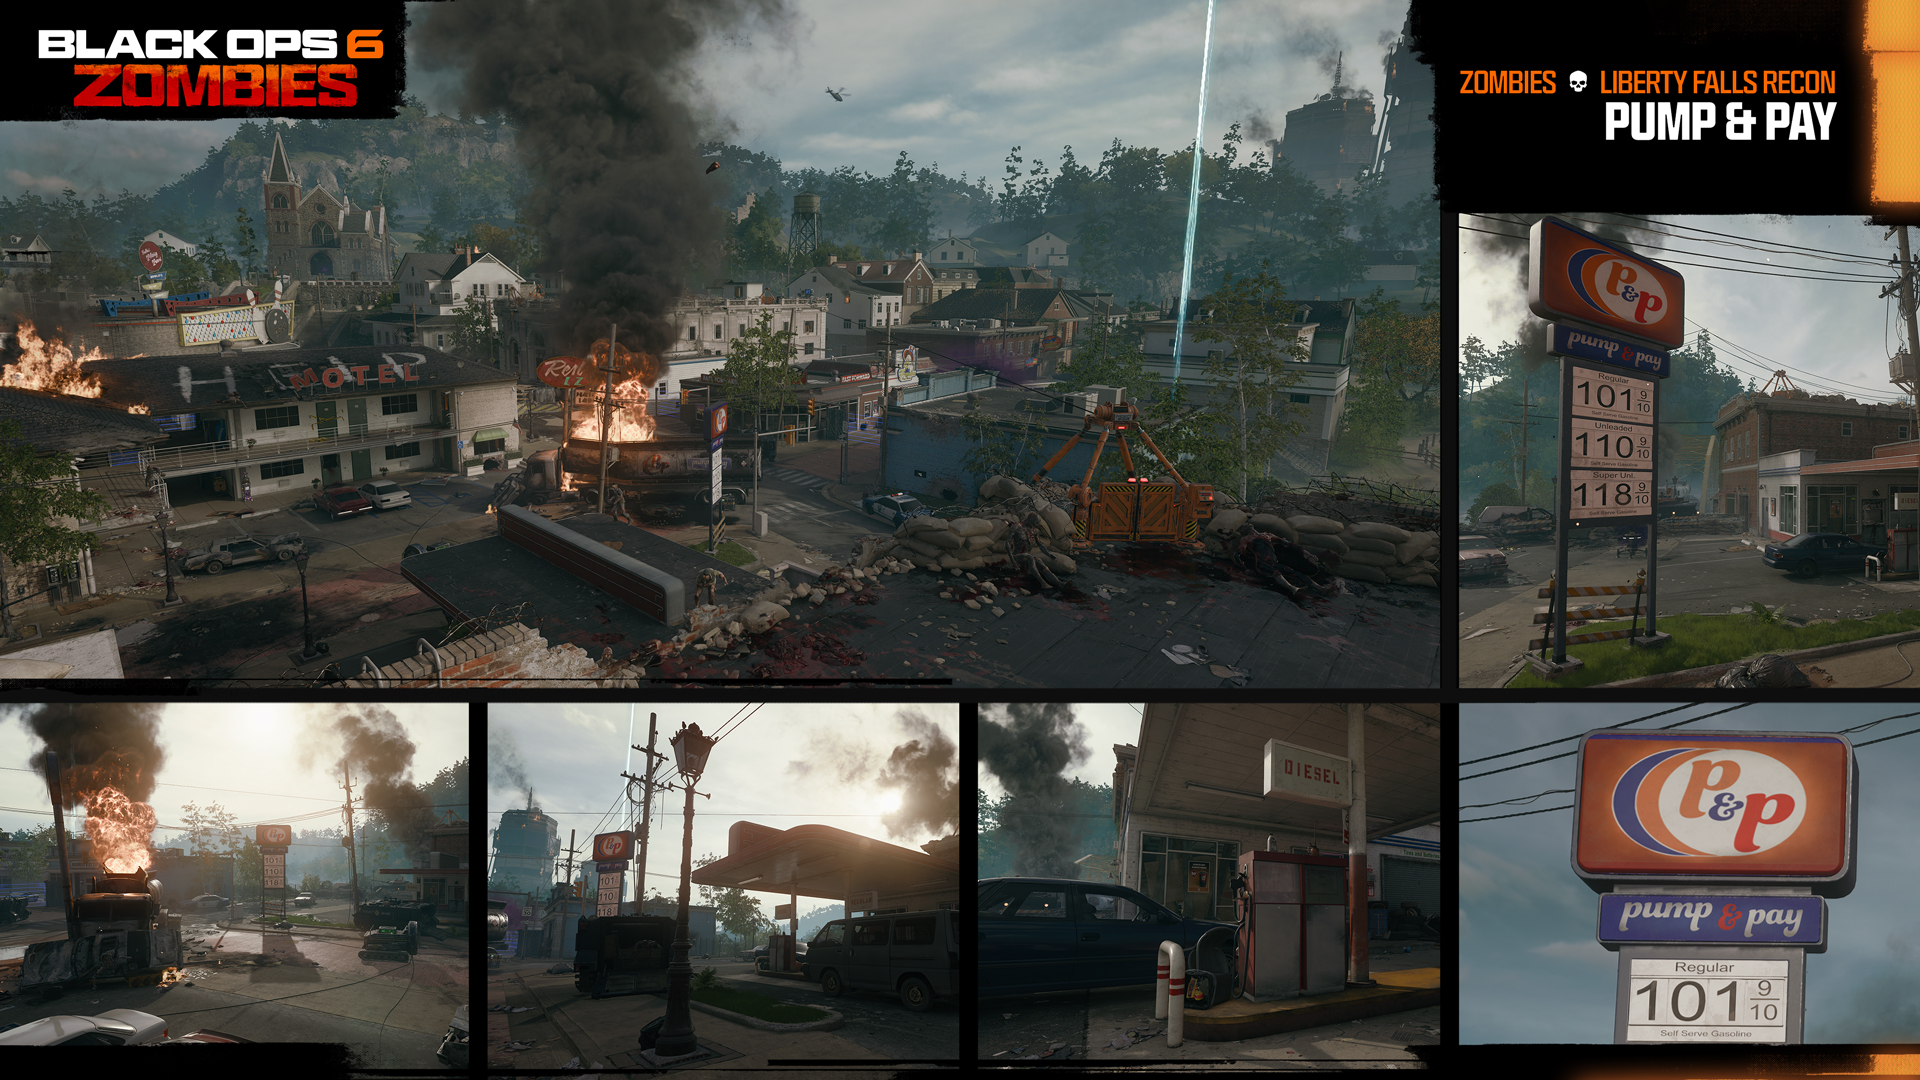
Pump & Pay
You begin your battles against the swarms of rotting townspeople from a gas station rooftop vantage point. This soon becomes a disadvantage when you realize how nimble zombies are at reaching you. If you’re a glutton for punishment, switch on the Rampage Inducer here to speed up the action. Otherwise, descend to the ground and bear witness to the true horrors that have befallen this cursed hamlet.
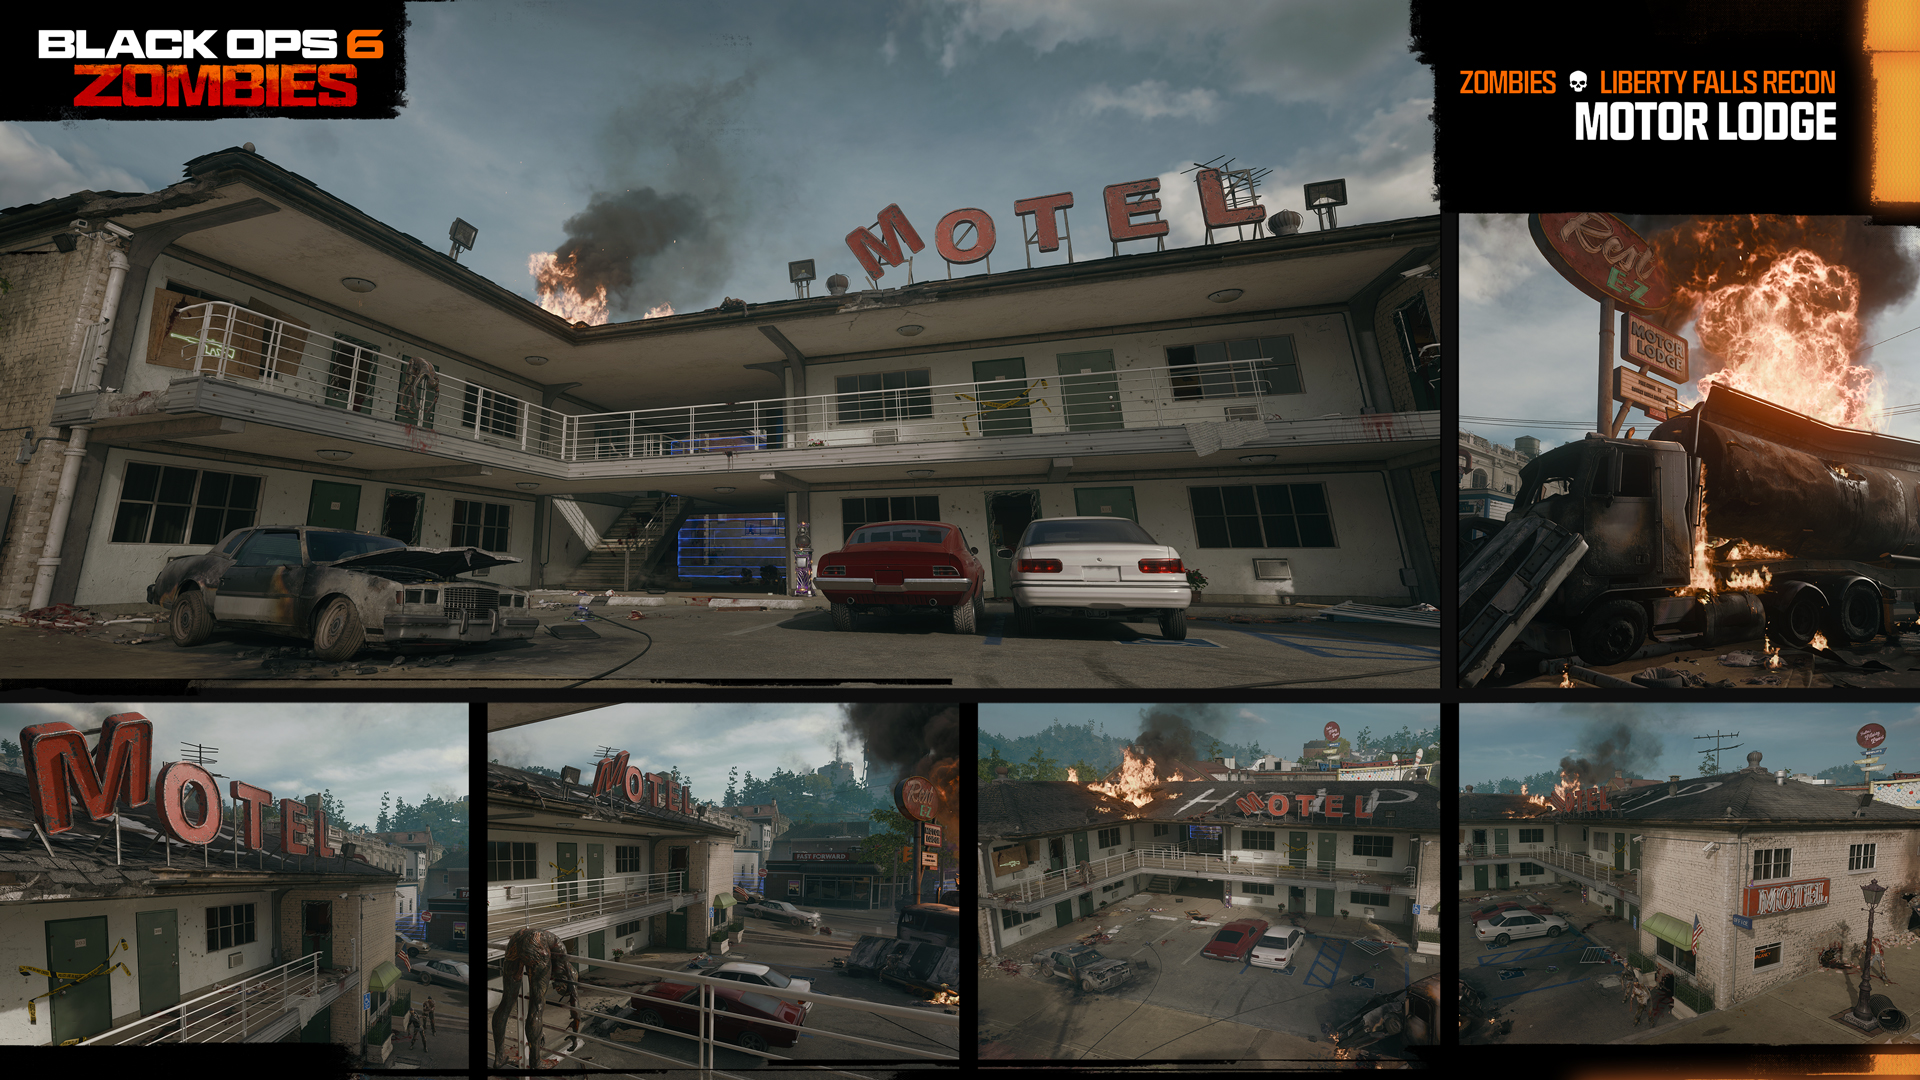
Motor Lodge
The ironically named Rest E-Z Motor Lodge is one of the first structures you’ll investigate after scrambling down from the gas station. Partly ablaze with the word “HELP” daubed across the roof, this is seemingly an epicenter of zombie activity, with shambling horrors crashing out of rooms on the ground and upper floors.
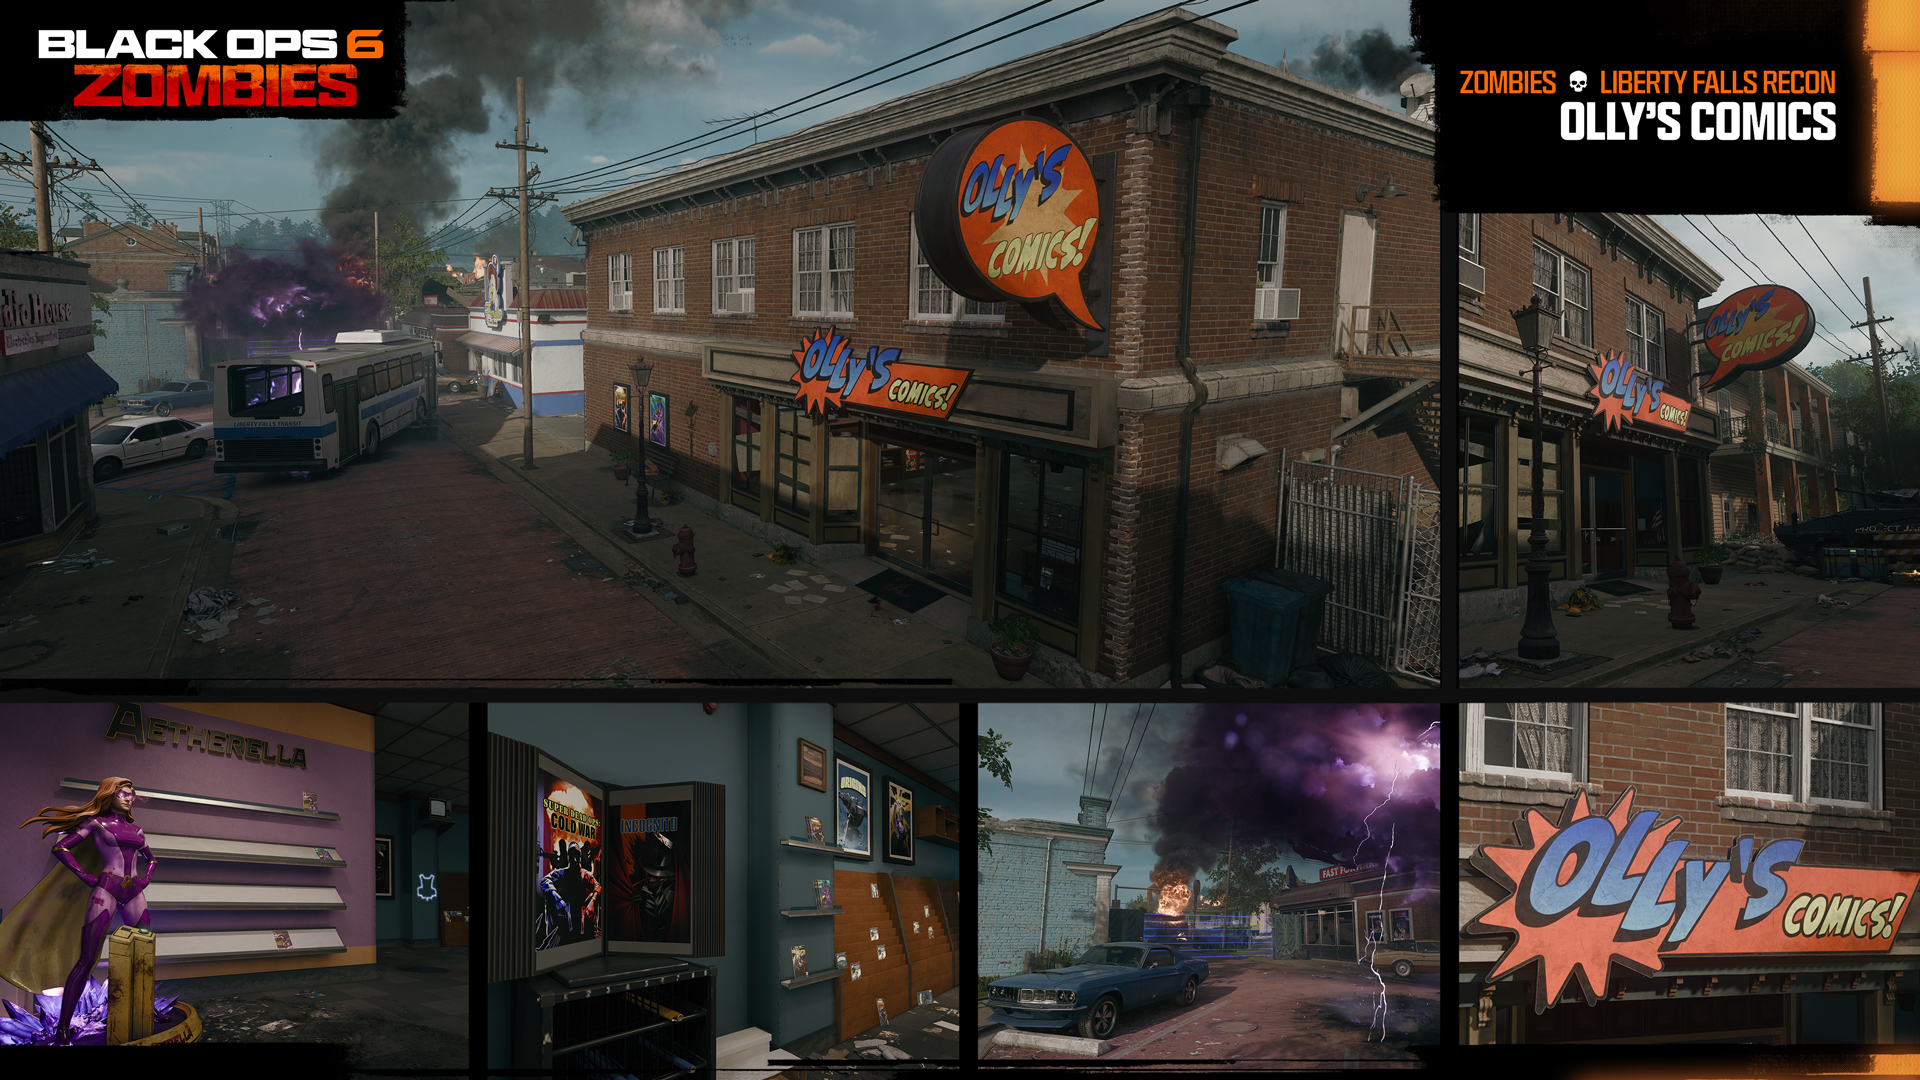
Olly’s Comics
In the southern corner of town is the local comic shop run by Olly. Best not think about what happened to him. The shop caters to the true collector, with both the latest and back issues of “Charged Up,” “Heavy Space,” and “Odd Stories” on sale at reasonable prices. But most folks come here for the life-sized statue of Aetherella to pose with, star of the comic line of the same name.
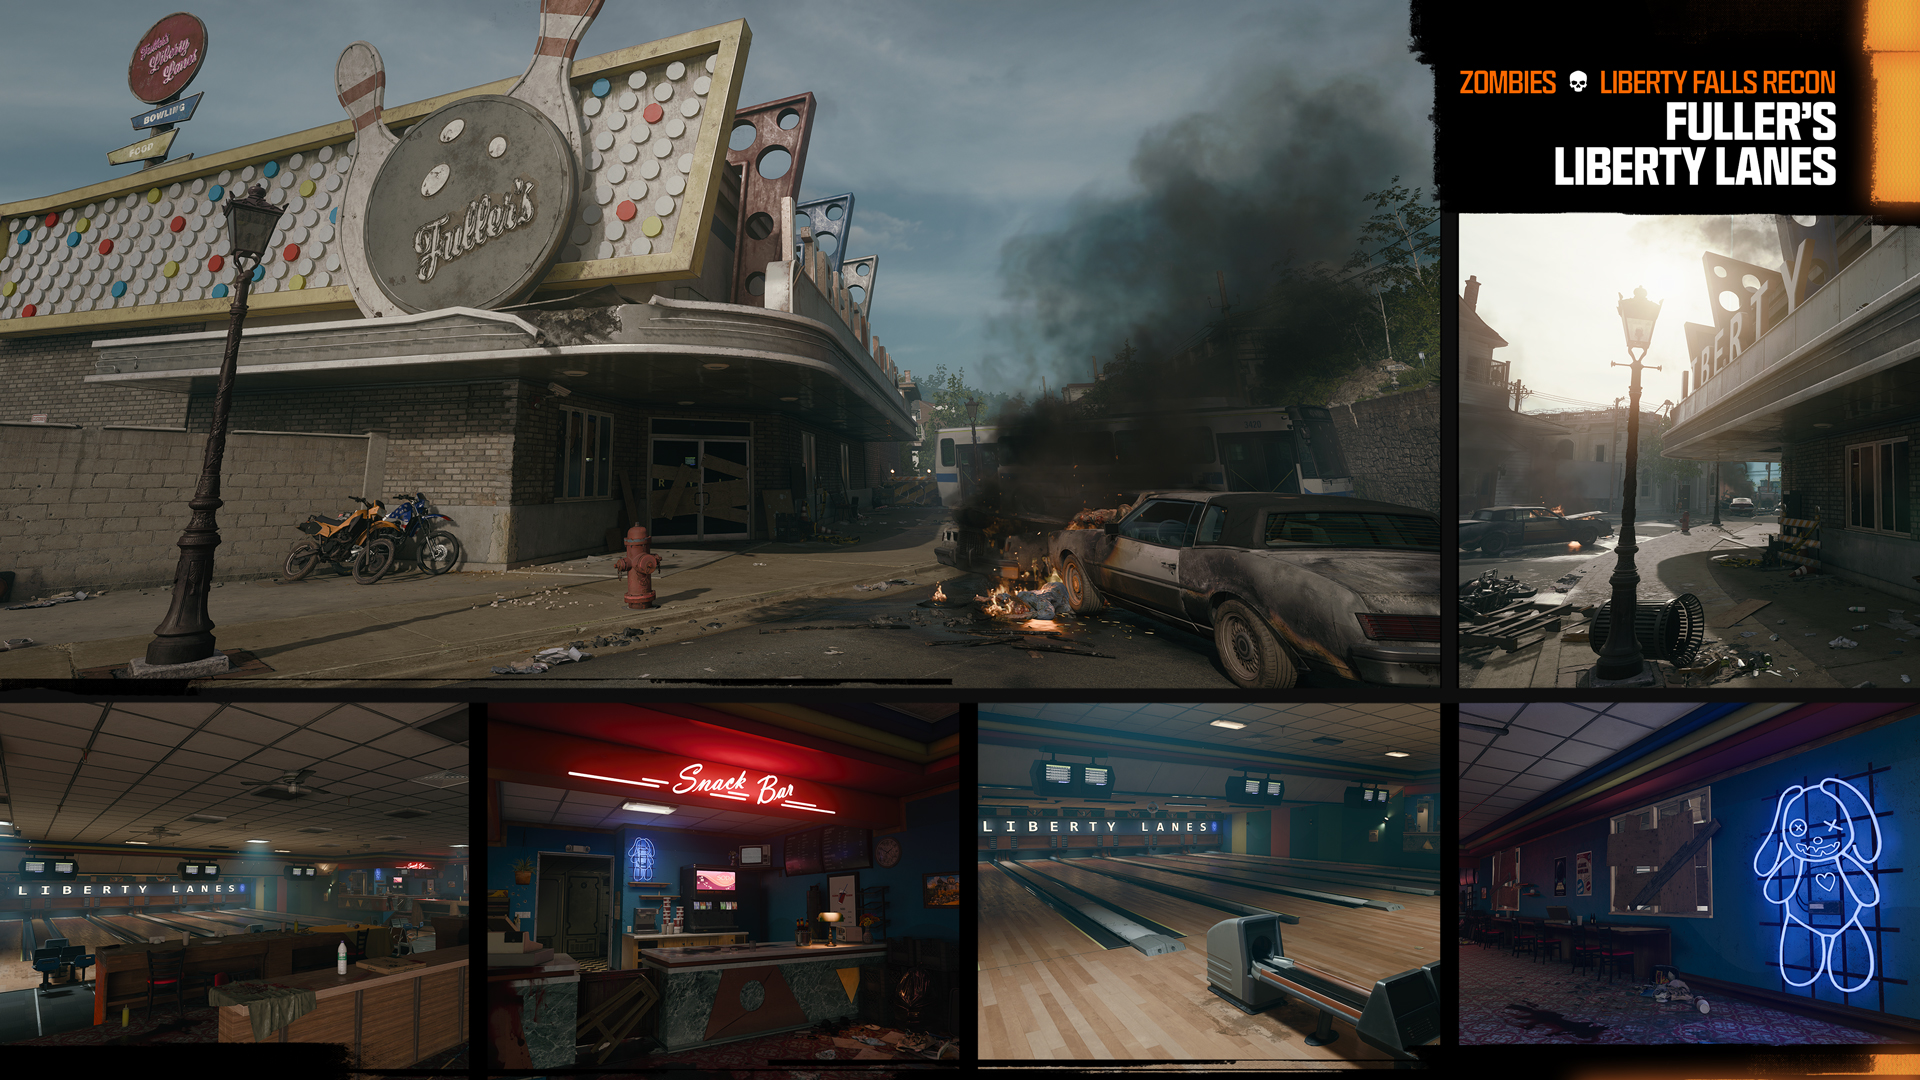
Fuller’s Liberty Lanes
An old-fashioned bowling alley comprised of a snack bar and small arcade has been overrun with the undead. The lanes themselves seem to be just wide enough to herd larger zombie hordes without getting trapped and ripped apart… but looks can be deceiving.
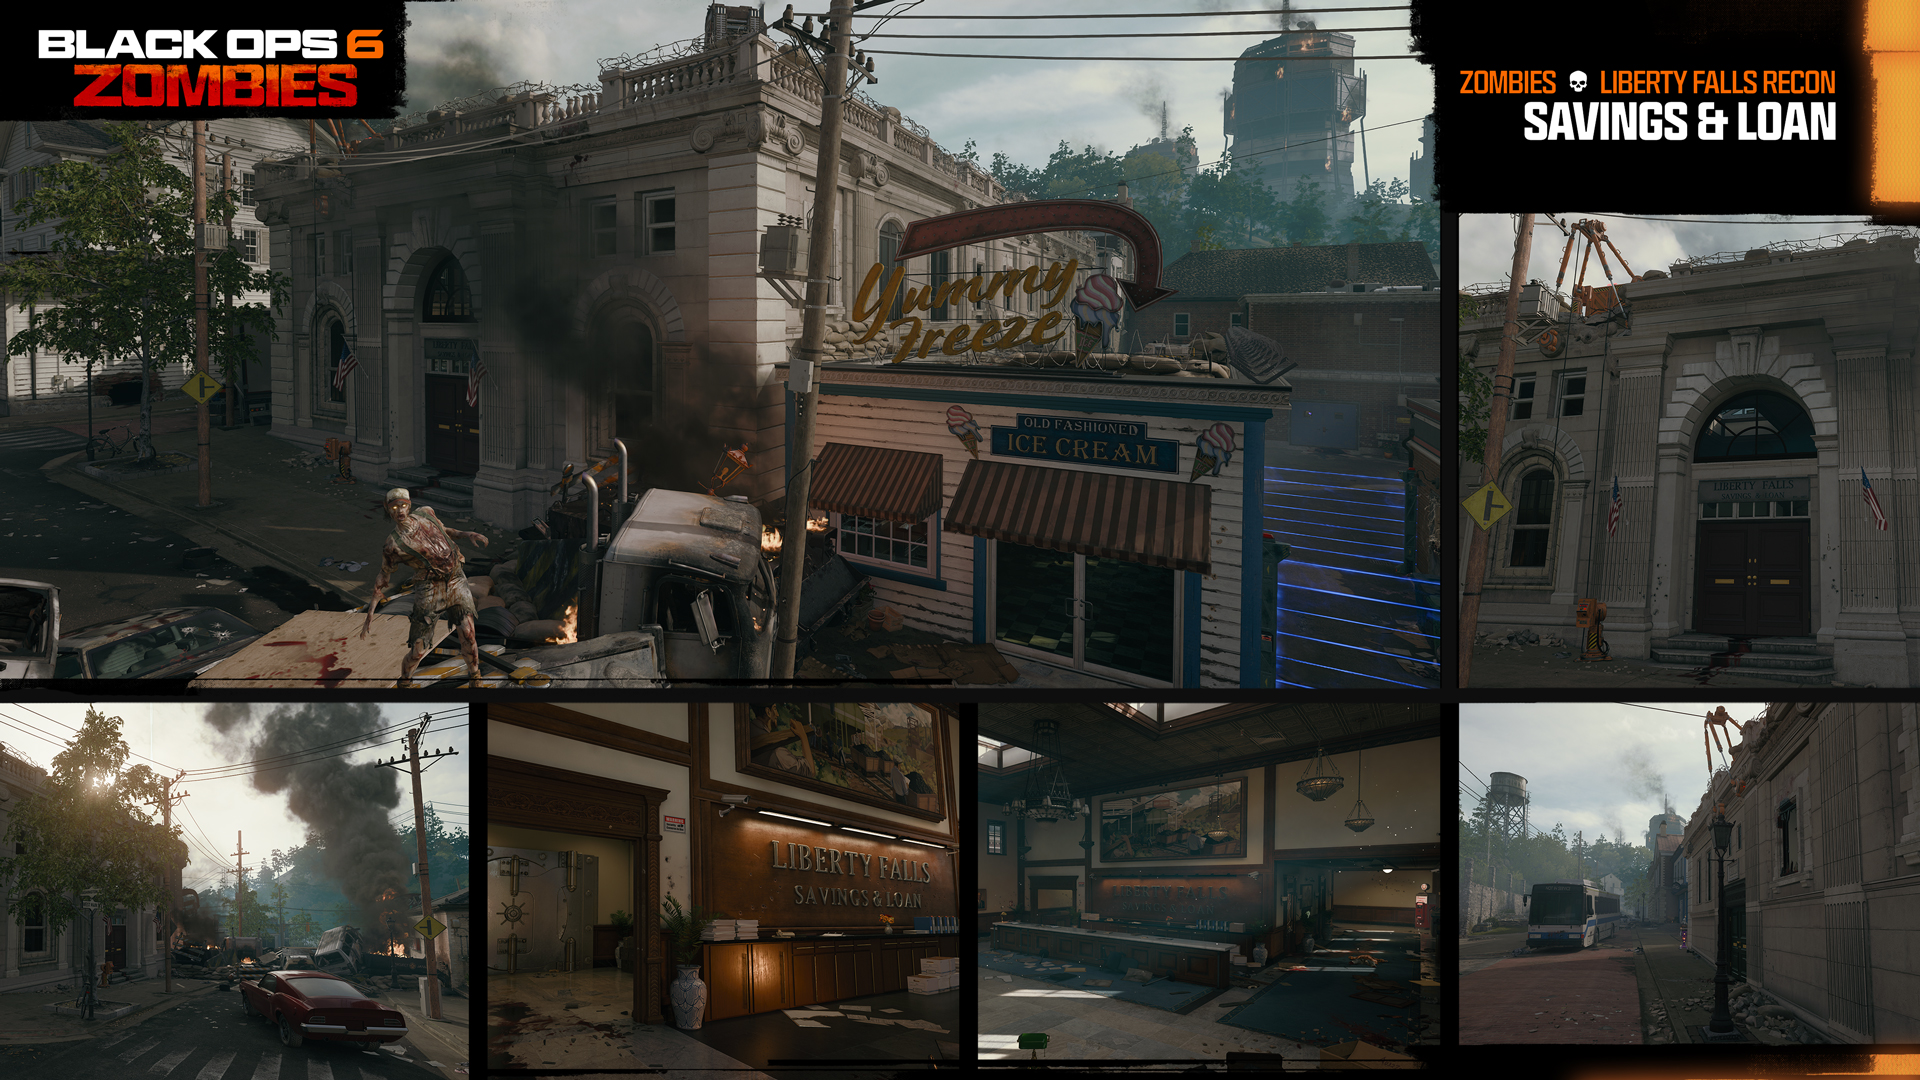
Savings & Loan
The Bank of Liberty Falls is a grand stone edifice and seems to have been well barricaded before the baying hordes overran the place. That’s not to say this a safe place to visit, but it’s centrally located with fine marbled floors, only somewhat tarnished by the wreckage, strewn debris, and unpleasant fluids.
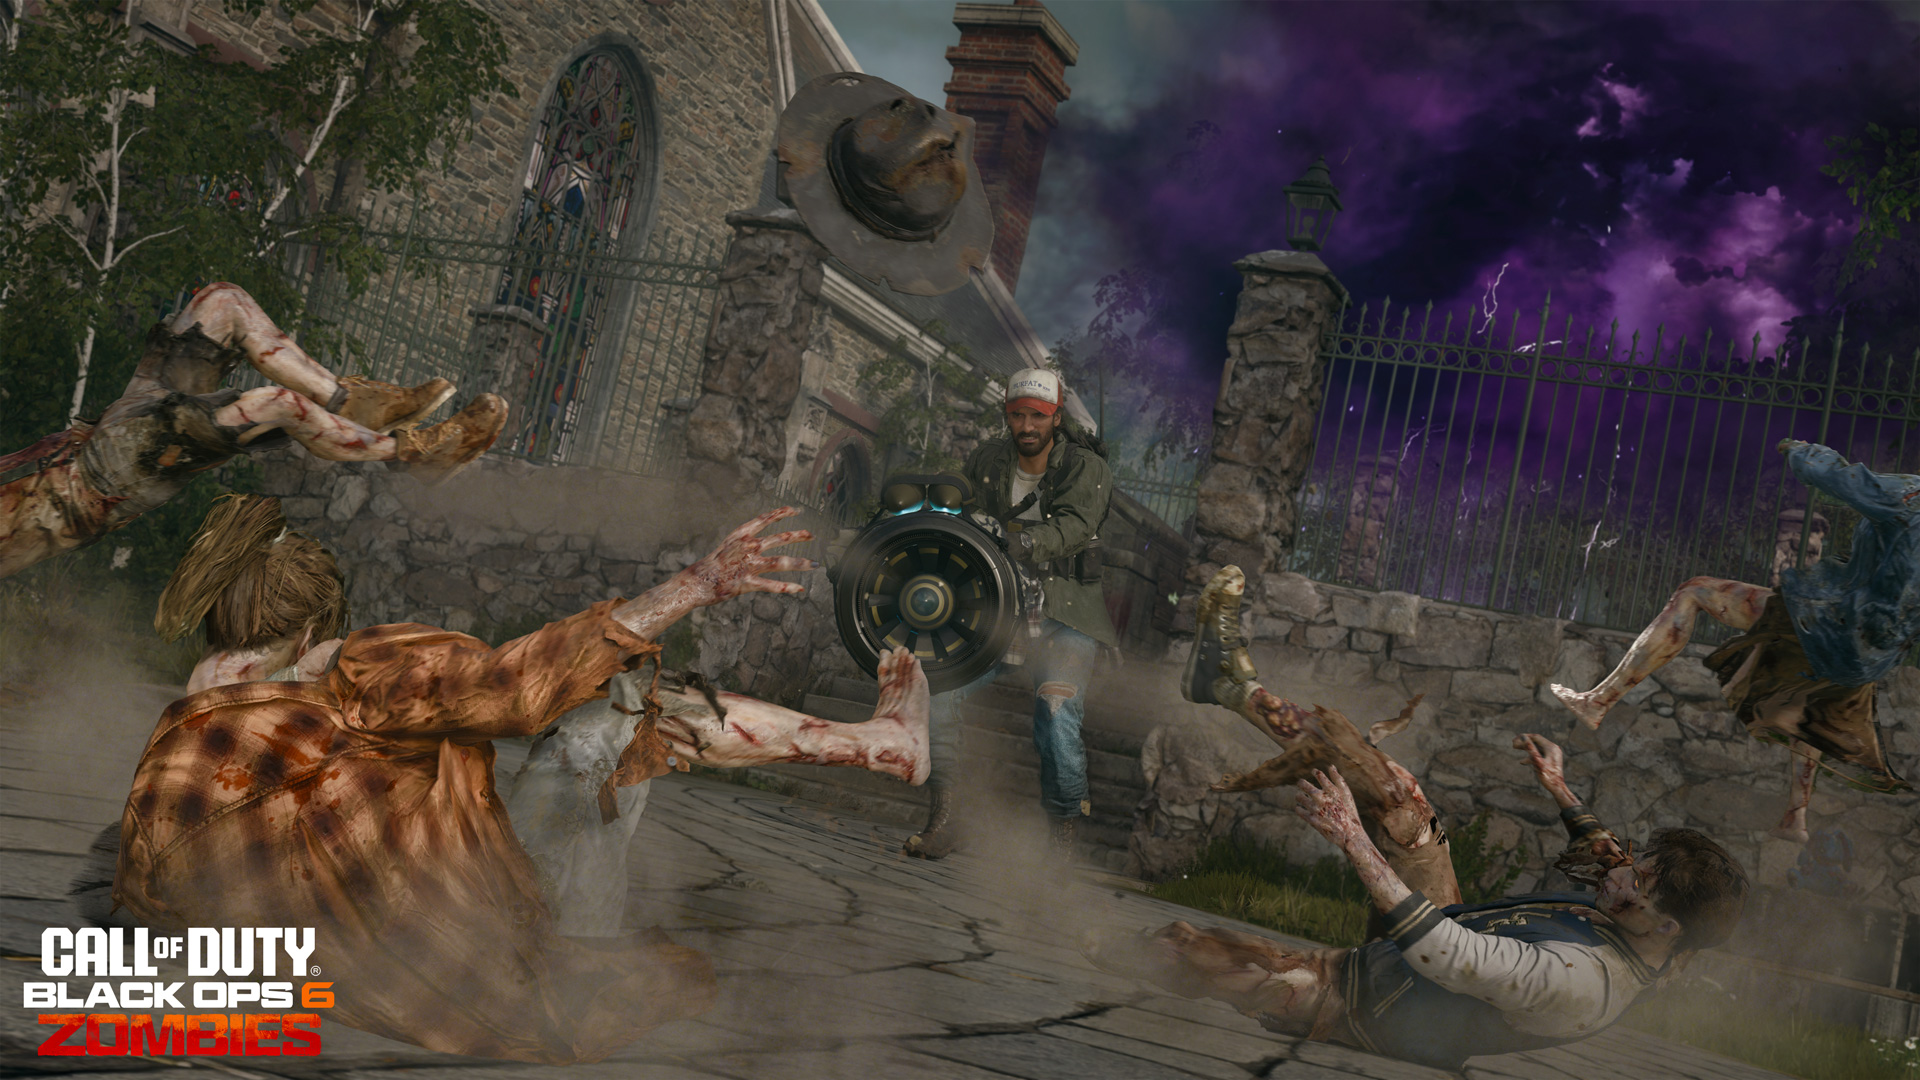
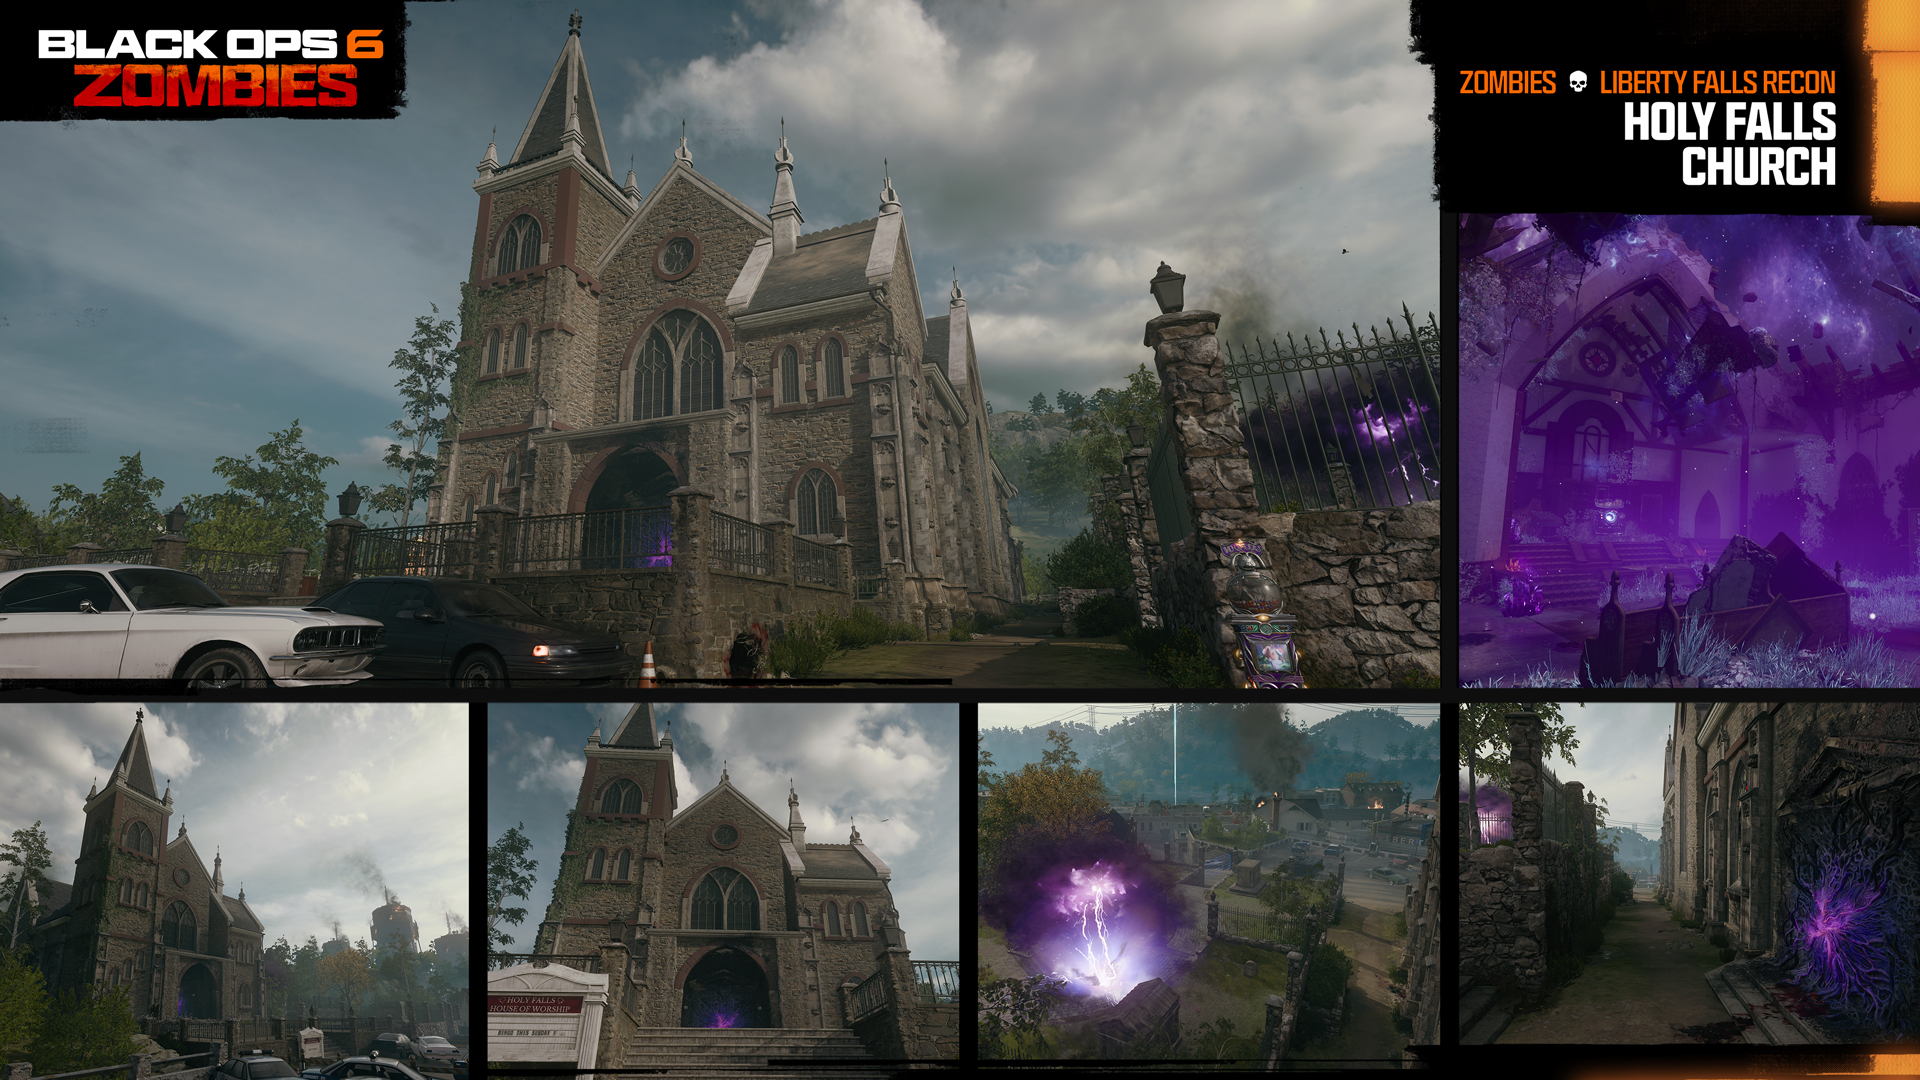
Holy Falls Church
This neo-gothic house of worship becomes more terrifying the further inside you investigate it. Placed on a plateau at the highest point in town, a dimensional anomaly seems to have fully enveloped the interior.
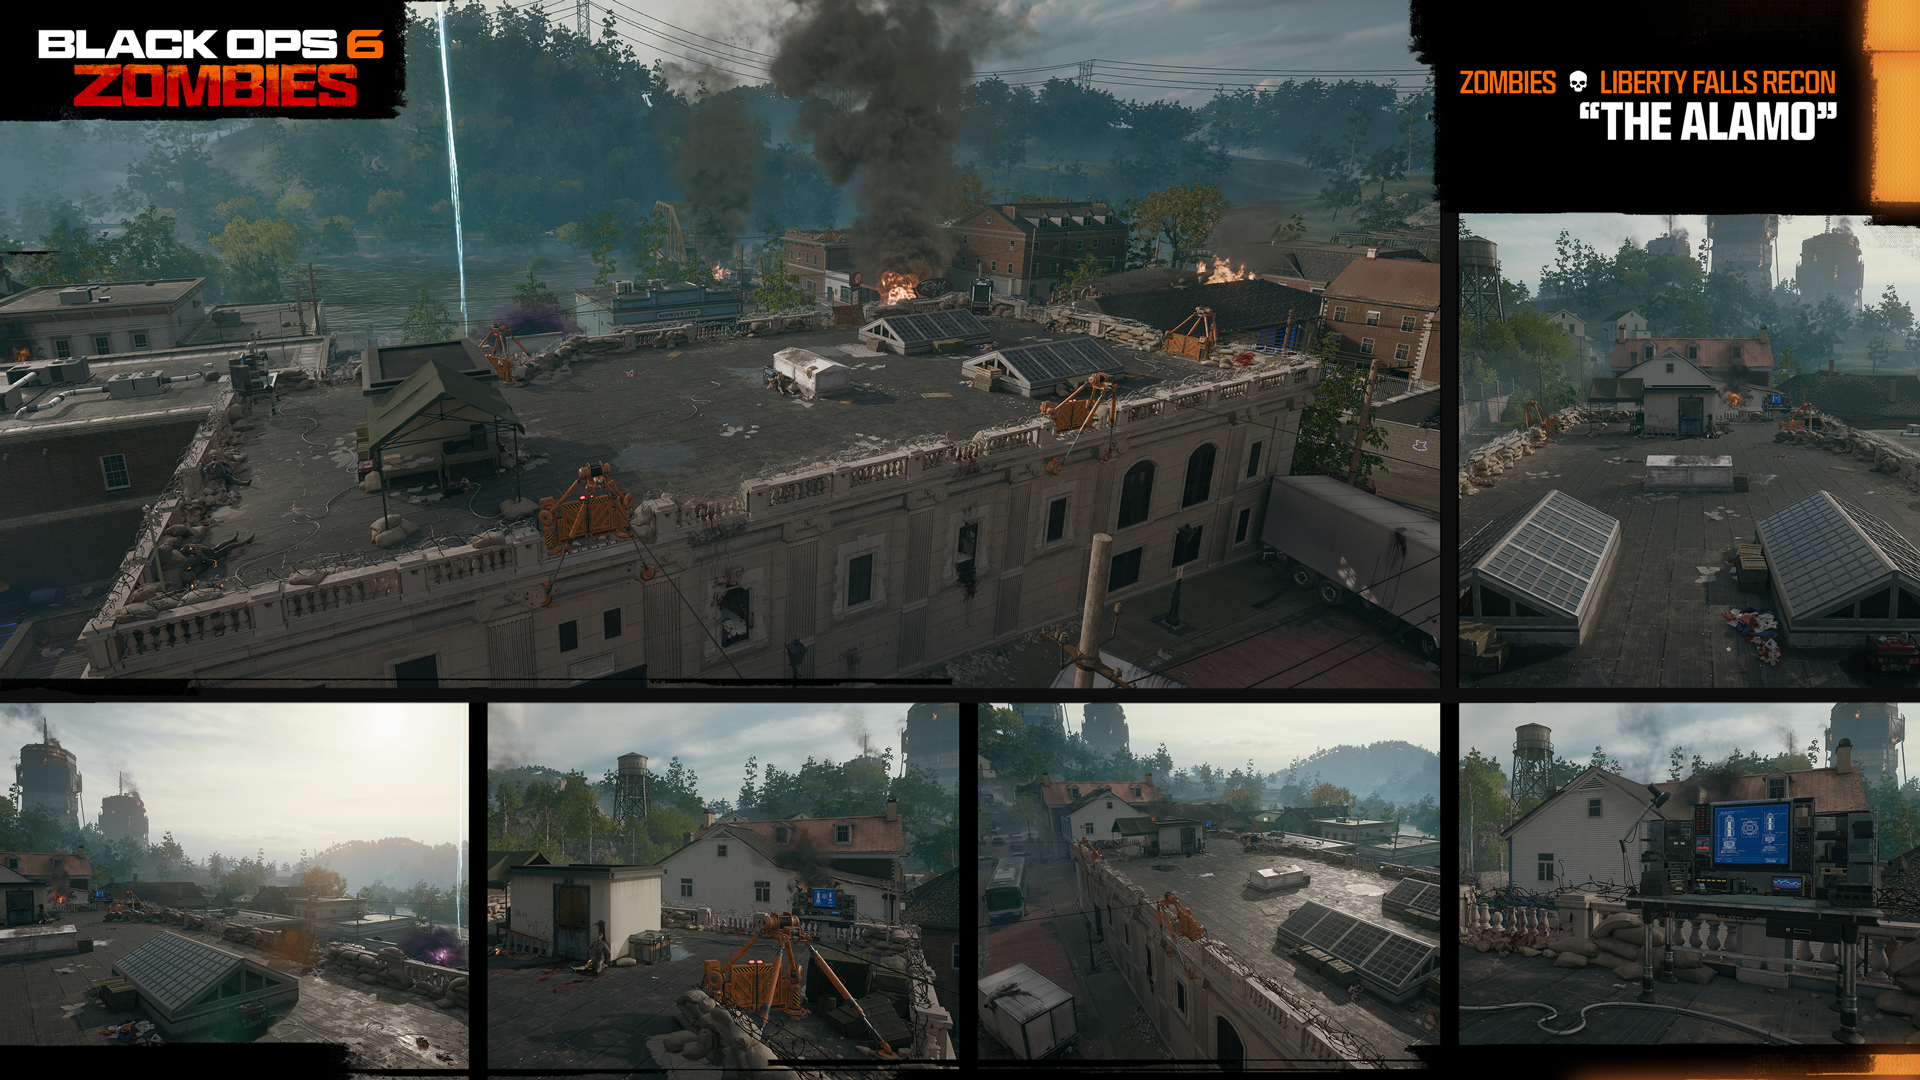
“The Alamo”
Judging by the sandbags, razor wire and other defenses, the bank’s rooftop is where the last surviving members of the Project Janus response teams made their last stand. You’ll find everything you need here….
Augments Overview
Equip Augments to your Perk-A-Colas, Ammo Mods and Field Upgrades to modify their performance.
Recap: Augments are unlockable gameplay advantages you can apply to every Perk-a-Cola, Ammo Mod, and Field Upgrade in the game, and provide a rich and innovative customization experience, allowing you to invest into research between matches. Learn more about Augments here.
- There are 108 Augments available to unlock and equip at the game’s launch, divided as follows:
- Perk-a-Colas: Eight, each with six Augments (48).
- Ammo Mods: Five, each with six Augments (30).
- Field Upgrades: Five, each with six Augments (30).
Researching and Choosing Augments
Augment Research: The key to unlocking the full potential of your loadouts is Augment Research. This unlocks at Player Level 11.
Once you research and unlock individual Augments, they can be chosen before the start of a match for each individual Perk, Ammo Mod, or Field Upgrade. To start researching an Augment, simply select which item you’d like to research in the menu and start earning XP in-game to make progress toward unlocking the Augment.
- Each item has two available Augment slots: one for a Major, and one for a Minor Augment.
- Expect three Major Augments to choose from, per item. A Major Augment offers a substantial advantage to the behavior of the item, usually during use.
- Expect three Minor Augments to choose from, per item. A Minor Augment offers a limited advantage to the item, usually during use.
The depth of the Augments customization experience becomes apparent as you learn the different effects of each Augment, and how they stack and affect other upgrades across the game. This subsequently allows you to customize your Augments for your style of play, whether solo or squad-based.
- If you’ve played a particular role in your squad – as a healer for example – you may already have a good idea of which Augments you should search for, unlock, and employ along with other related power-ups to optimize your team’s dynamics and survivability!
Perk-A-Colas (8) and Augments (48)
Currency to access Perk-a-Colas: Essence
Recap: If you’re after a tasty beverage that also has the benefit of granting abilities to aid you and your teammates’ survival chances, then get ready to hunt down your preferred vending machines, as Perk-a-Colas are back and with more of a kick than ever: For Black Ops 6 Zombies, every Perk-a-Cola can comes with up to six Augment options to choose from (three Minor, three Major).
Perks are purchased in-game using Essence and have been designed to offer a wide variety of bonuses that suit your style of play, allowing you to choose the order and number you need. Each time you purchase a new Perk, the Essence cost increases, and your Perk collection – displayed along the bottom of your HUD – lasts as long as you do: If you’re downed, expect to lose Perks depending on how many you’ve obtained, and how long you’re downed for.
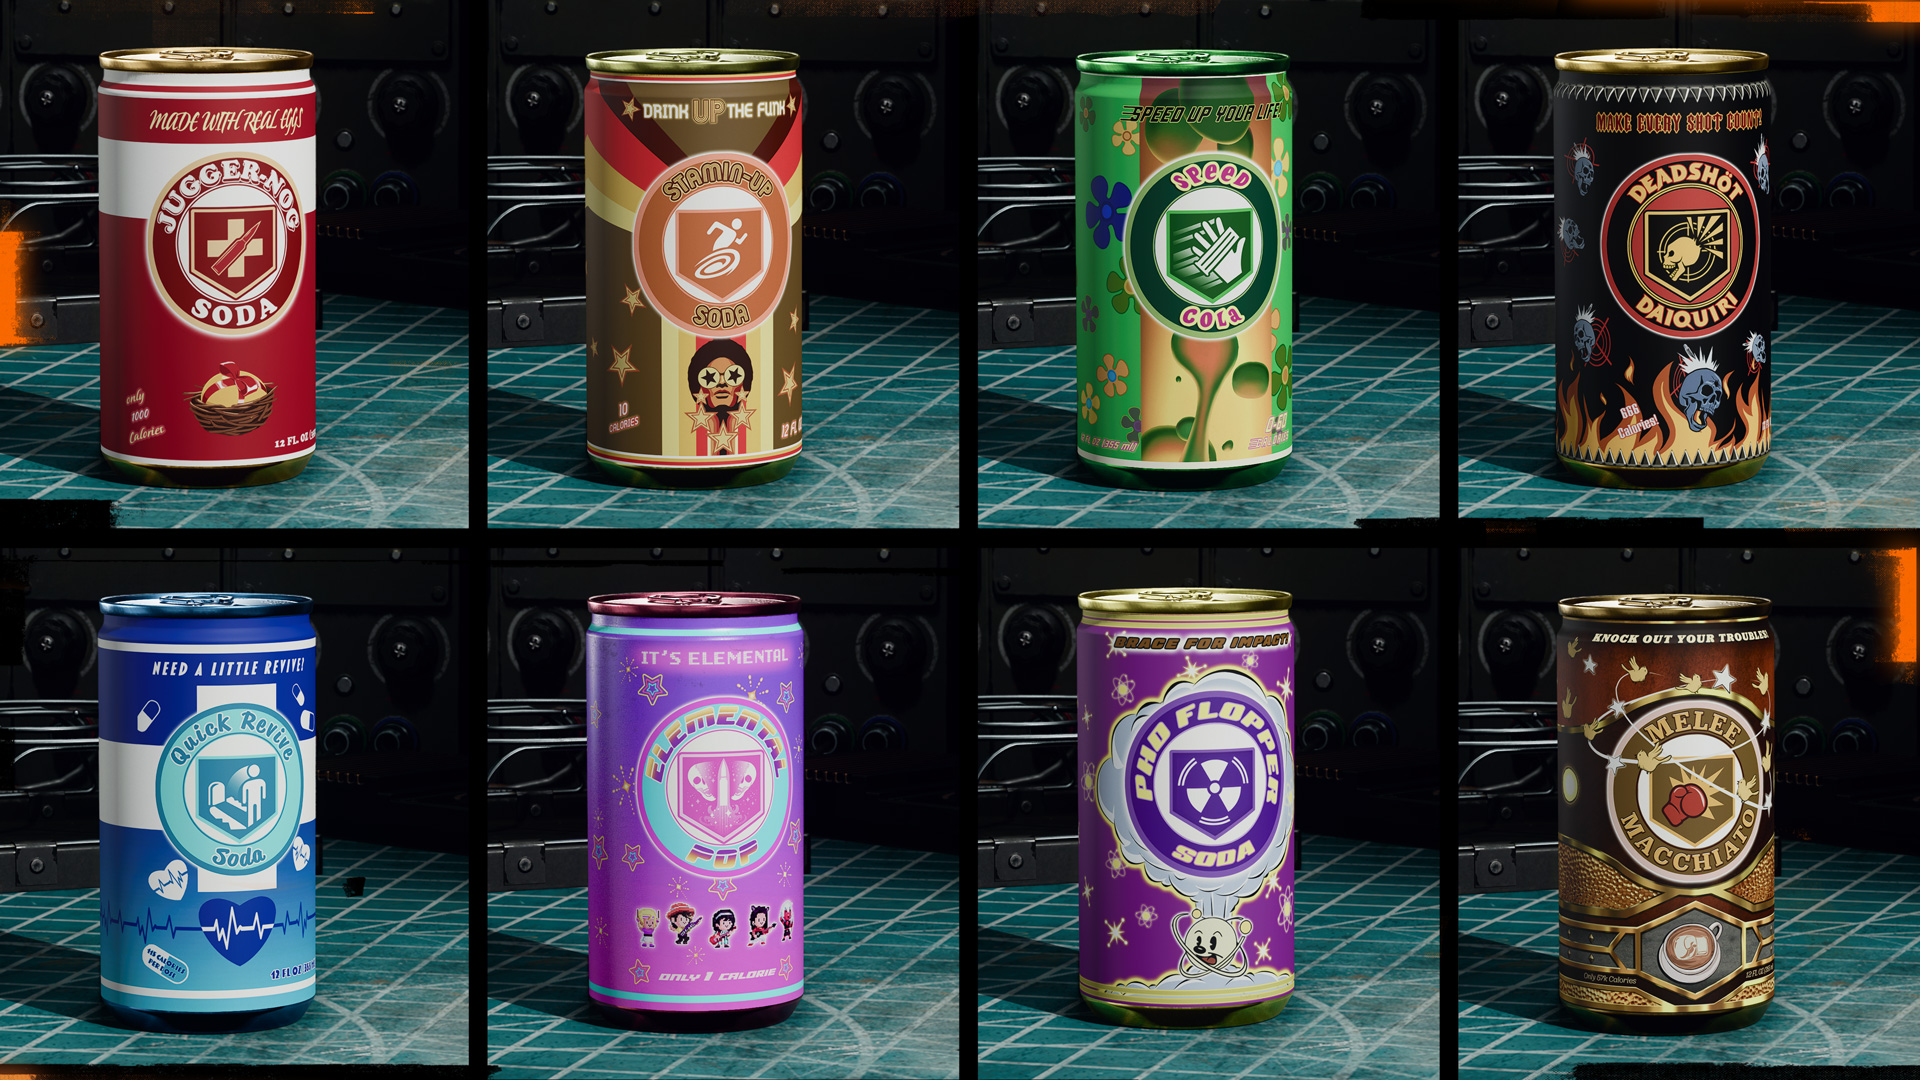
At launch, expect to access the following Perk Machines:
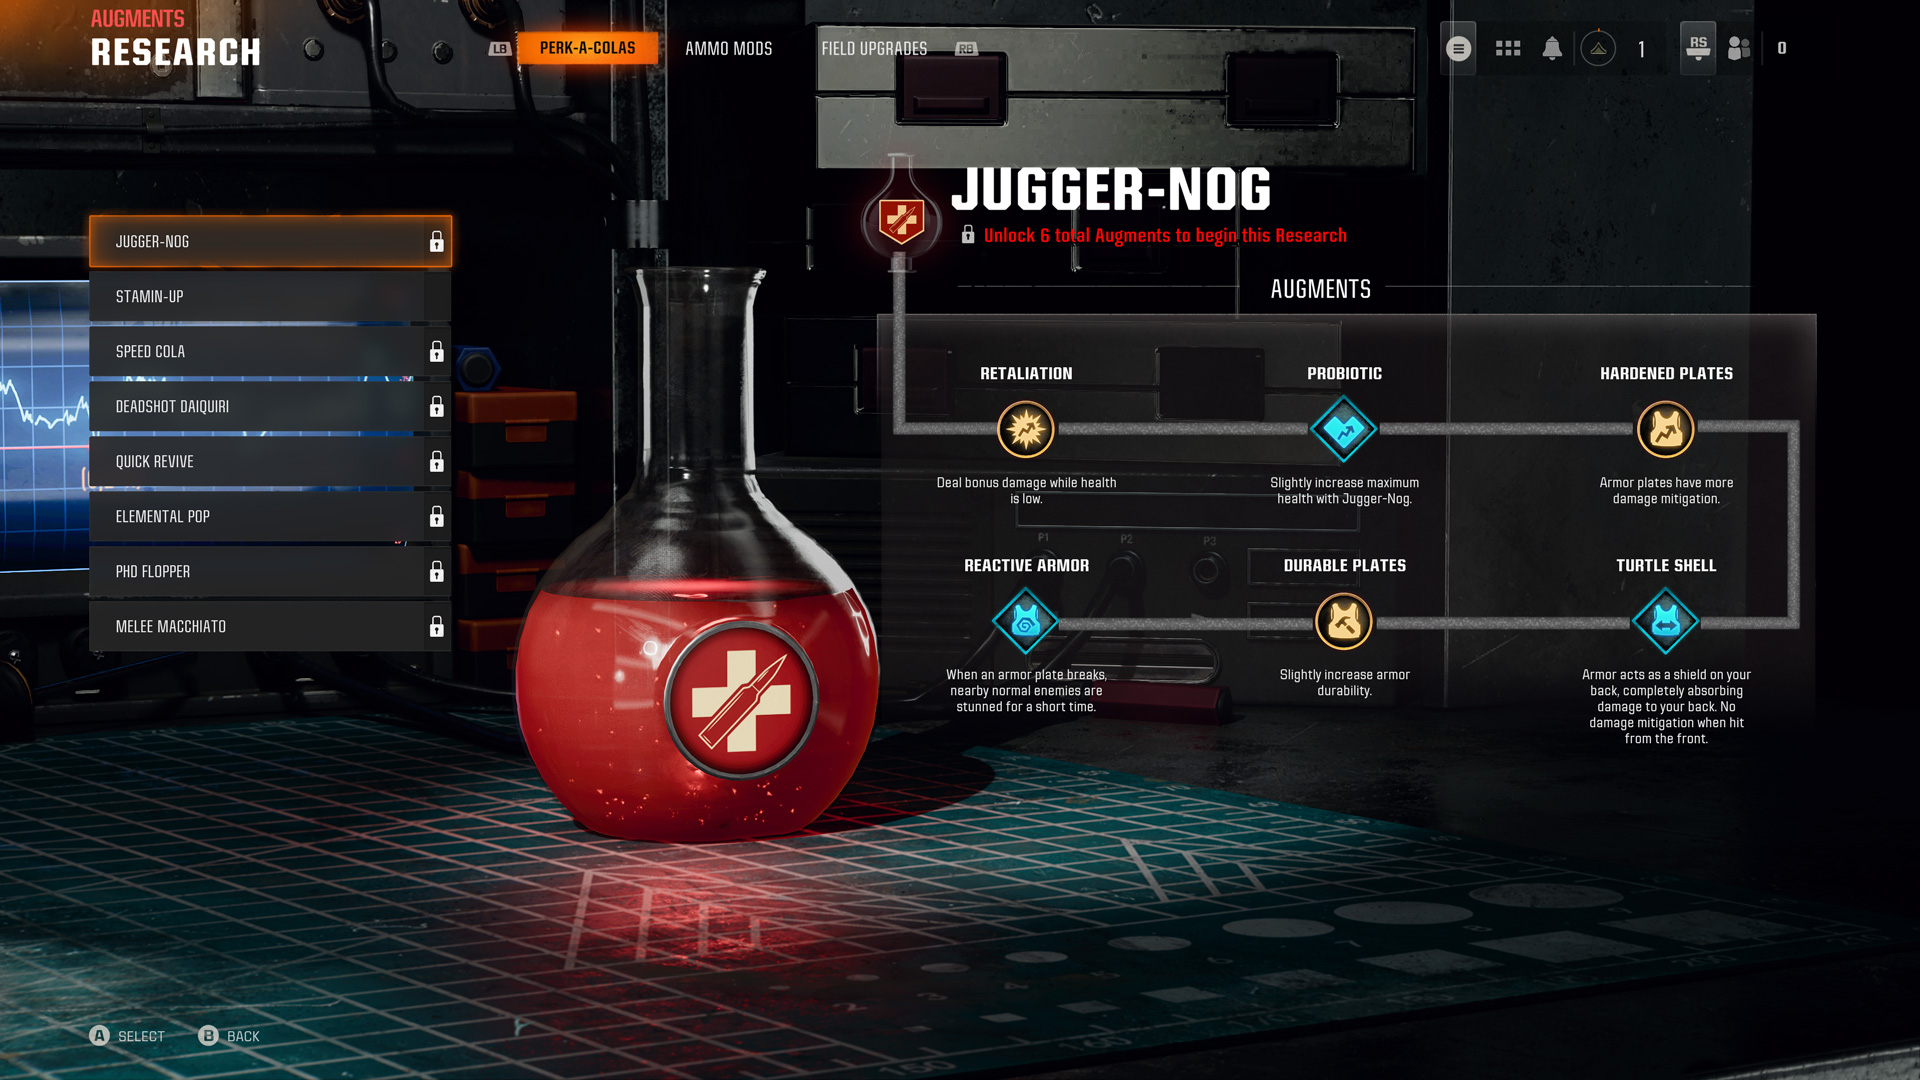
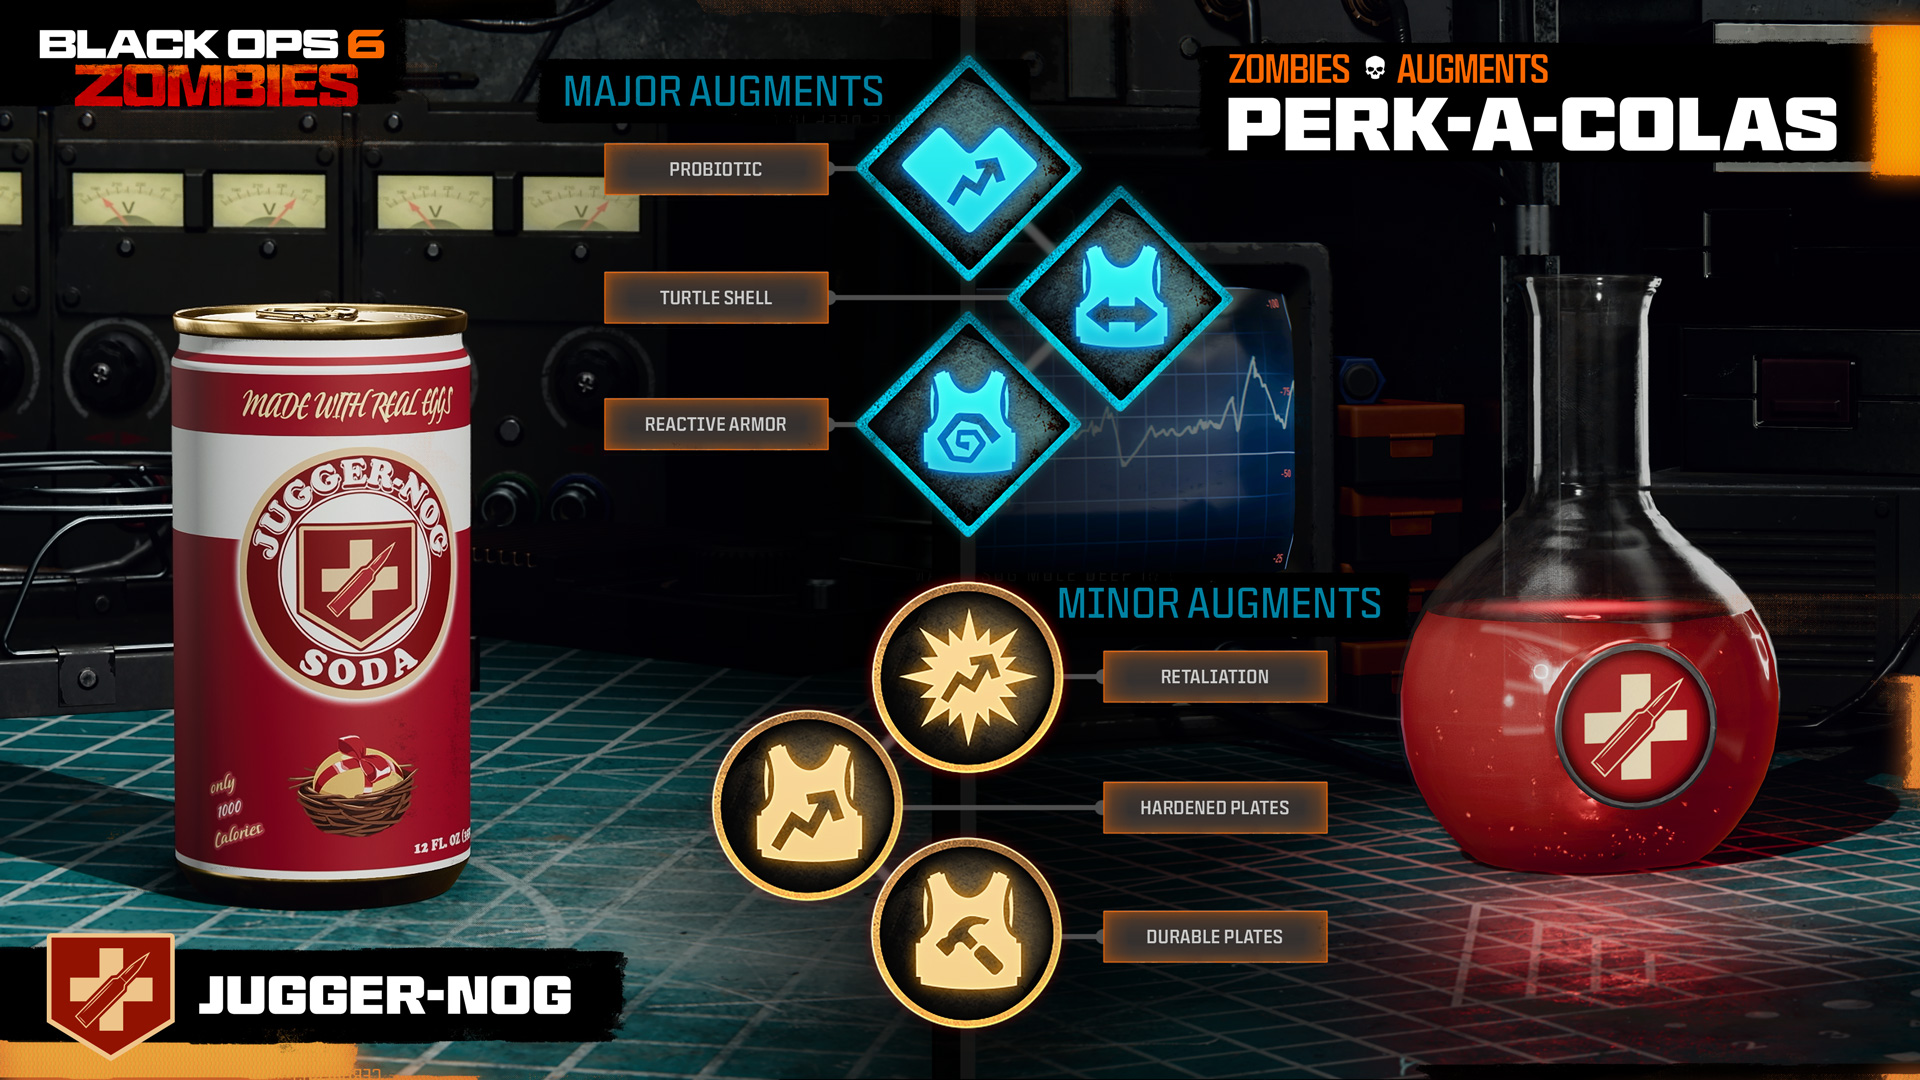
- Jugger-Nog: Increase maximum health by 100.
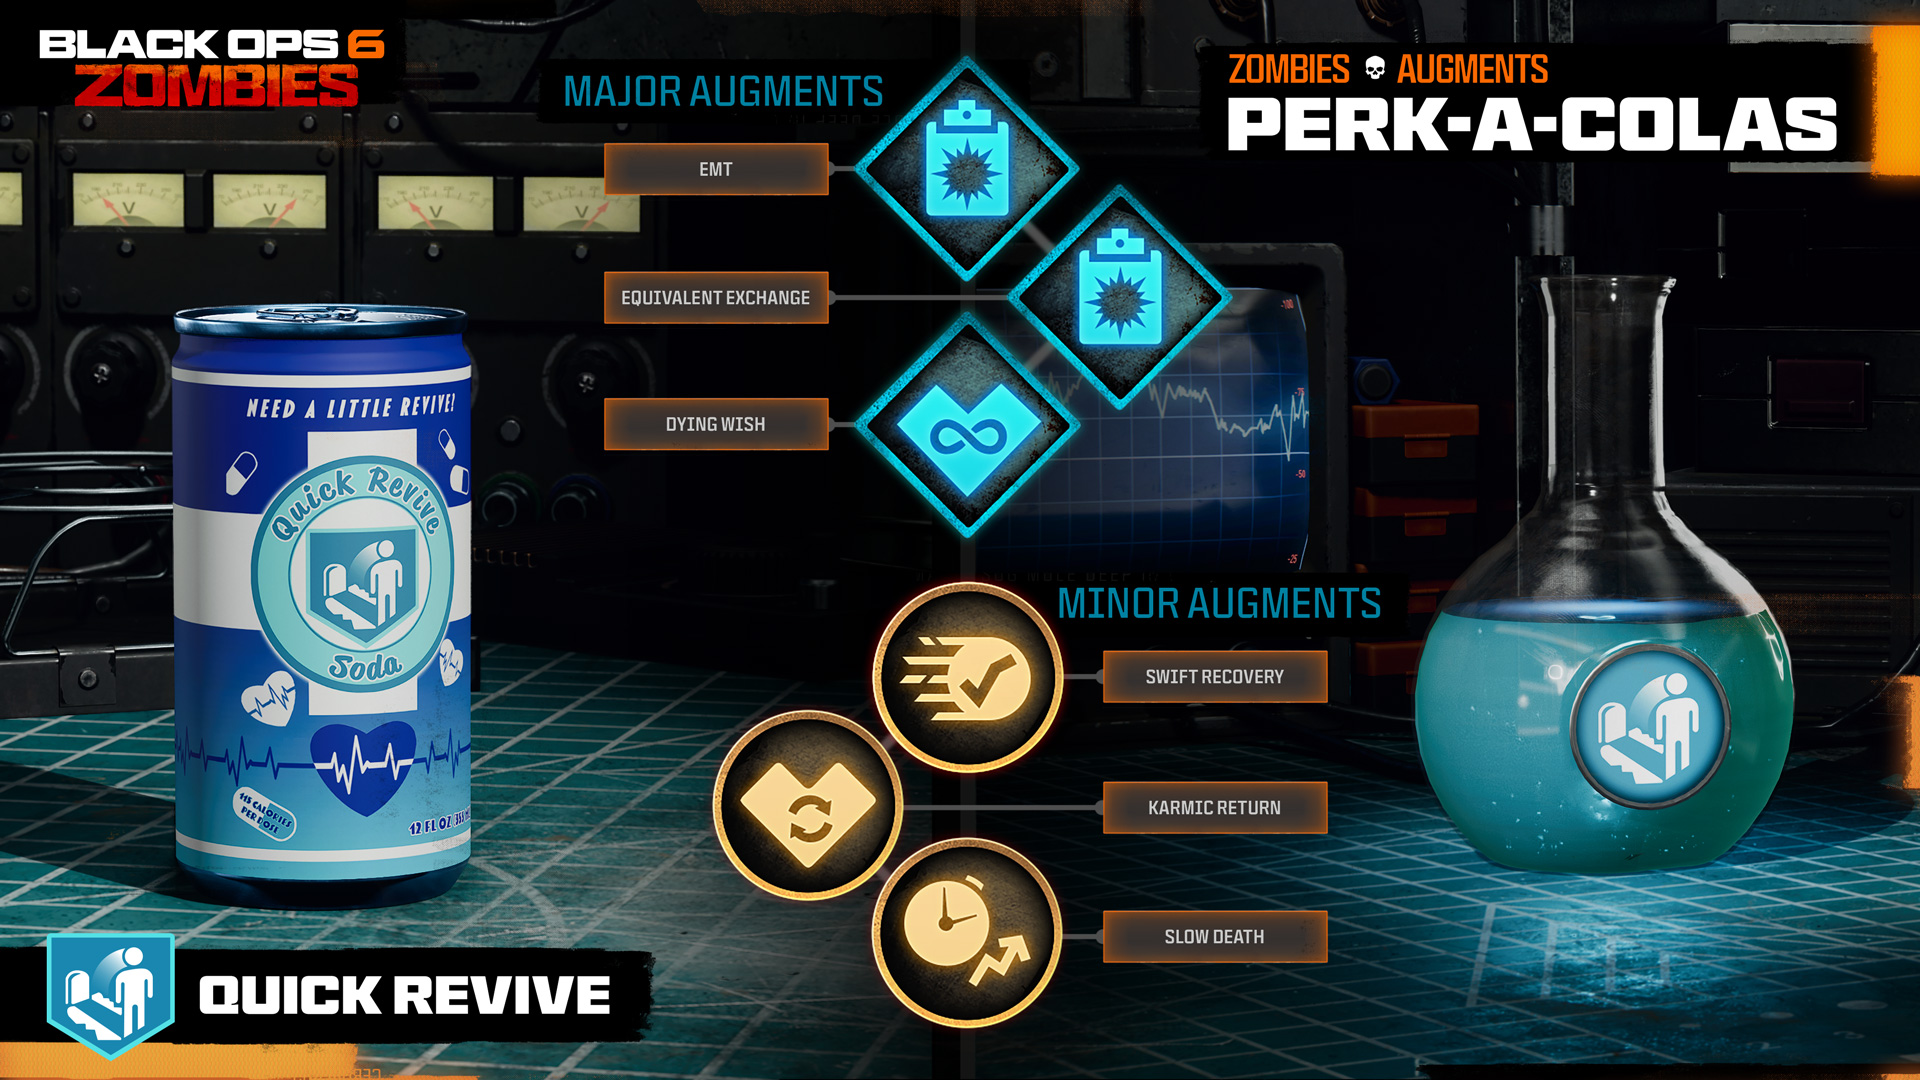
- Quick Revive: Reduce the health regen delay time by 50%. Reduce the time it takes to revive an ally by 50%.
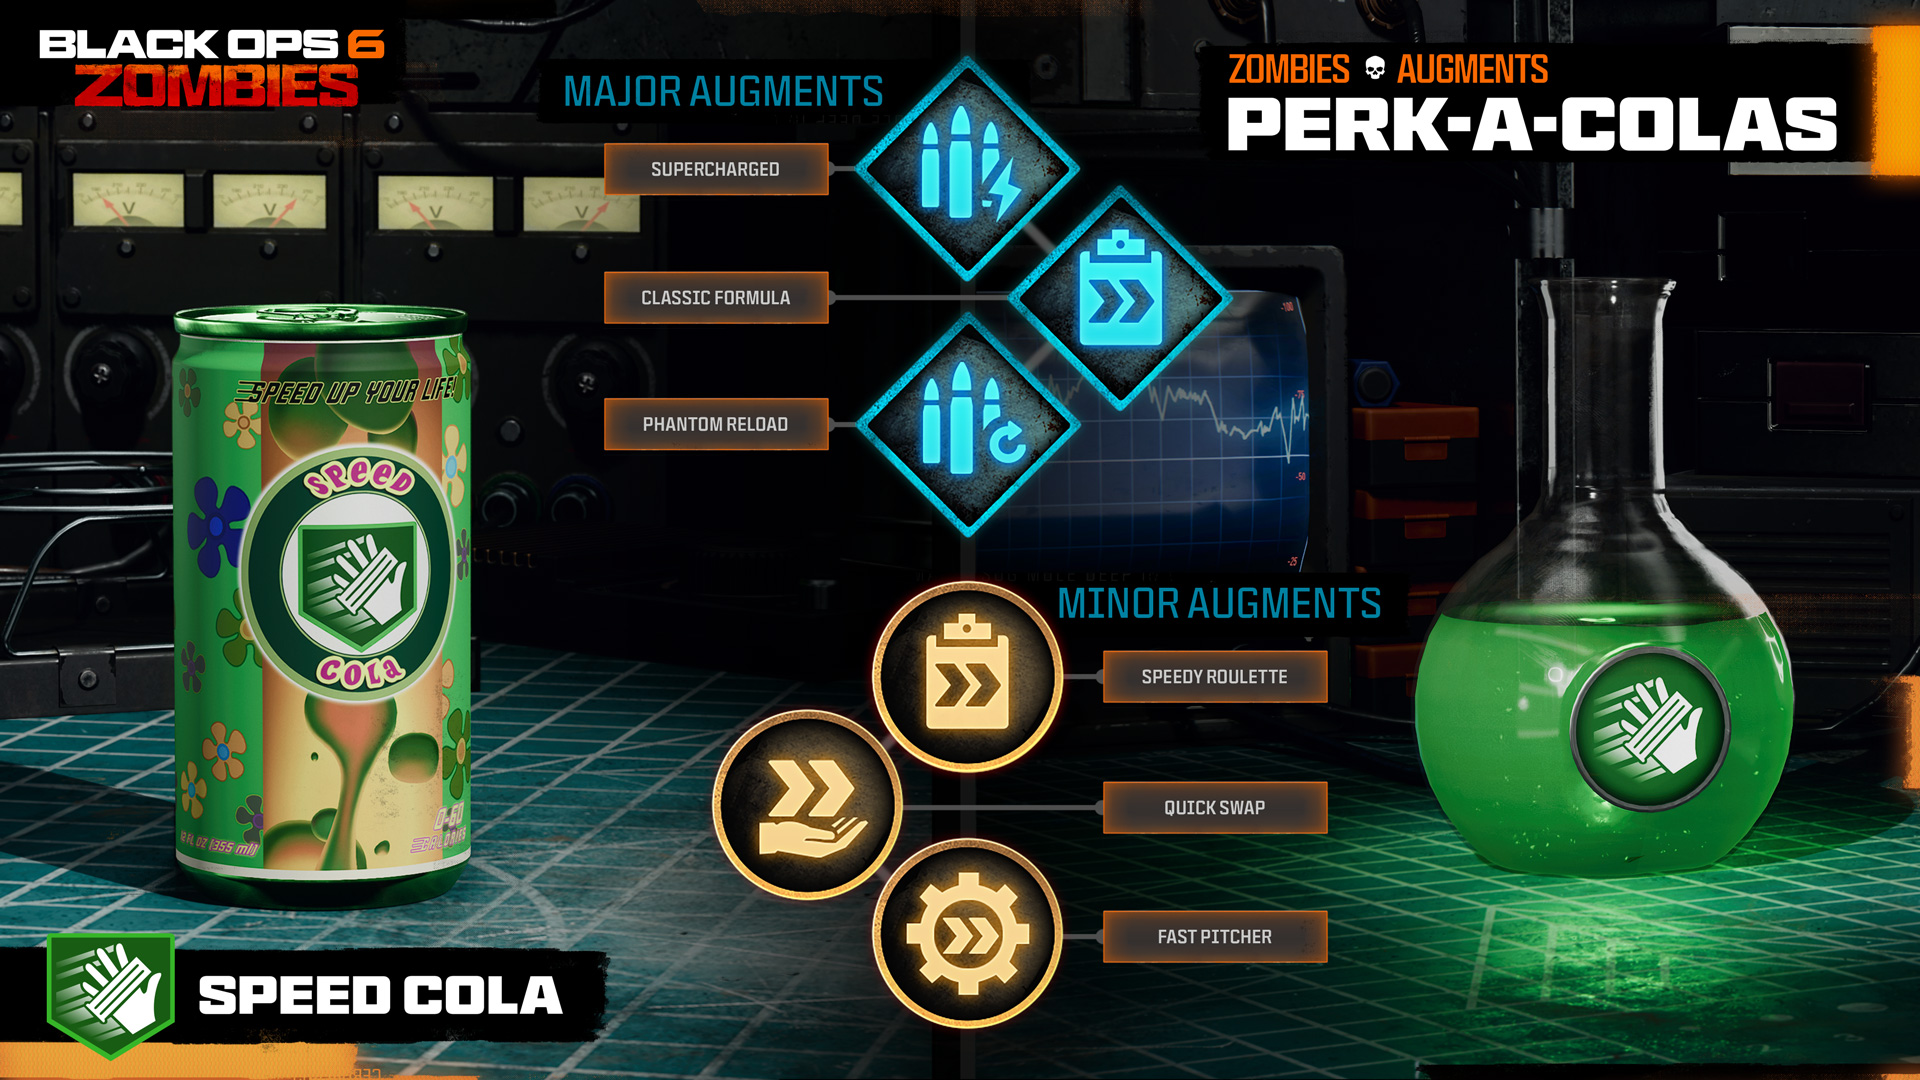
- Speed Cola: Increase reload and armor replating speed bonus by 30%.
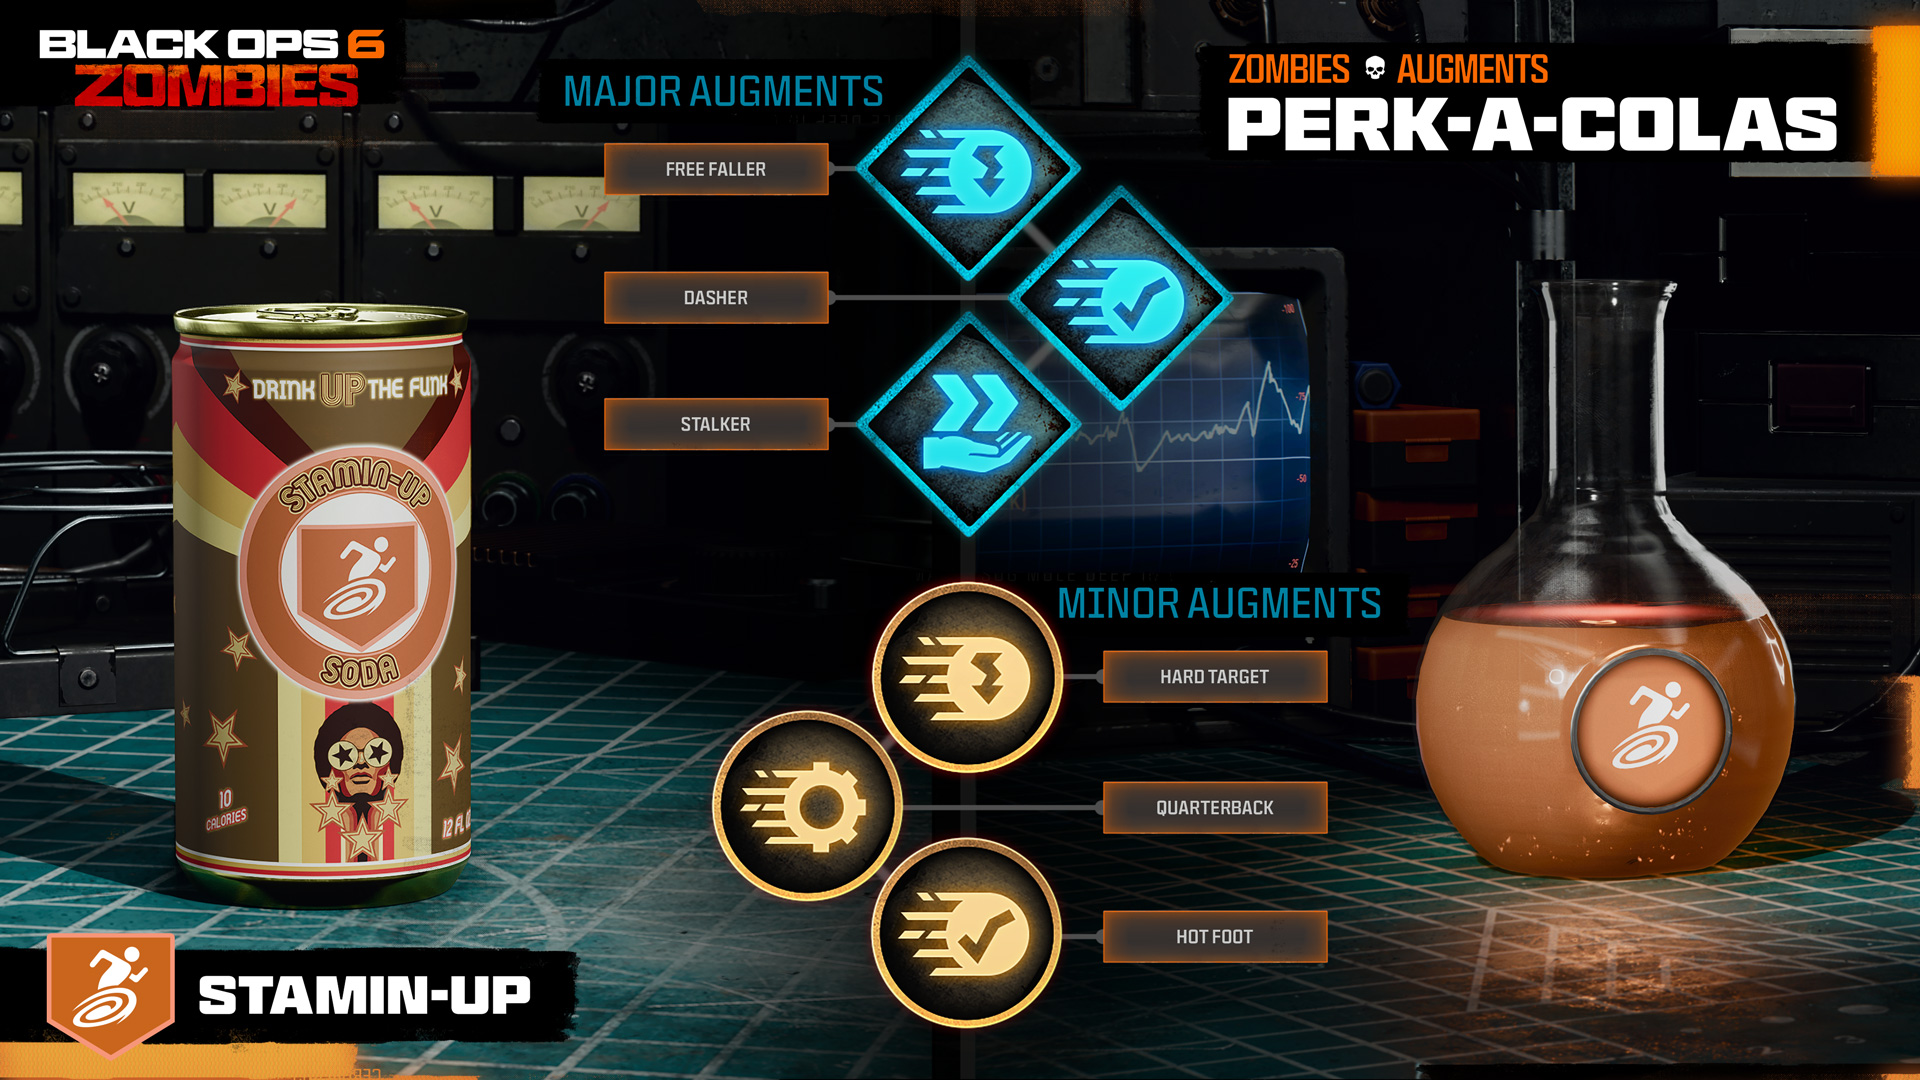
- Stamin-Up: Increase movement speed.
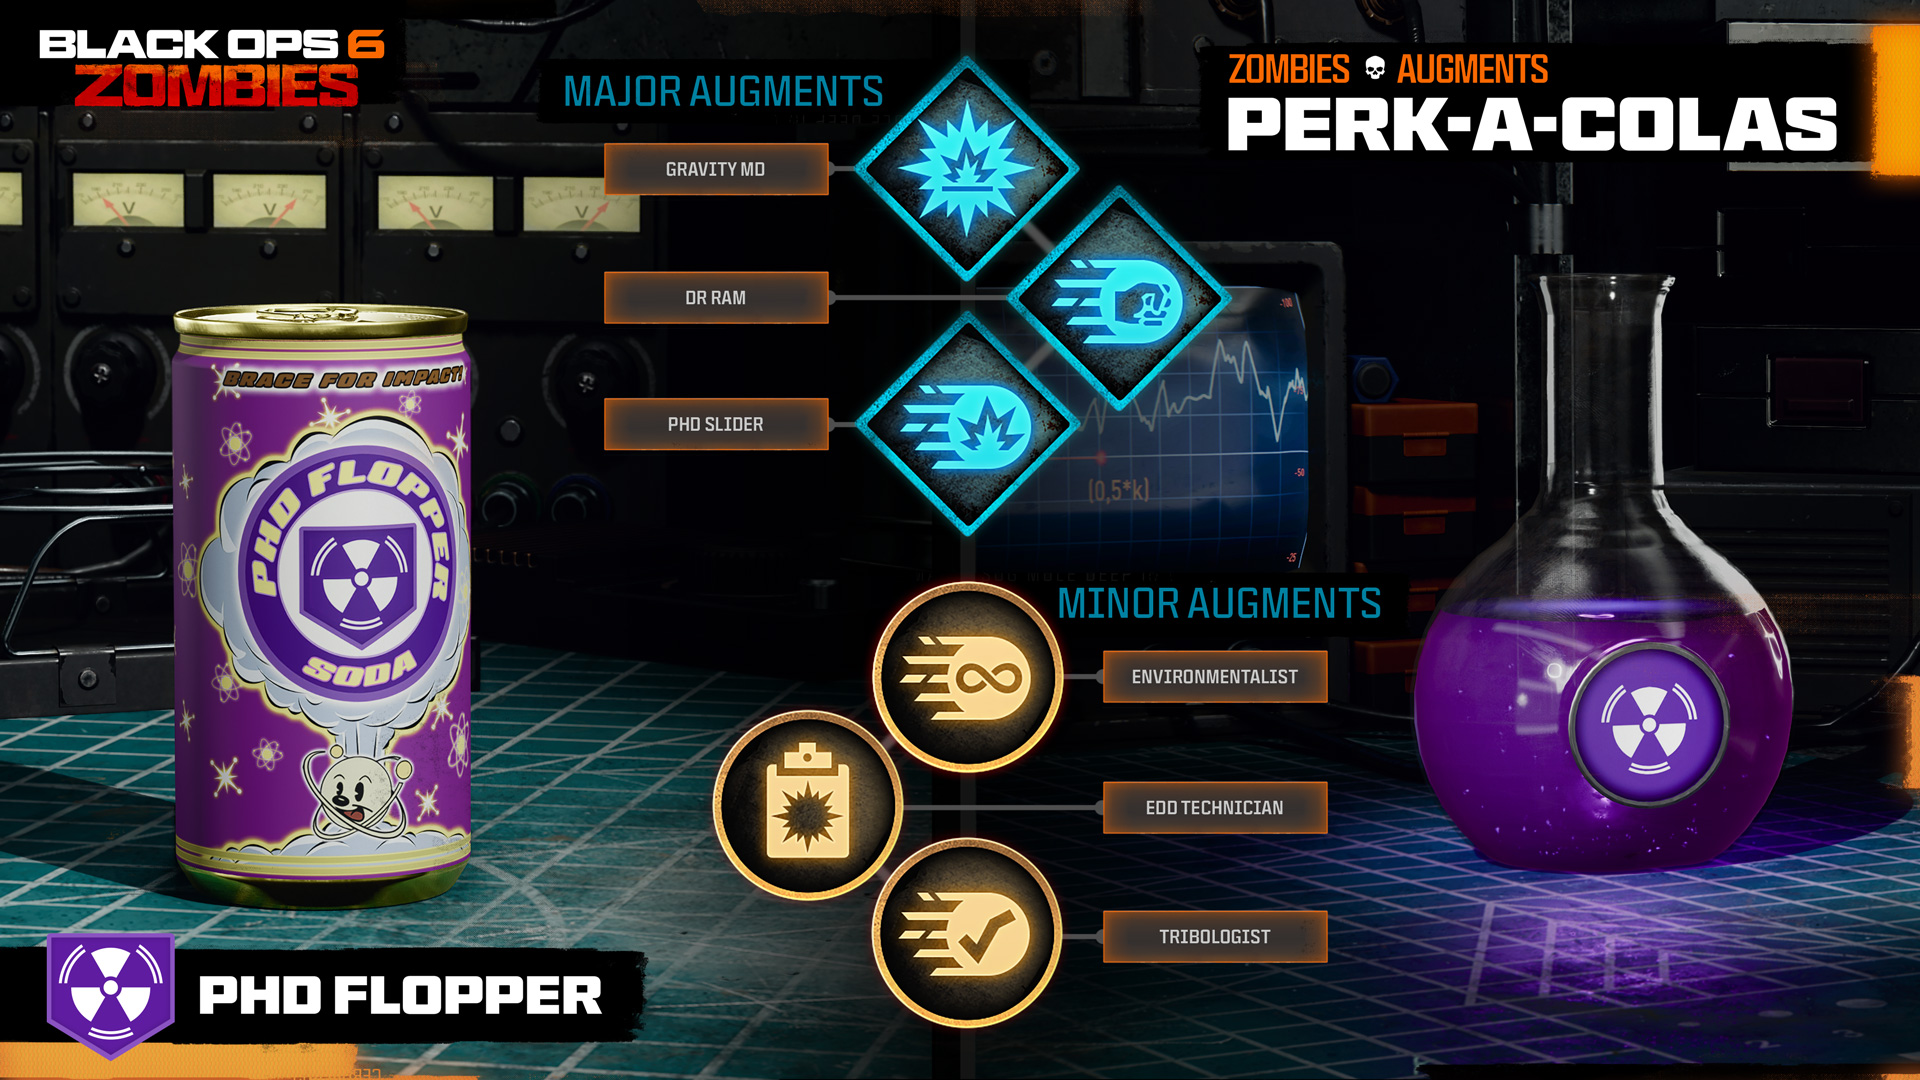
- PhD Flopper: Immunity to all self-inflicted damage and status effects. Dive to prone triggers an explosion, which increases the higher you fall. Immunity from fall damage while diving prone.
- Deadshot Daiquiri: Aiming down sight moves to enemy critical location. Increase critical damage to enemies.
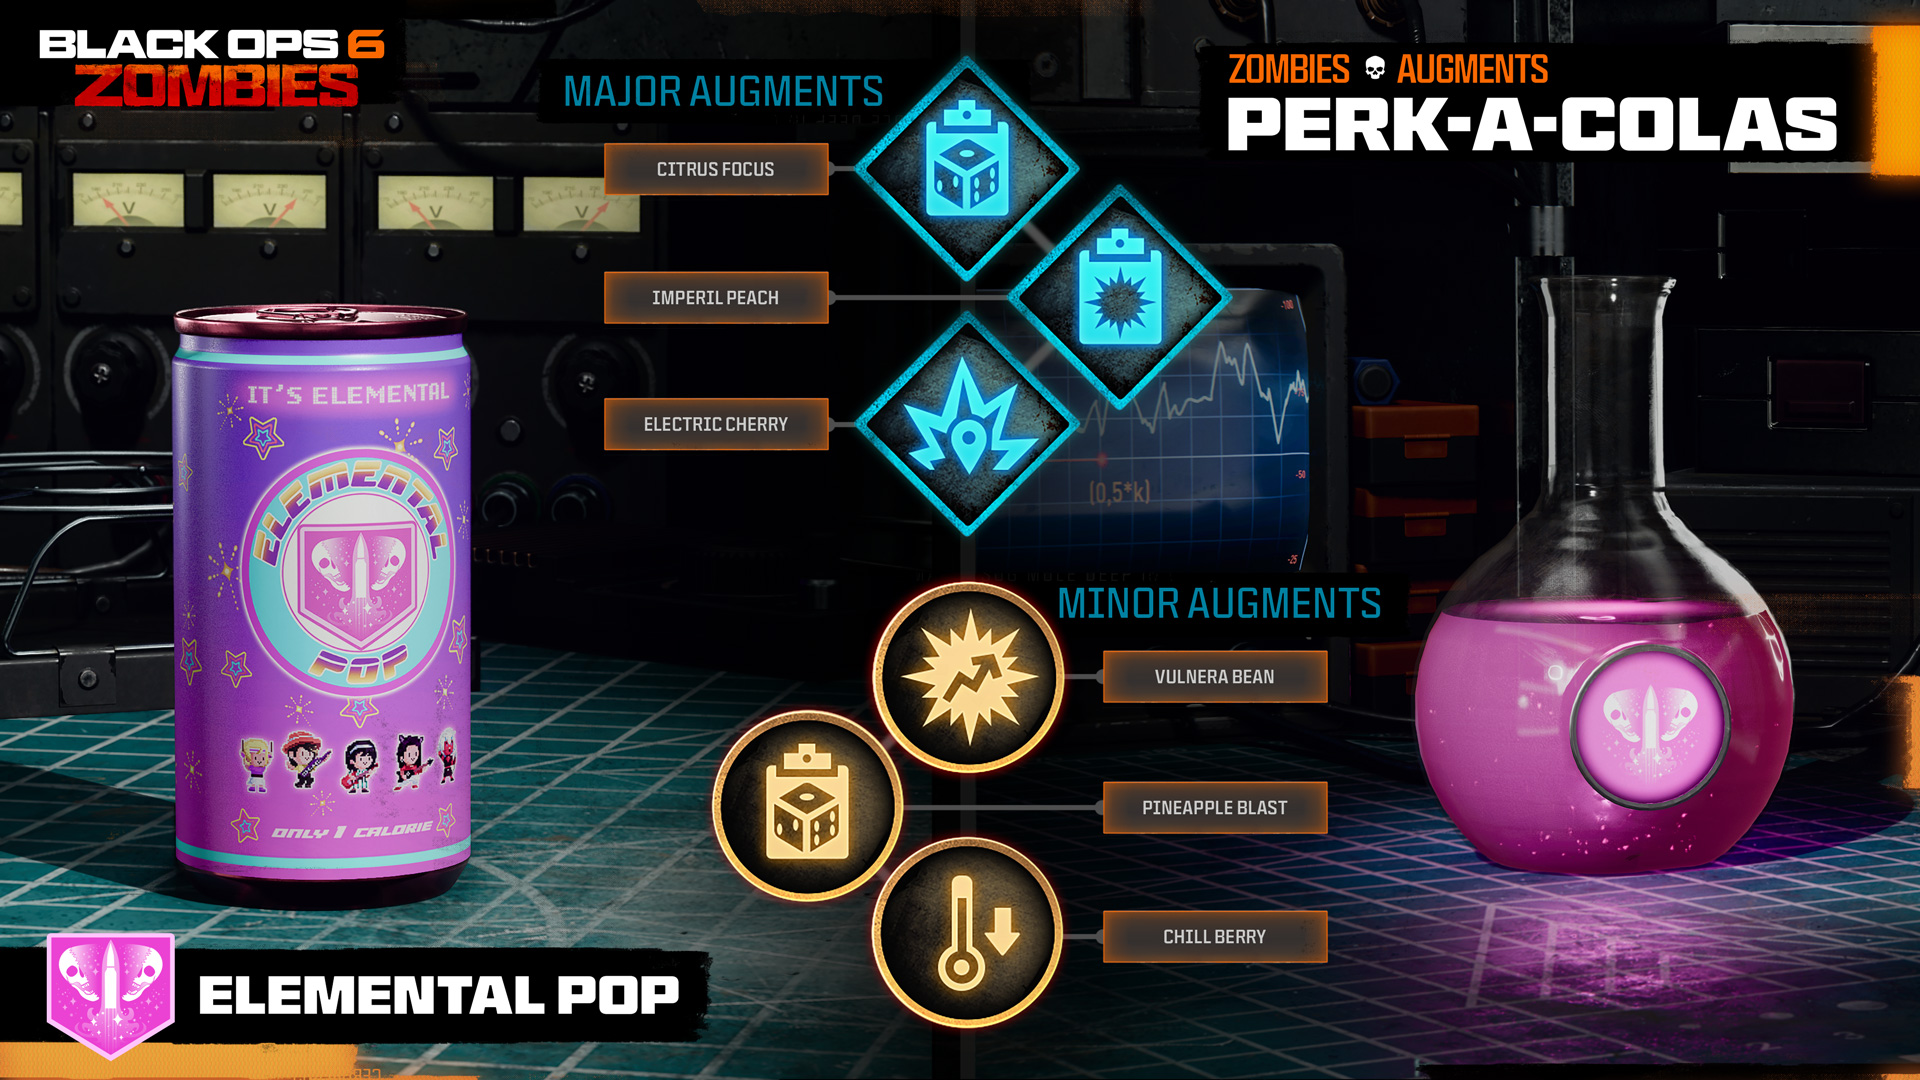
- Elemental Pop: Every bullet you fire has a small chance to apply a random Ammo Mod effect.
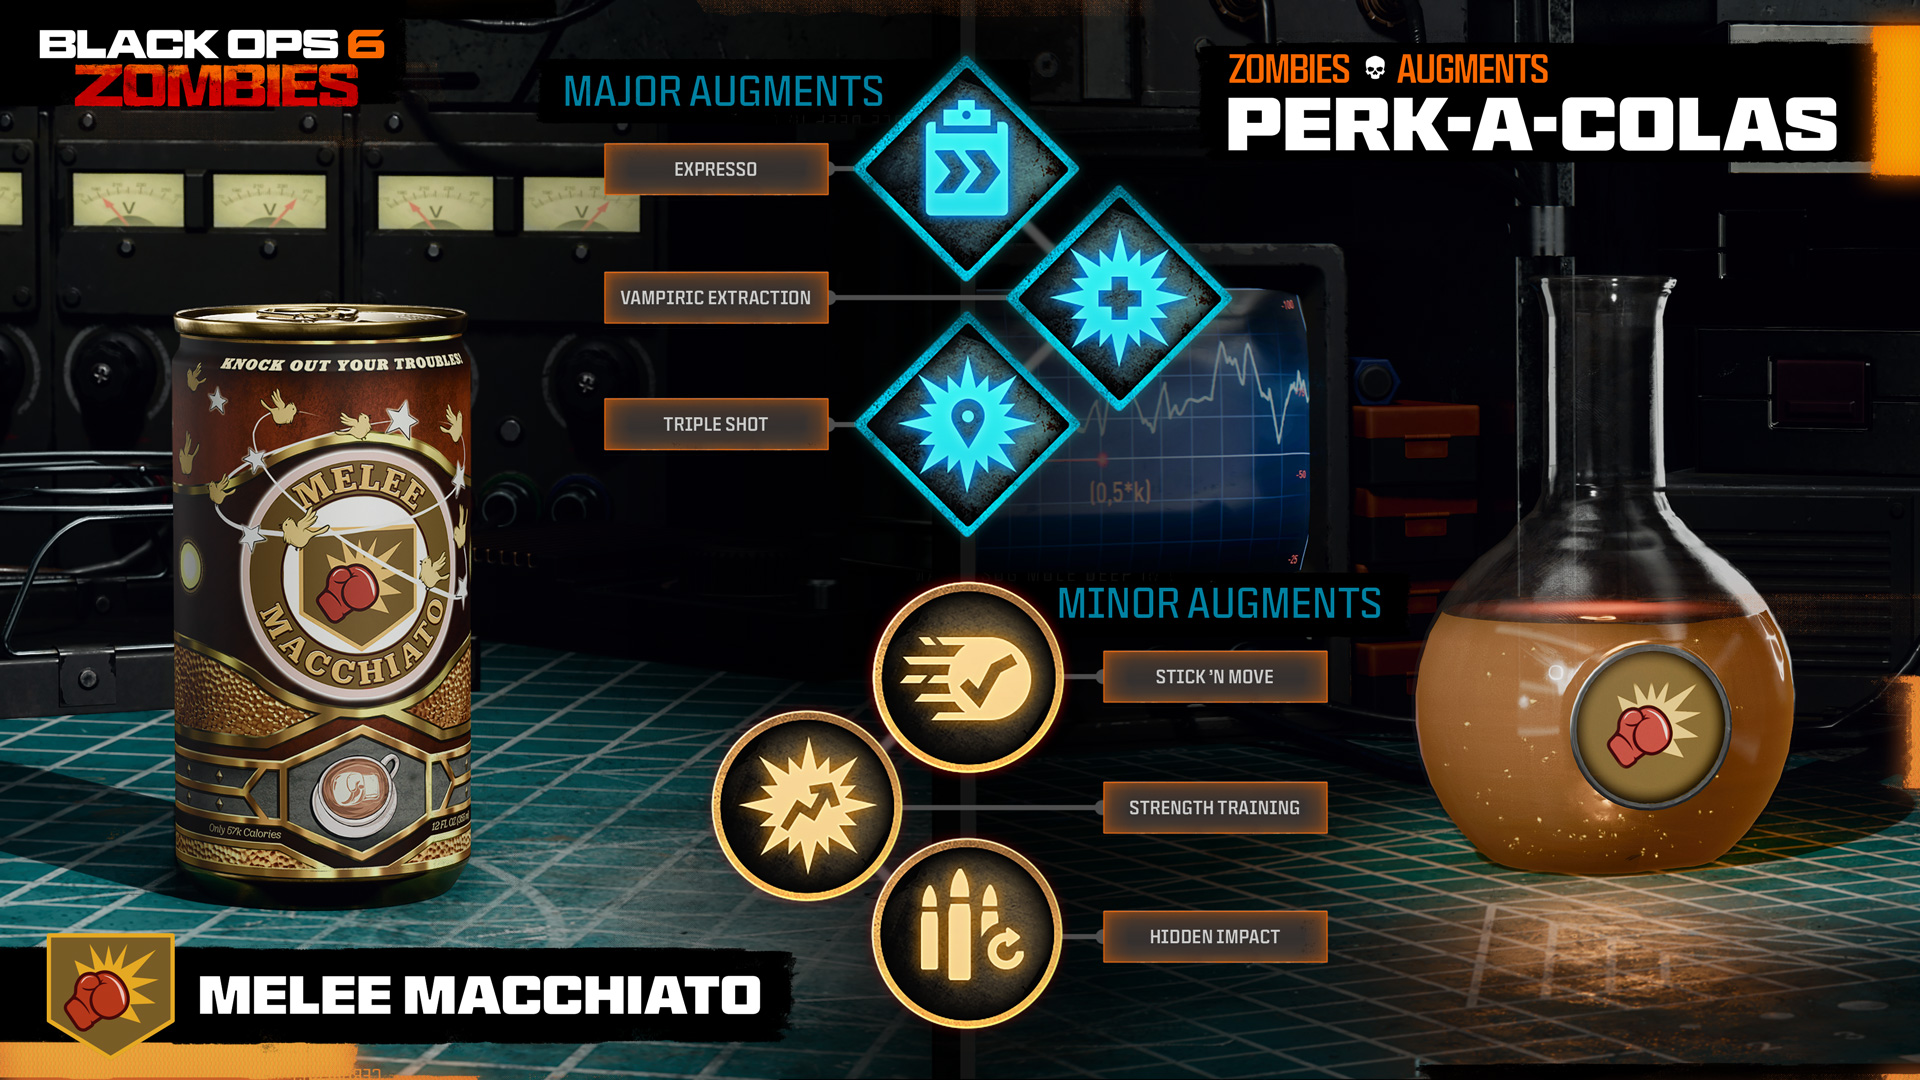
- Melee Macchiato: Replace weapon gun butt with a deadly punch that sends enemies flying.
Here is a complete list of Augments for each of the Perk-a-Colas available at launch:
Perk-A-Cola Augments
Jugger-Nog
Increases maximum health.
Major Augments
PROBIOTIC: Slightly increase maximum health with Jugger-Nog.
TURTLE SHELL: Armor acts as a shield on your back, completely absorbing damage to your back. No damage mitigation when hit from the front.
REACTIVE ARMOR: When an armor plate breaks, nearby normal enemies are stunned for a short time.
Minor Augments
RETALIATION: Deal bonus damage while health is low.
HARDENED PLATES: Armor plates have more damage mitigation.
DURABLE PLATES: Slightly increase armor durability.
Stamin-Up
Increase movement speed.
Major Augments
FREE FALLER: Become immune to fall damage.
DASHER: Increase Tactical Sprint duration.
STALKER: Walk faster while aiming.
Minor Augments
HARD TARGET: While Tactical Sprinting, projectile damage is reduced.
QUARTERBACK: Use equipment while sprinting.
HOT FOOT: Gain a speed boost after your equipment kills an enemy.
Speed Cola
Reload weapons and replate armor faster.
Major Augments
SUPERCHARGED: Field Upgrades recharge a bit faster.
CLASSIC FORMULA: Reload speed is even faster.
PHANTOM RELOAD: Weapon magazines are slowly refilled over time.
Minor Augments
SPEEDY ROULETTE: The Mystery Box settles much faster.
QUICK SWAP: Swap weapons faster.
FAST PITCHER: Deploy equipment faster.
Deadshot Daiquiri
Drink to improve ADS precision and increase critical damage.
Major Augments
DEAD HEAD: Further increase in critical damage.
DEAD FIRST: Deal double critical damage if an enemy is at full health.
DEAD AGAIN: Critical hits have a chance of adding a bullet to your magazine.
Minor Augments
DEAD BREAK: Increase damage to armor pieces.
DEAD DRAW: Reduce hip-fire spread.
DEAD SET: Reduce gun movement while performing advanced movement.
Quick Revive
Recover health and revive allies faster.
Major Augments
EMT: Reviving an ally allows them to keep all of the Perks on their bleed-out bar.
EQUIVALENT EXCHANGE: Killing an enemy while downed will revive you and remove Quick Revive. This can be done up to three times.
DYING WISH: On lethal damage, become immune to all damage for two seconds and keep one health. Quick Revive is removed on use.
Minor Augments
SWIFT RECOVERY: Reviving an ally increases both of your movement speeds for a short time.
KARMIC RETURN: Reviving an ally heals you to full health.
SLOW DEATH: Increase your time in last stand.
Elemental Pop
Attacks can trigger random Ammo Mods.
Major Augments
CITRUS FOCUS: If a weapon has an Ammo Mod applied, Elemental Pop will only activate that one.
IMPERIL PEACH: Enemies that hit you have a chance to trigger a random Ammo Mod.
ELECTRIC CHERRY: Reloading creates an electric damage discharge that damages and stuns nearby normal enemies. The emptier the magazine, the stronger the damage.
Minor Augments
VULNERA BEAN: Slightly increase enemy elemental weakness damage.
PINEAPPLE BLAST: Equipment can also trigger a random Ammo Mod.
CHILL BERRY: Slightly reduce all Ammo Mod cooldowns.
PHD Flopper
Explosive dive to prone and immunity to self-inflicted explosive damage.
Major Augments
GRAVITY MD: Just falling from heights creates explosions.
DR RAM: Tactical Sprint knocks down and damages base zombies.
PHD SLIDER: Sliding into enemies triggers explosions.
Minor Augments
ENVIRONMENTALIST: Become immune to environmental damage while sliding.
EOD TECHNICIAN: Slightly reduce height and distance requirements for explosions.
TRIBOLOGIST: Sliding distance and speed are increased.
Melee Macchiato
Replace weapon gun butt with a deadly punch.
Major Augments
EXPRESSO: All melee attacks are slightly faster.
VAMPIRIC EXTRACTION: Melee attacks heal a small amount of your health.
TRIPLE SHOT: Your punch can hit multiple enemies at once.
Minor Augments
STICK ’N MOVE: Backpedal speed is increased after a successful melee attack.
STRENGTH TRAINING: Your punch can one-hit kill normal enemies for longer.
HIDDEN IMPACT: Melee kills reload a portion of your held weapon.
Ammo Mods (5) and Augments (30)
Currency to access Ammo Mods: Salvage
Recap: Along with Rarity and Pack-a-Punch capabilities (showcased in this blog), your Primary and Melee Weapons can be outfitted with an upgrade known as an Ammo Mod. Obtained in-game via a purchase at the Arsenal Machine using Salvage, Ammo Mods grant the affected weapon a percentage chance of dealing a special additional effect upon a successful projectile impact. Only one Ammo Mod can be applied to the weapon at a time, though you can purchase a new Ammo Mod as necessary.
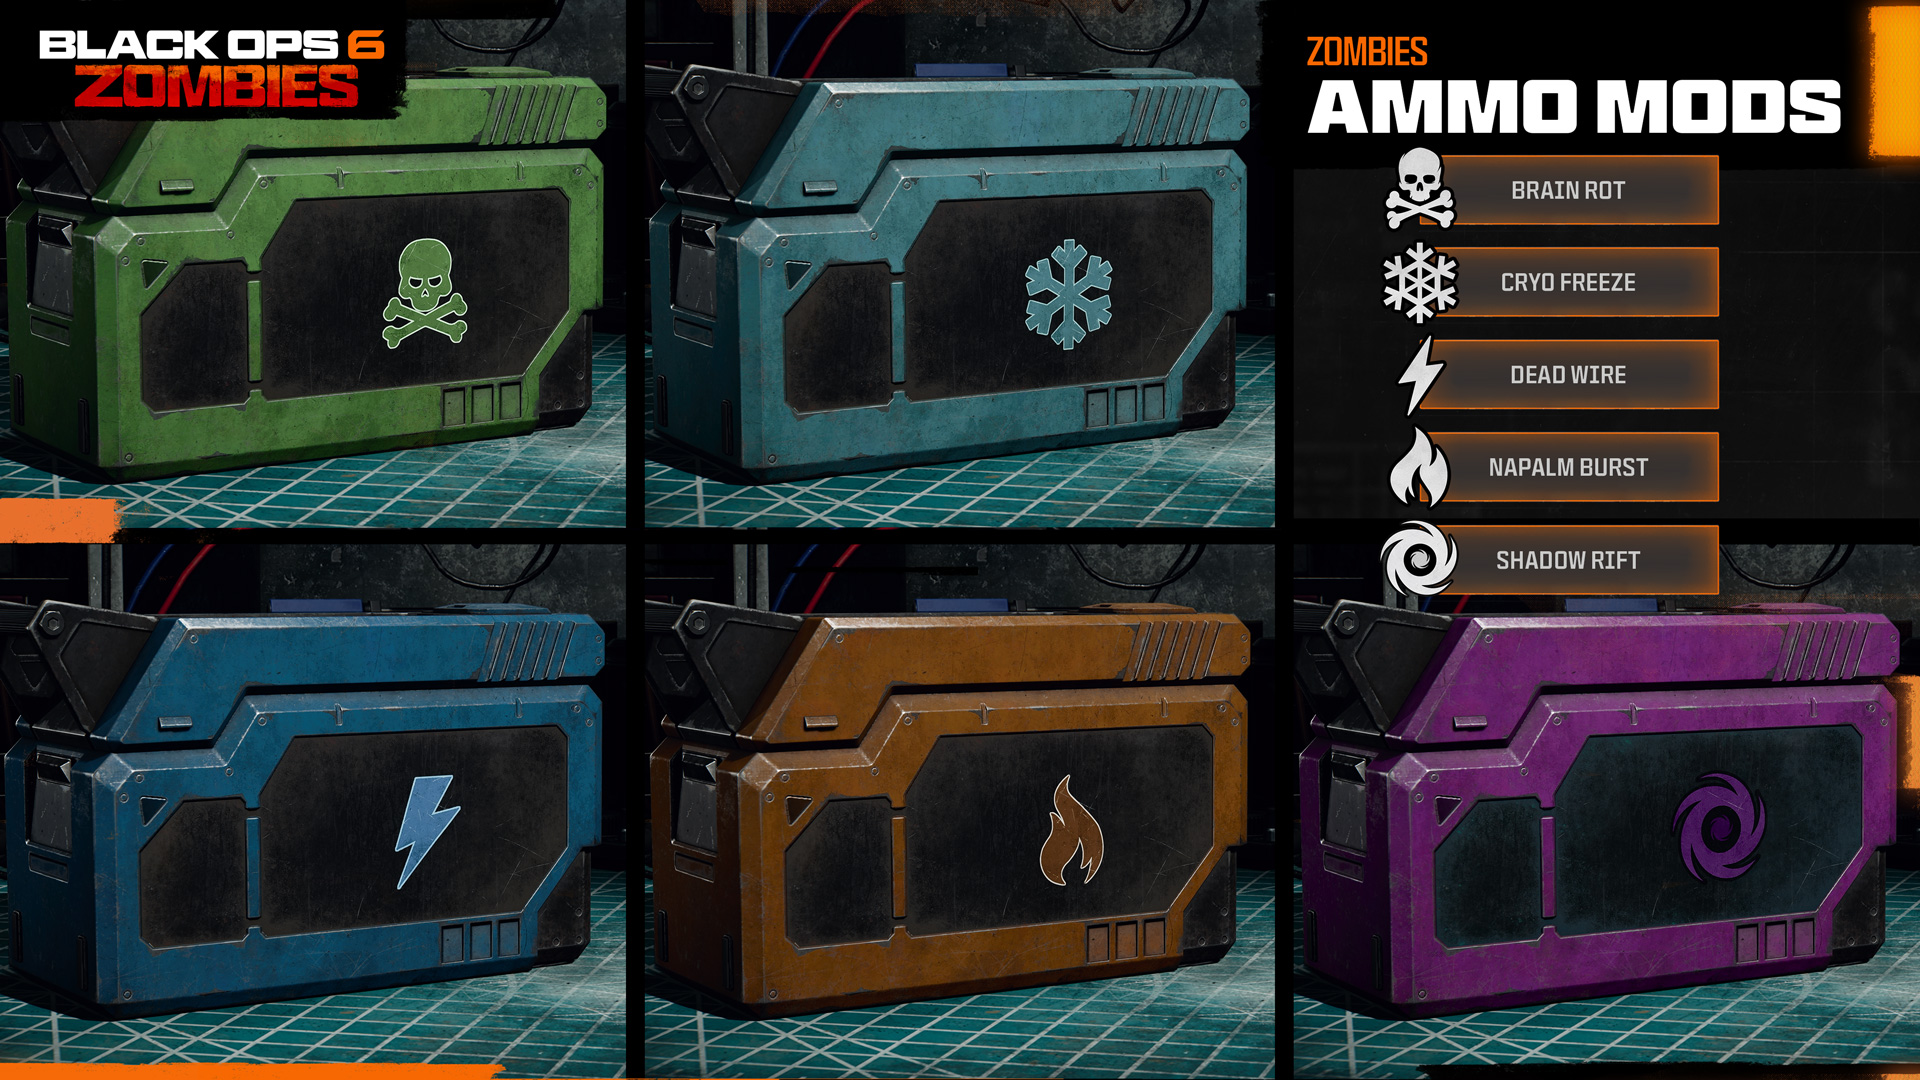
At launch, expect to access five Ammo Mods, some of which require you to be a specific Player Level. Each Ammo Mod has six Augments to unlock and choose from, to further bolster the following base effects:
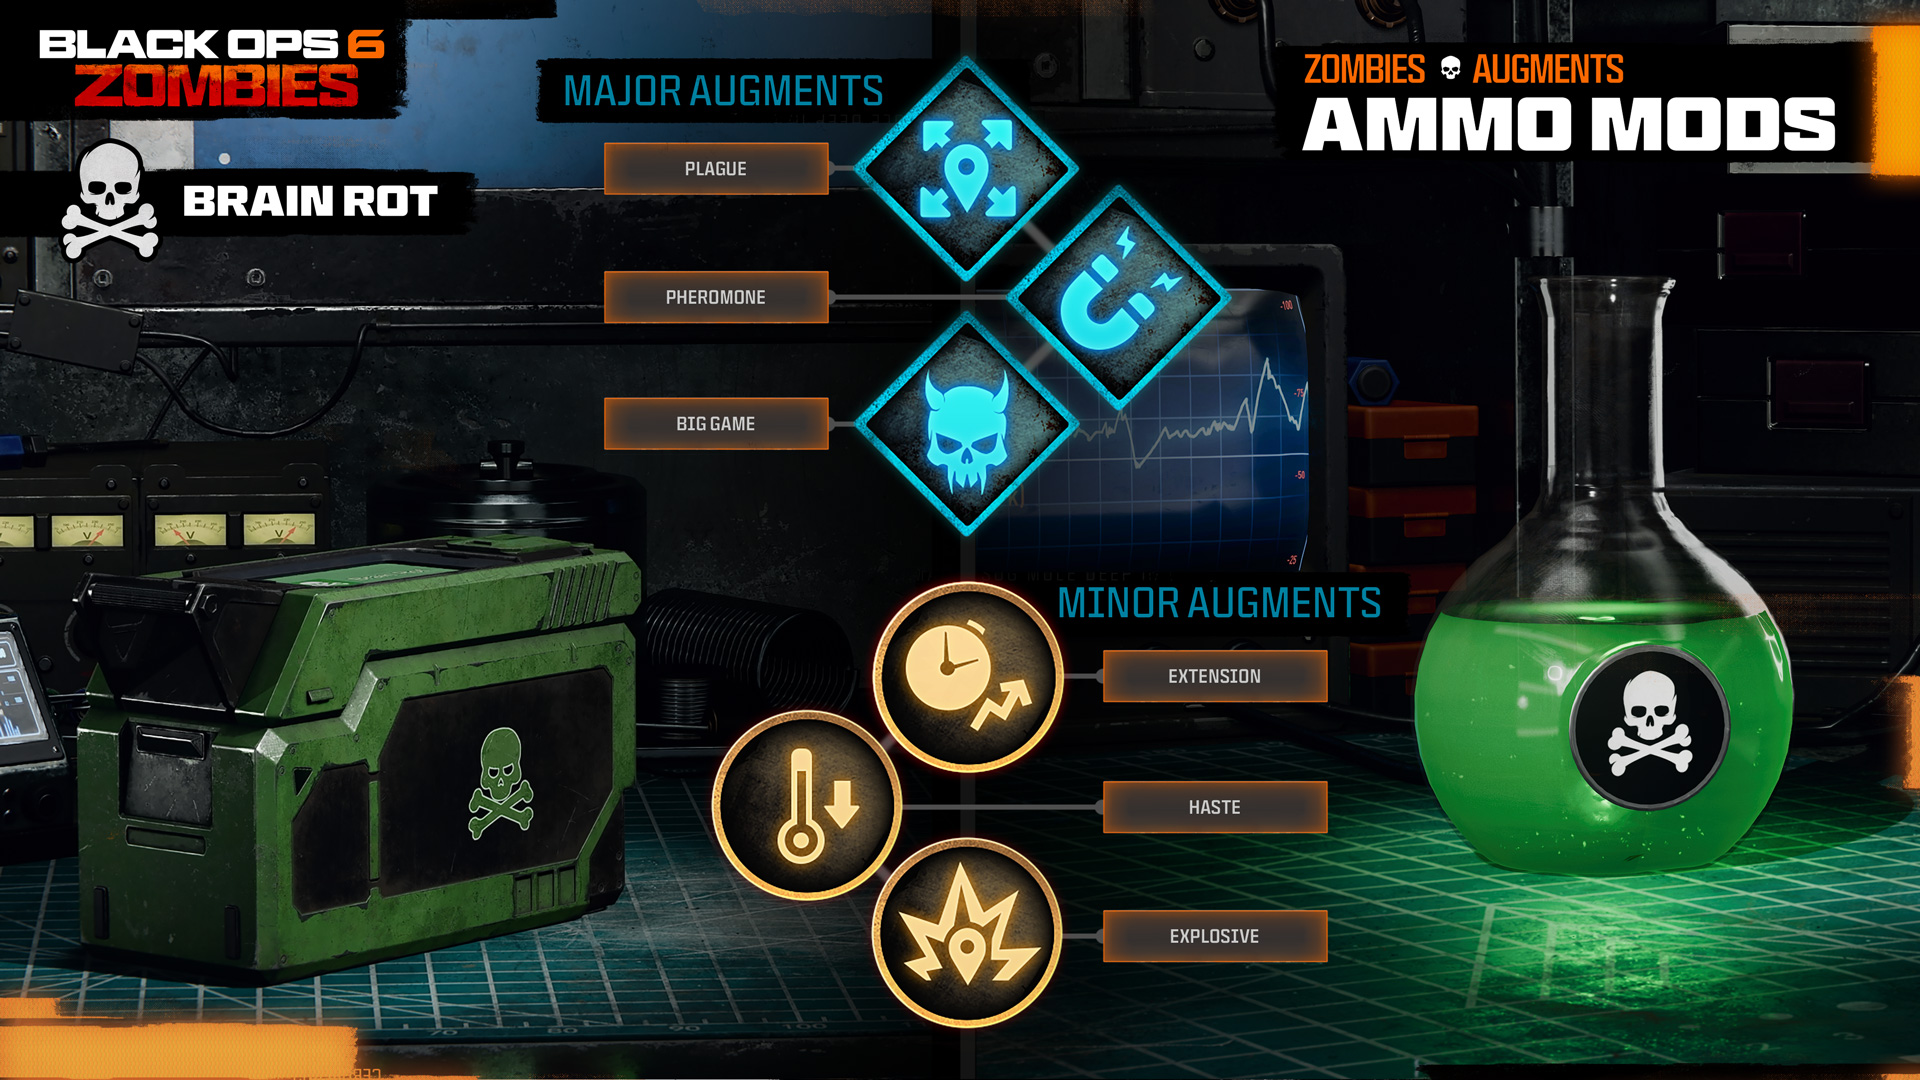
- Brain Rot: Bullets deal toxic damage. Each bullet has the chance to turn a Normal or Special enemy into an ally.
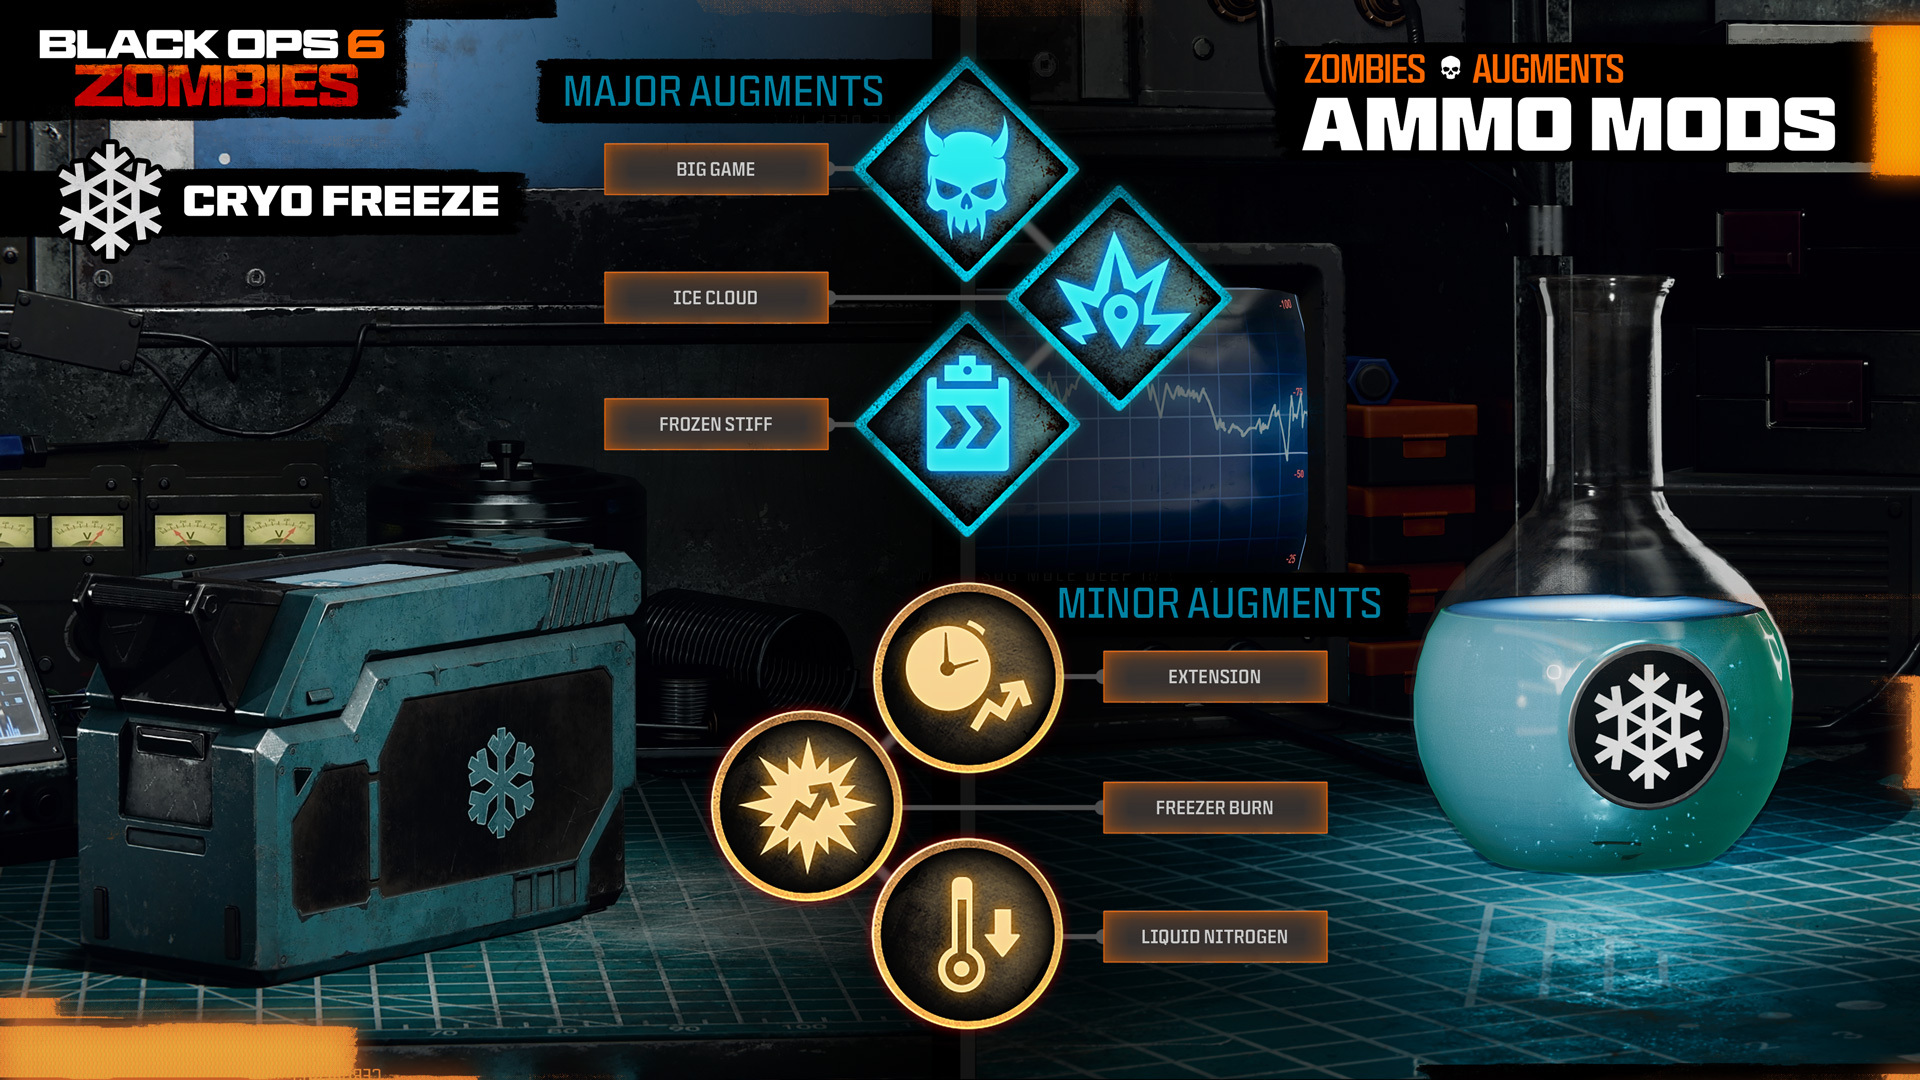
- Cryo Freeze: Bullets deal frost damage. Each bullet has a chance to slow Normal or Special enemies.
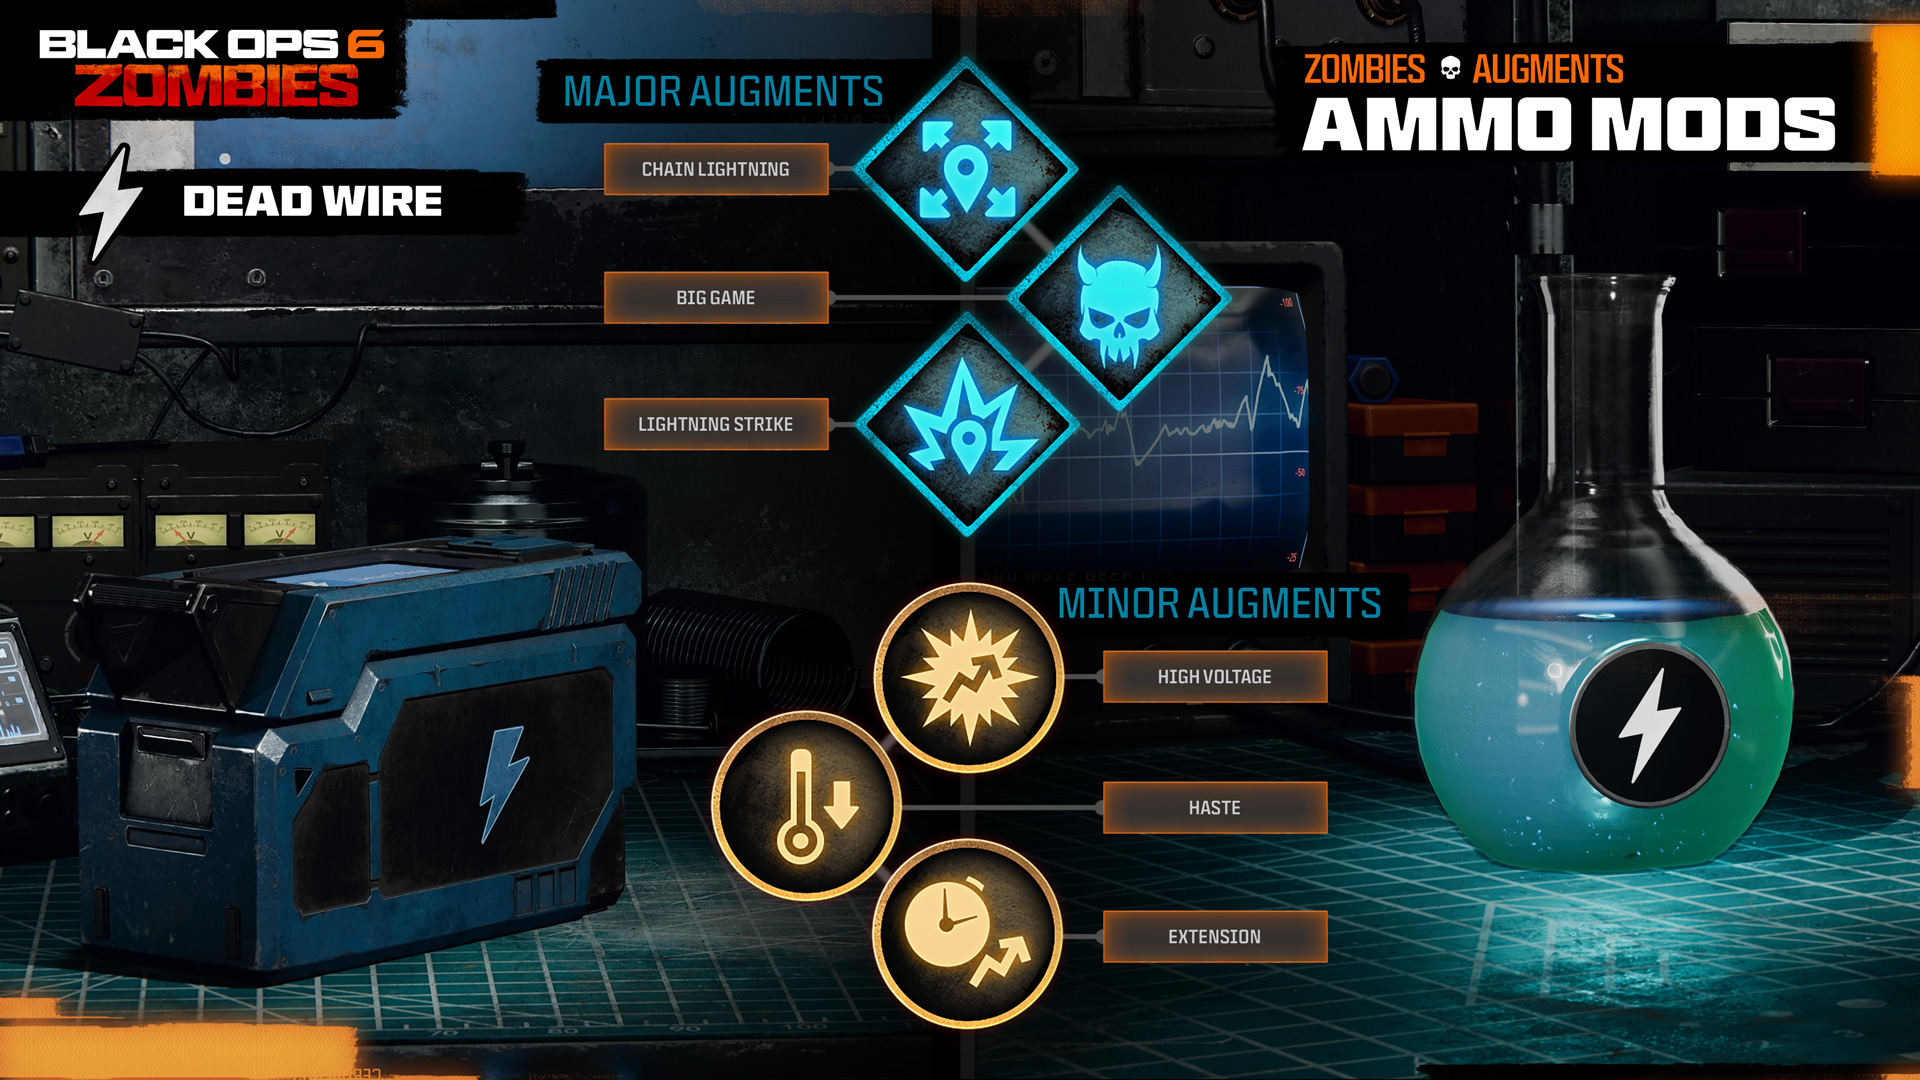
- Dead Wire: Bullets deal electrical damage. Each bullet has a chance to stun any Normal and Special enemy, generating a field that deals electric damage to nearby enemies.
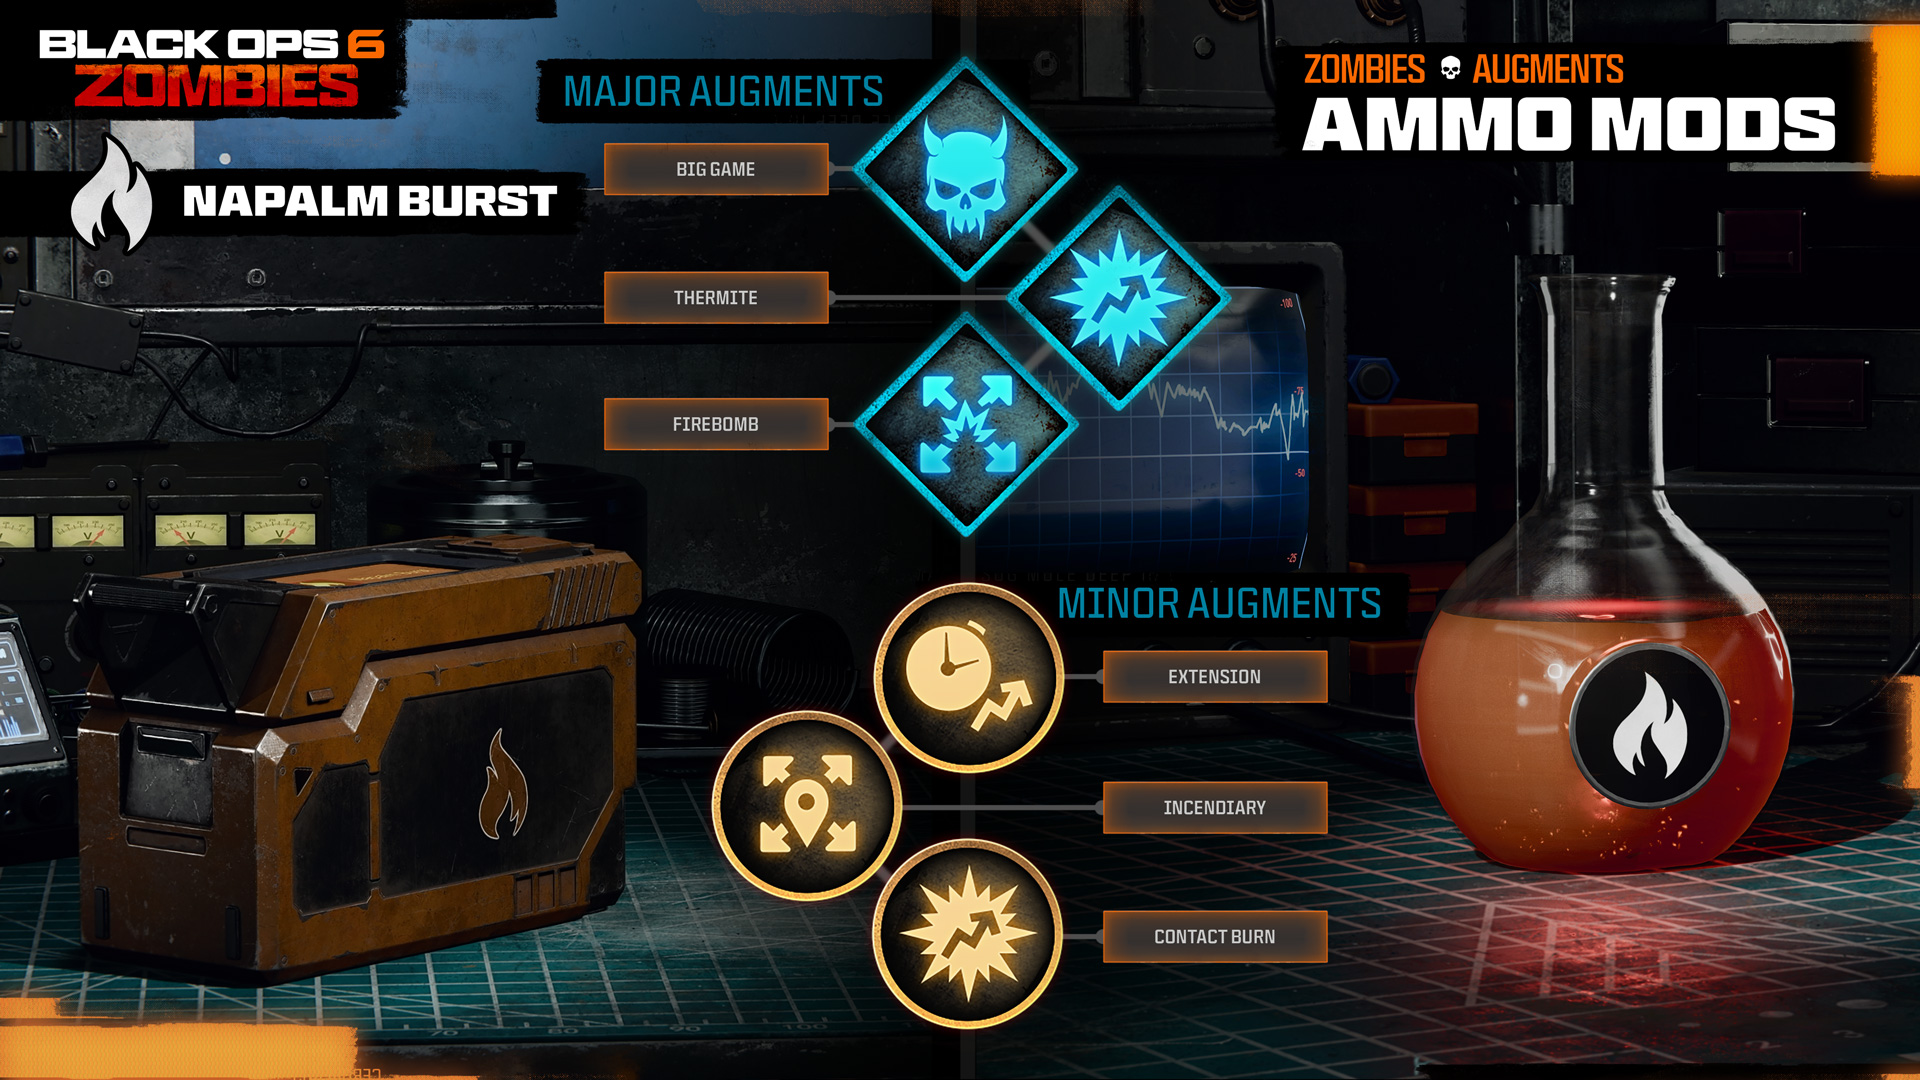
- Napalm Burst: Bullets deal fire damage. Each bullet has a chance to ignite Normal and Special enemies.
- Shadow Rift: Bullets deal shadow damage. Each bullet has a chance to spawn a black hole if striking Normal or Special enemies, warping nearby zombies away and dropping some from the air at high speed.
Progression: Ammo Mods Unlocks
Major Augments
PLAGUE: The charmed enemy has a chance to turn other enemies.
PHEROMONE: The charmed enemy distracts nearby normal and special enemies for a short time.
BIG GAME: Brain Rot can charm elite enemies.
Minor Augments
EXTENSION: Brain Rot duration is slightly increased.
HASTE: Brain Rot cooldown is slightly reduced.
EXPLOSIVE: Charmed enemies explode at the end of Brain Rot’s duration, dealing toxic damage.
Cryo Freeze
Available: Unlocked at Player Level 14
Bullets deal frost damage. Each bullet has a chance to slow a normal or special enemy and increase the damage they receive.
Major Augments
BIG GAME: Cryo Freeze can slow elite enemies.
ICE CLOUD: Enemies that are killed while frozen may leave a cloud that slows enemies.
FROZEN STIFF: Enemies are frozen in place.
Minor Augments
EXTENSION: Slightly increase the slow duration.
FREEZER BURN: Slightly increase damage to frozen enemies.
LIQUID NITROGEN: Significantly increase your chance for Cryo Freeze to activate.
Dead Wire
Available: Unlocked Immediately
Bullets deal electric damage. Each bullet has a chance to stun a normal or special enemy, causing them to generate an electric damage field.
Major Augments
CHAIN LIGHTNING: The stunned enemy can spread the stun to others.
BIG GAME: Dead Wire can stun elite enemies.
LIGHTNING STRIKE: A bolt of lightning strikes from above, stunning all normal and special enemies in the area.
Minor Augments
HIGH VOLTAGE: Dead Wire deals slightly more damage.
HASTE: Dead Wire cooldown is slightly reduced.
EXTENSION: The stun and electric field last longer.
Napalm Burst
Available: Unlocked at Player Level 6
Bullets deal fire damage. Each bullet has a chance to apply a burn effect on normal and special enemies, dealing damage over time.
Major Augments
BIG GAME: Napalm Burst can burn elite enemies.
THERMITE: Increase burn effect damage.
FIREBOMB: Burned enemies explode on death, spreading the fire to nearby enemies.
Minor Augments
EXTENSION: Increase the burn duration.
INCENDIARY: Each damage tick has a small chance to spread to a nearby enemy.
CONTACT BURN: Initial burn effect deals more damage.
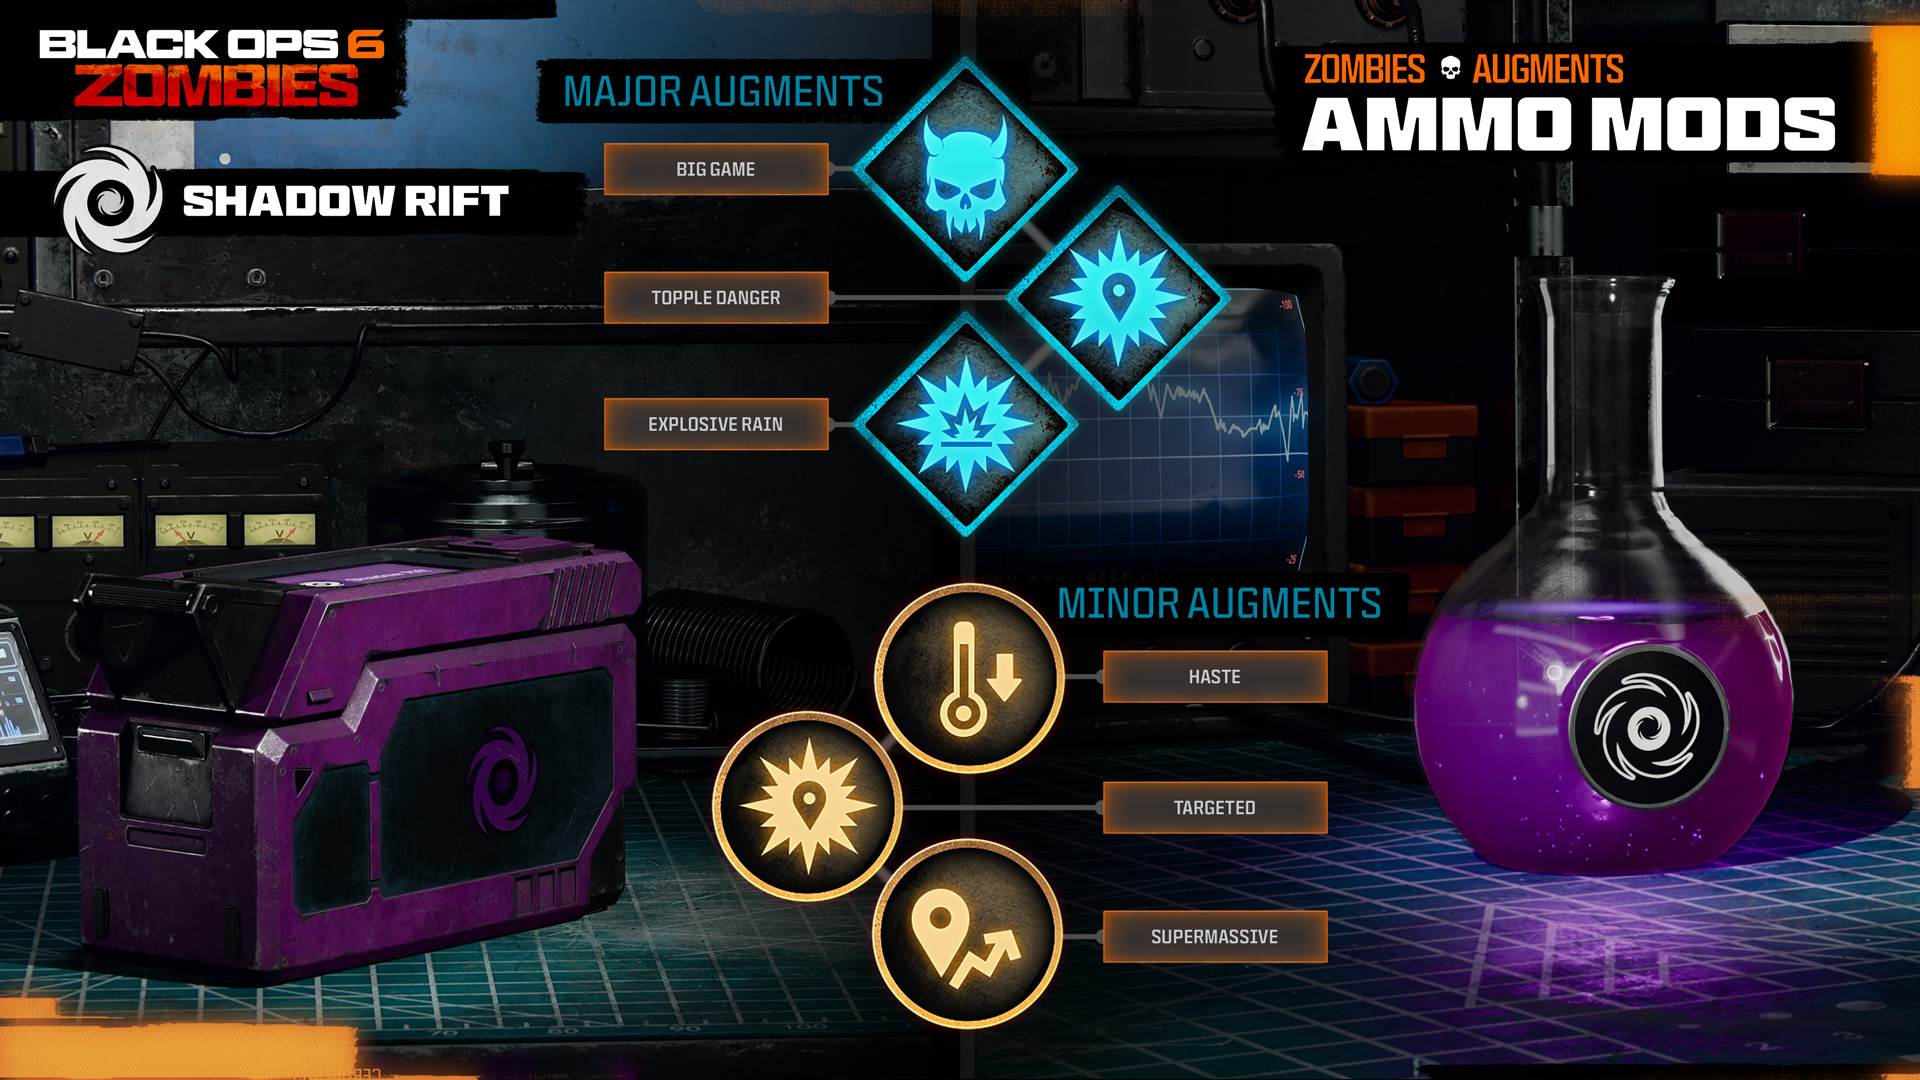
Shadow Rift
Available: Unlocked at Player Level 44
Bullets deal shadow damage. Each bullet has a chance to spawn a black hole on a normal or special enemy, warping away those nearby and dropping some from the air at lethal speed.
Major Augments
BIG GAME: Shadow Rift can activate on elite enemies.
TOPPLE DANGER: Warp one enemy that deals shadow damage to others
EXPLOSIVE RAIN: Enemies that are dropped from portals will explode on contact with the ground.
Minor Augments
HASTE: Shadow Rift cooldown is reduced.
TARGETED: Dropped enemies will fall on other enemies.
SUPERMASSIVE: The singularity’s lethal radius is increased and can kill more enemies.
Field Upgrades (5) and Augments (30)
Mastery Badges available for this Equipment Type
Currency to access Ammo Mods: Salvage
Field Upgrades are selected prior to a Match, within your Loadout Menu. During a match, you can also swap to a different Field Upgrade at any time by using the in-game menu. Note that your cooldown will reset upon switching to a different Field Upgrade.
At launch, expect to choose the following Field Upgrades:
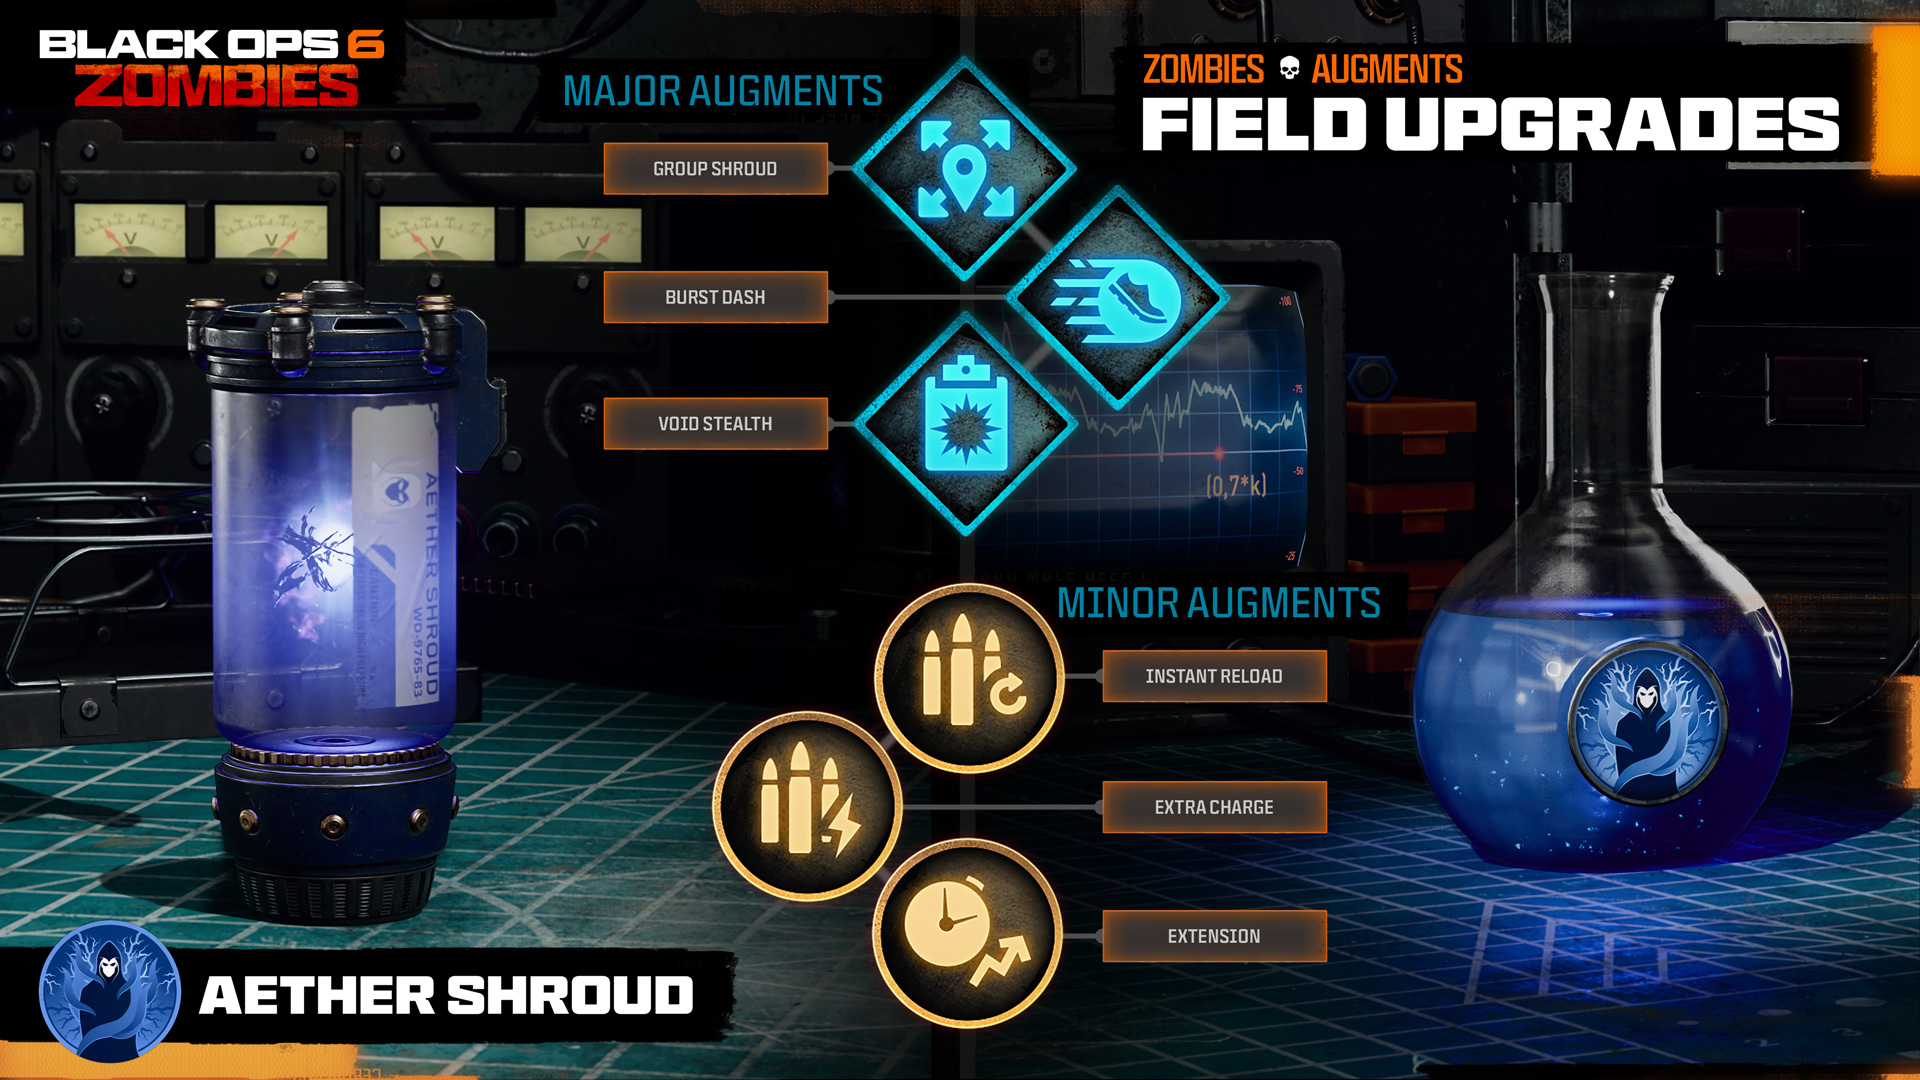
Aether Shroud: Phase into the Dark Aether, becoming hidden from enemy detection.
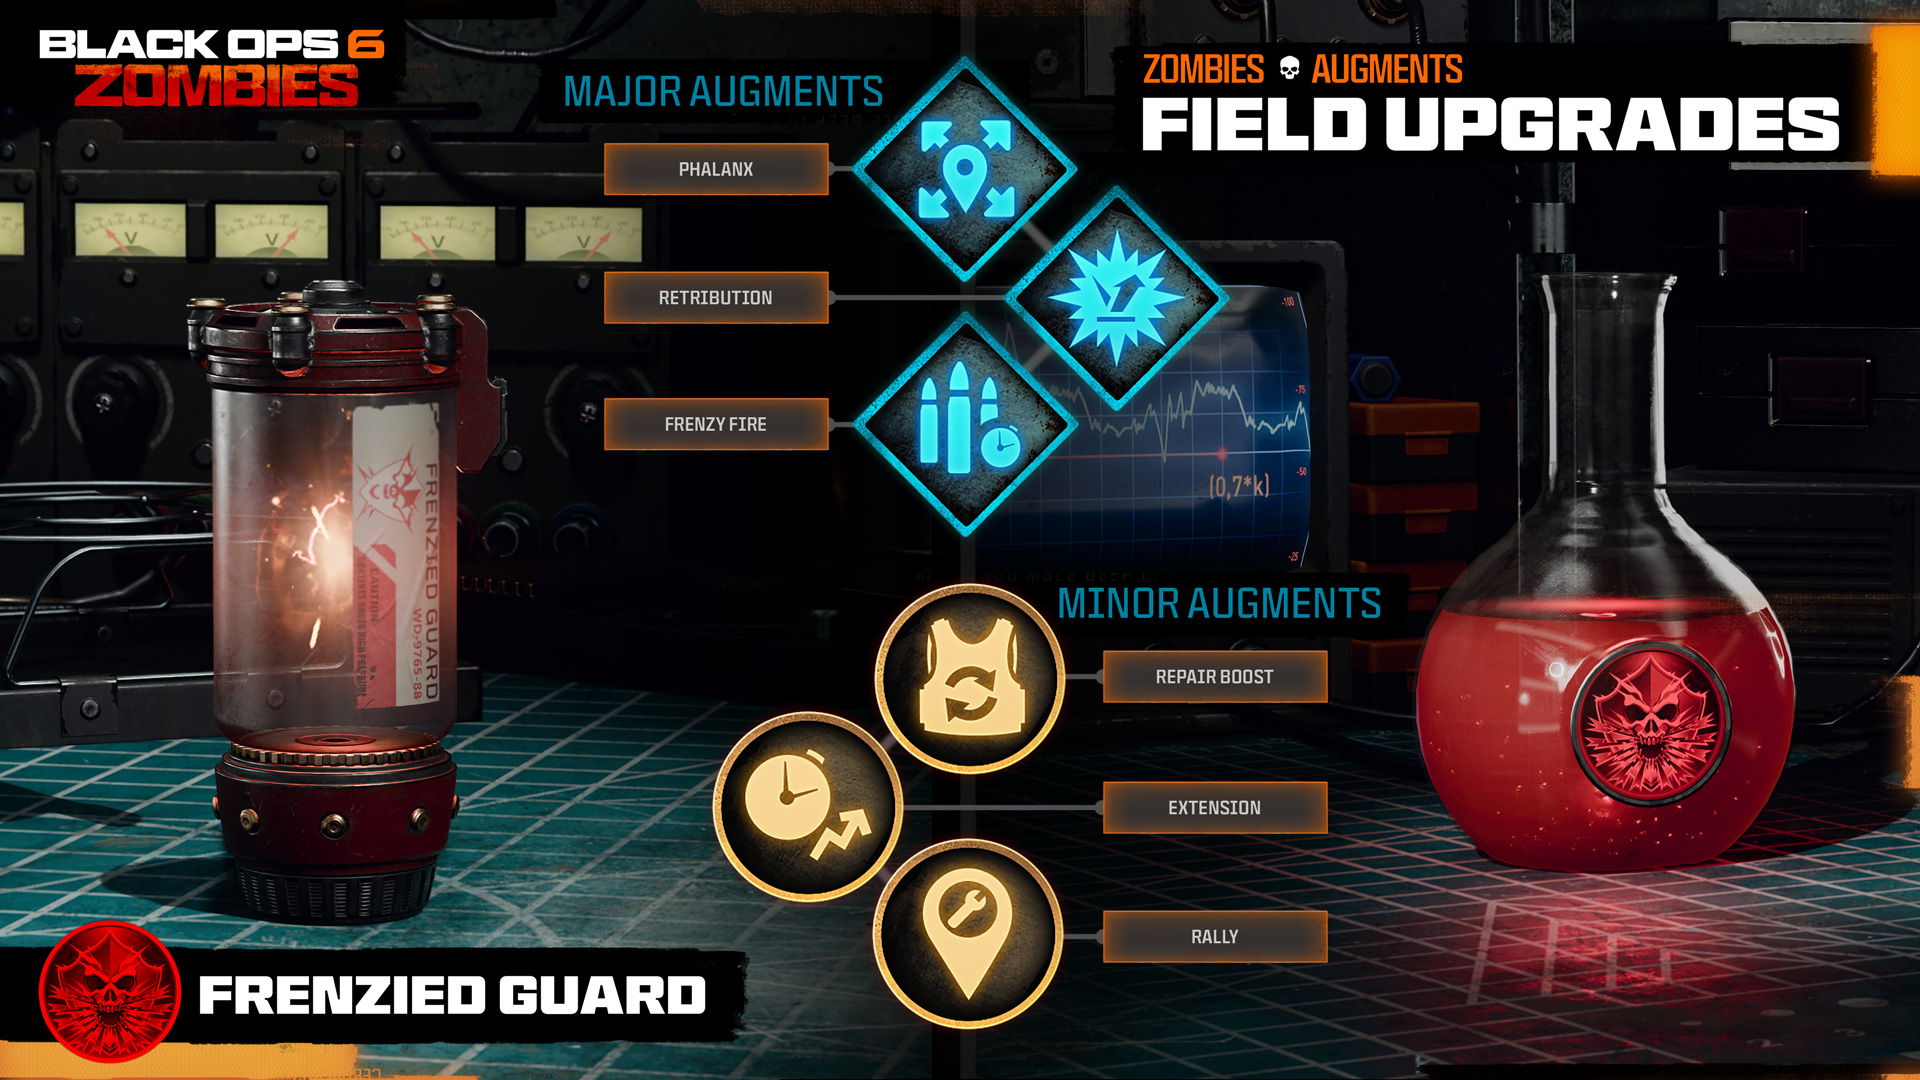
Frenzied Guard: Repair armor and force all enemies in the area to target you. During this time, kills repair a portion of your armor.
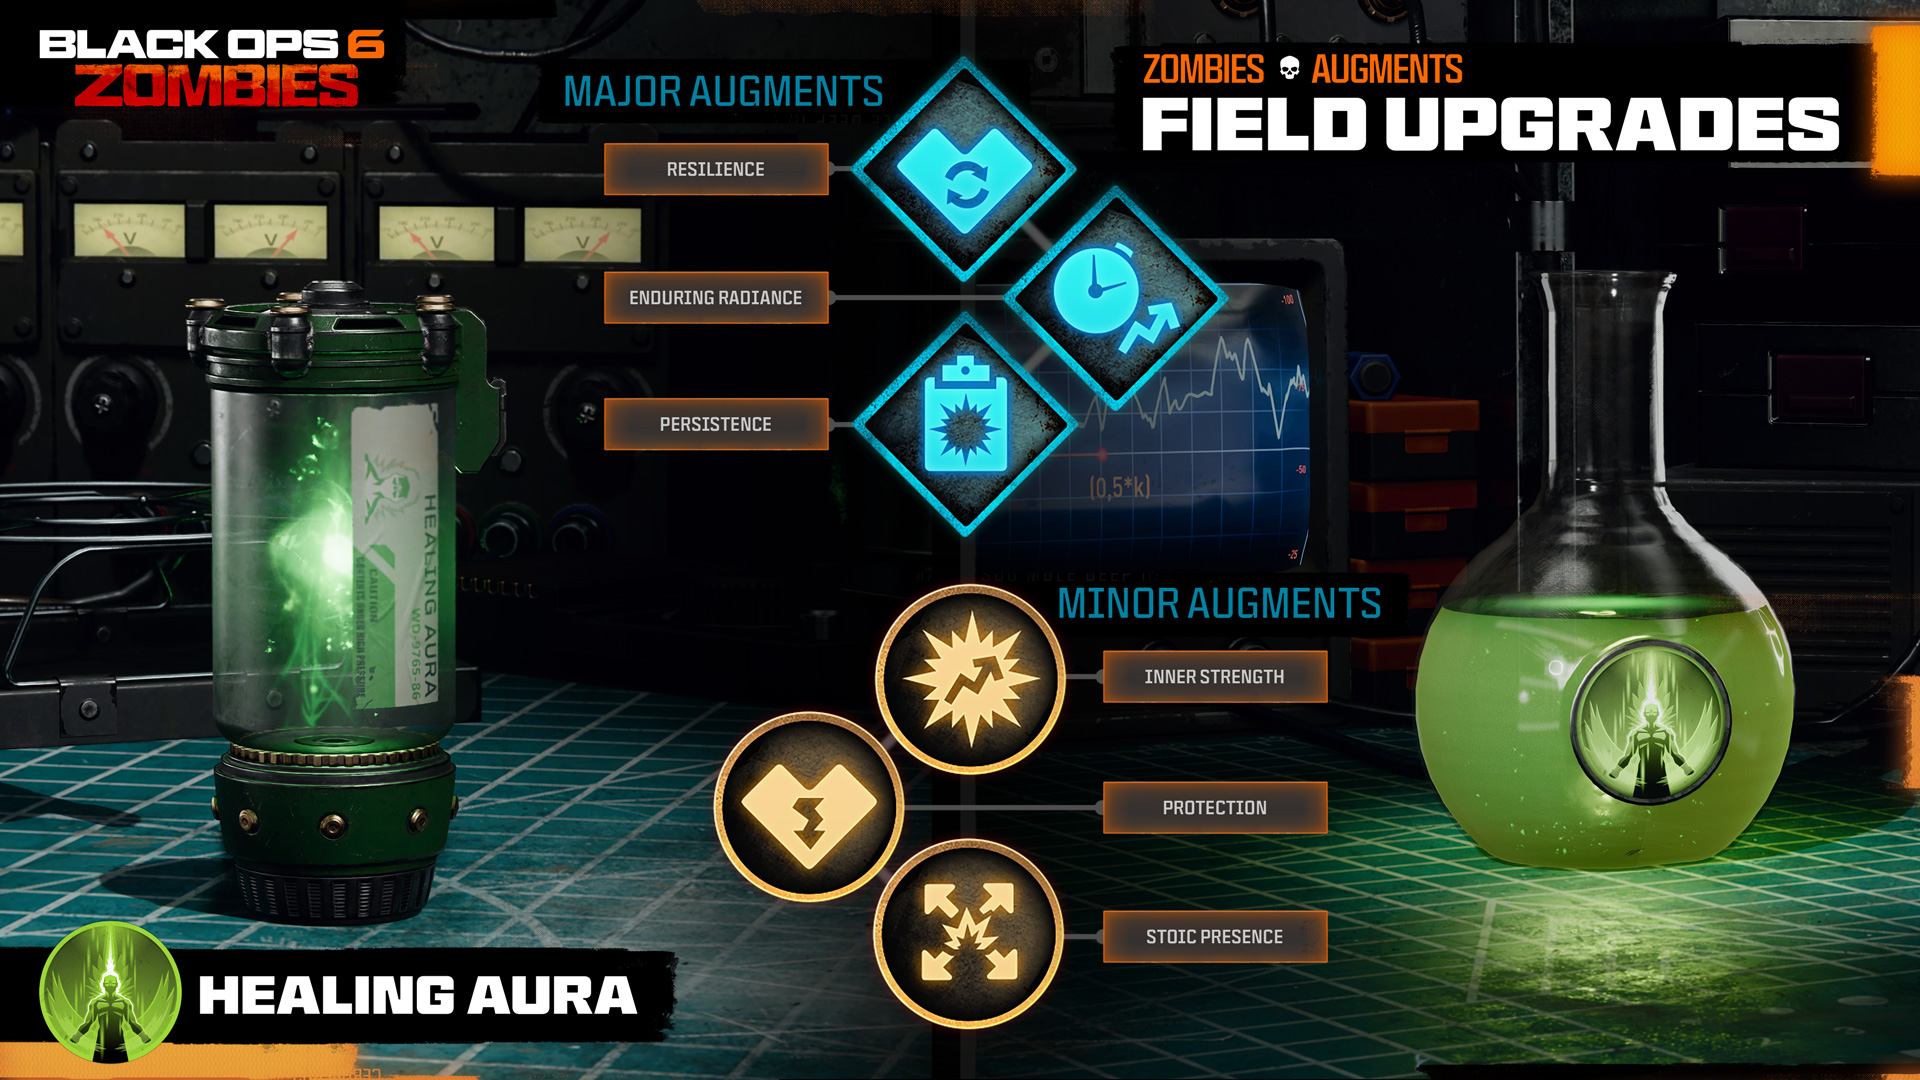
Healing Aura: Summons beams of energy down on yourself and allies to instantly revive and heal to full health.
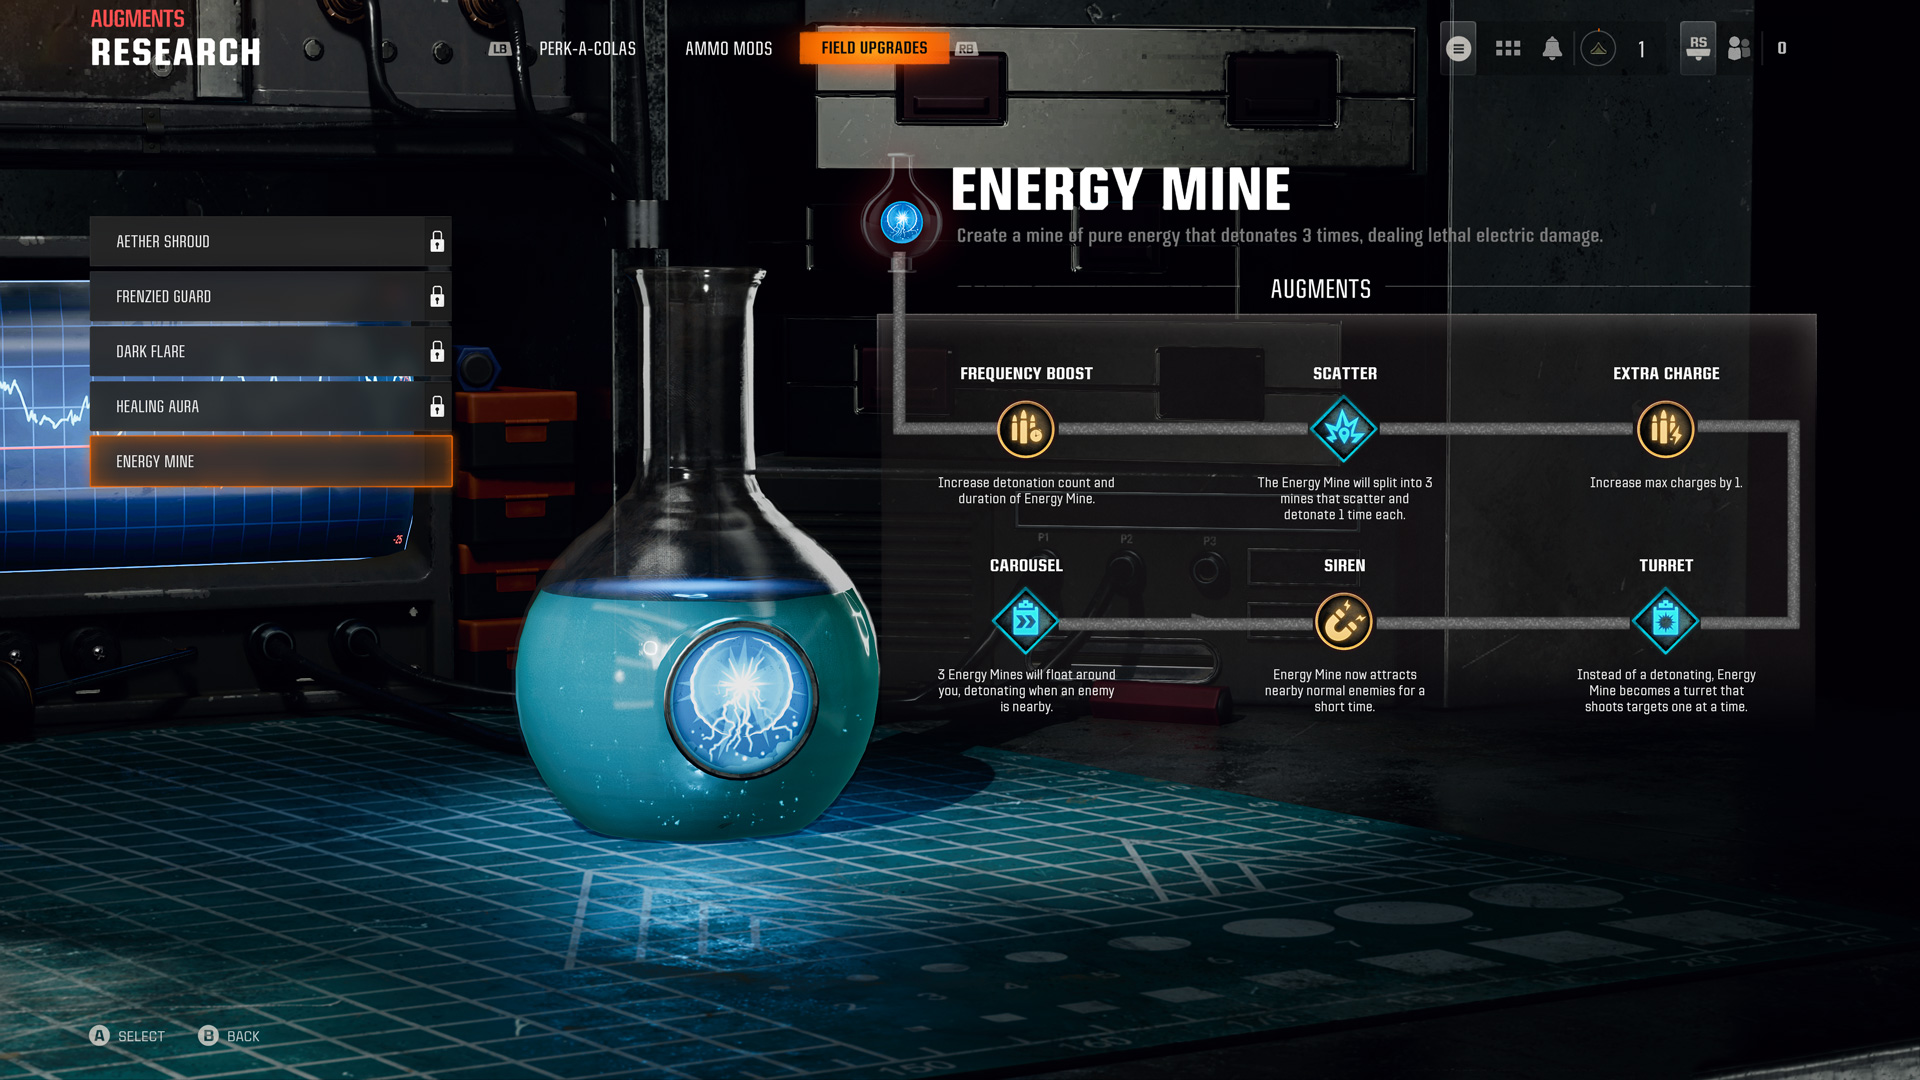
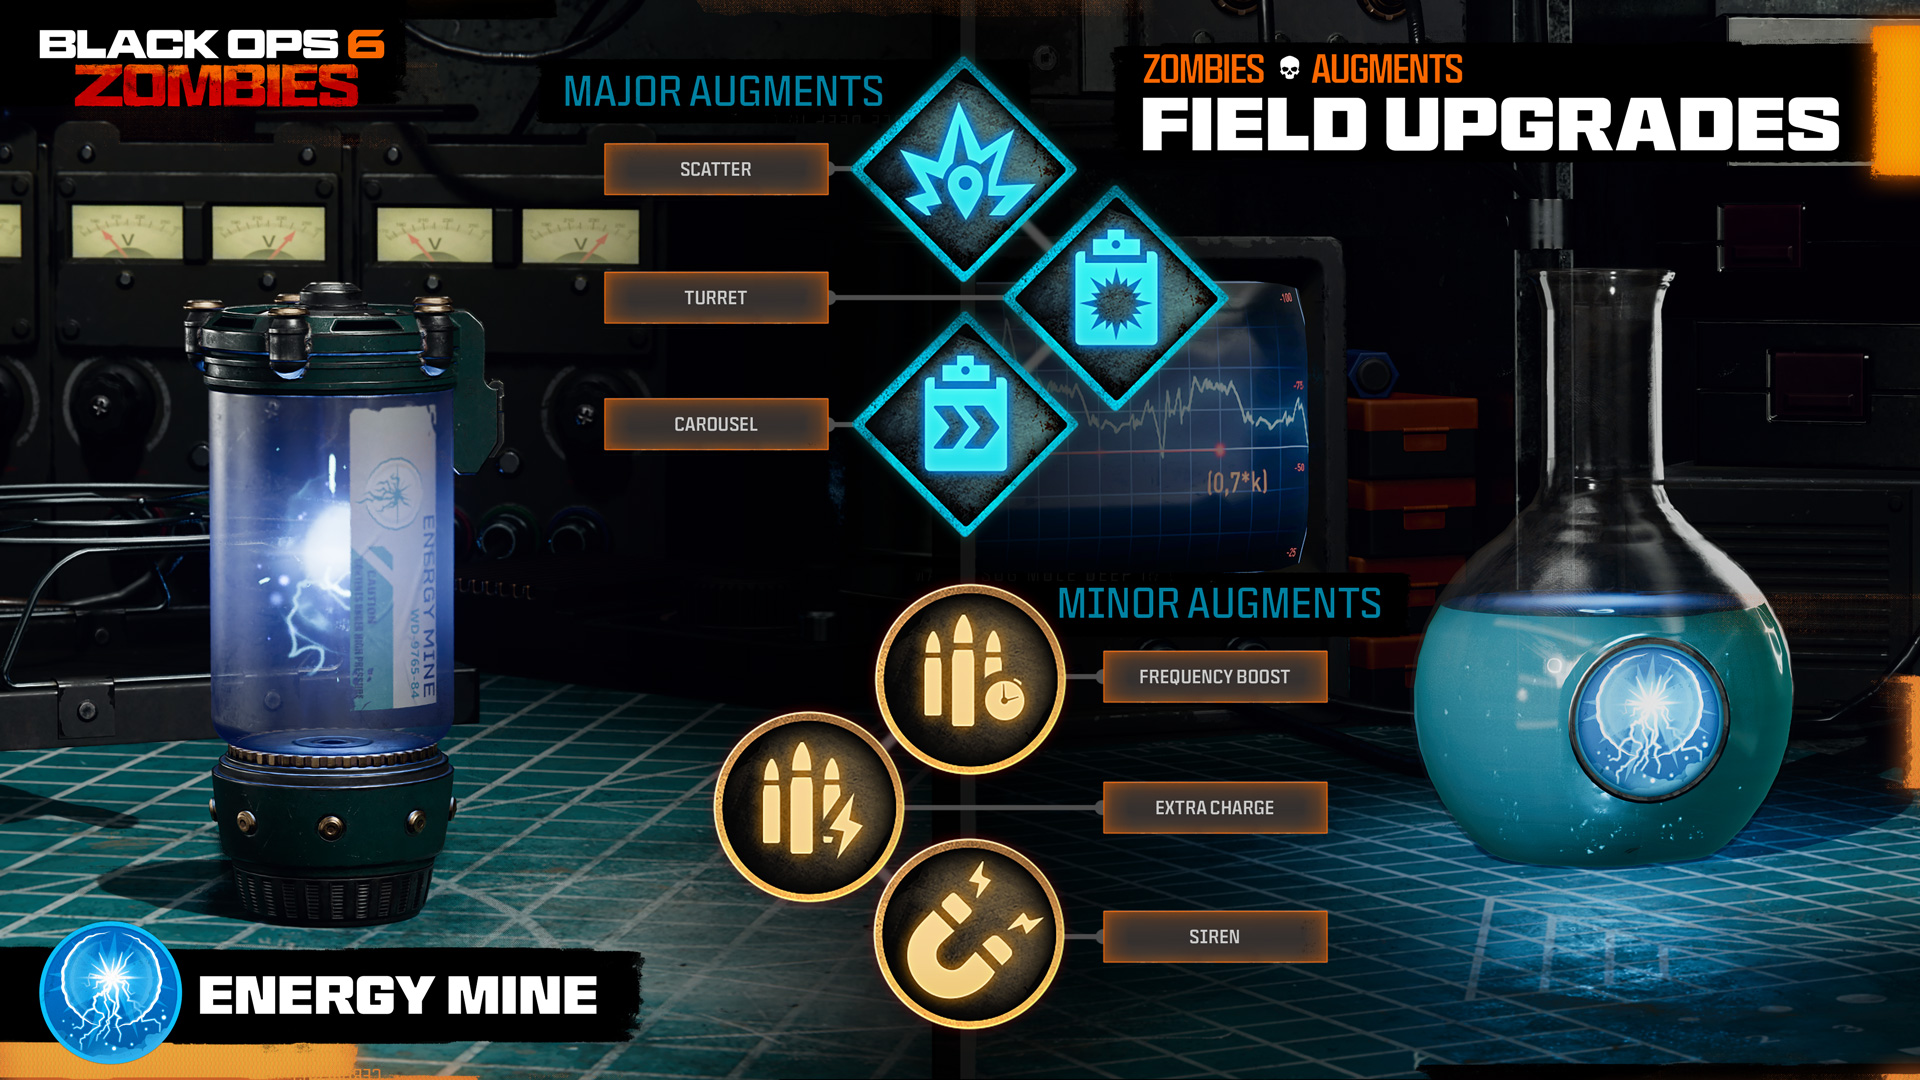
Energy Mine: Create a mine of pure energy that detonates in rapid succession, dealing lethal electric damage.
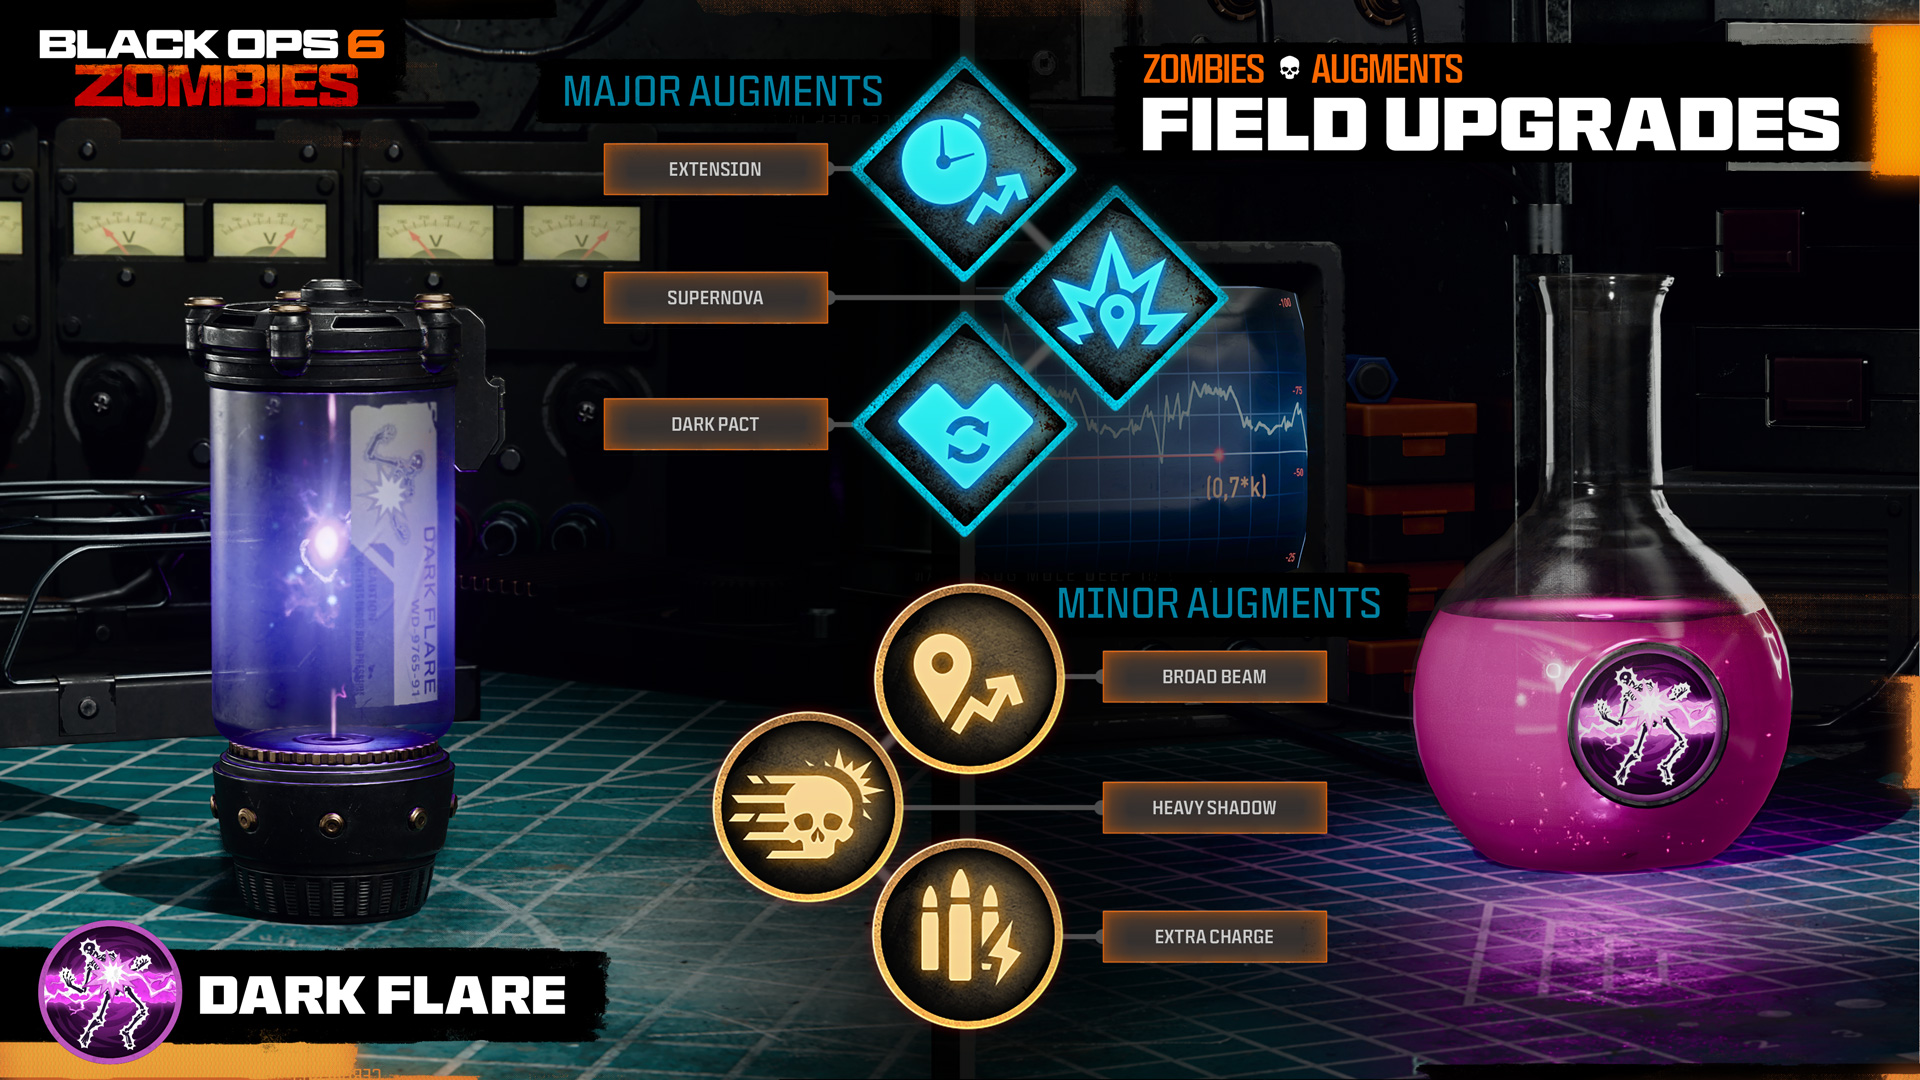
Dark Flare: You generate a massive energy beam that deals lethal shadow damage. The beam penetrates everything in its path.
Progression: Field Upgrades Unlocks
Aether Shroud
Available: Unlocked at Player Level 47
Phase into the Dark Aether and become temporarily hidden from enemy detection.
Major Augments
GROUP SHROUD: Nearby players are also cloaked.
BURST DASH: Warp forward a short distance, killing all normal enemies in your path.
VOID SHEATH: Swap to your dedicated melee weapon as it’s imbued with Dark Aether energy. Kills allow you to stay in Aether Shroud for longer.
Minor Augments
INSTANT RELOAD: Activation instantly reloads your currently held weapon.
EXTRA CHARGE: Increase max charges by one.
EXTENSION: Aether Shroud duration is significantly increased.
Dark Flare
Available: Unlocked at Player Level 20
Generate an energy beam that deals lethal shadow damage and penetrates everything in its path.
Major Augments
EXTENSION: Significantly increase Dark Flare duration.
SUPERNOVA: The beam is replaced with a sphere that damages nearby enemies as it travels. The ball detonates at the end of Dark Flare’s duration.
DARK PACT: Beam heals and revives other players on contact.
Minor Augments
BROAD BEAM: Significantly increase the size of the beam.
HEAVY SHADOW: The beam slows enemies on contact.
EXTRA CHARGE: Increase Max Charges by one.
Frenzied Guard
Available: Unlocked at Player Level 9
Repair armor to full and force all enemies in the area to temporarily target you. Armor takes all damage during this time.
Major Augments
PHALANX: Teammates can also repair armor from kills while near you.
RETRIBUTION: Trigger an explosion on activation. Normal enemies that melee the player are damaged and knocked down.
FRENZY FIRE: While Frenzied, use ammo from stock.
Minor Augments
REPAIR BOOST: Repair more armor per kill.
EXTENSION: Increase Frenzied Guard duration.
RALLY: On activation, repair all nearby teammates’ armor to full.
Healing Aura
Available: Unlocked at Player Level 33
Heal all nearby players immediately.
Major Augments
RESILIENCE: All affected players have their health regeneration delay reduced and their rate of healing increased temporarily.
ENDURING RADIANCE: The beams and their healing effects persist for a short time after leaving the area of effect.
PERSISTENCE: Revived players keep all Perks on their bleed-out bar.
Minor Augments
INNER STRENGTH: Affected player damage is slightly increased for a short time.
PROTECTION: Healed players have damage slightly mitigated for a short time.
STOIC PRESENCE: On activation, Special and Elite enemies are stunned while normal enemies are knocked down.
Energy Mine
Available: Unlocked Immediately
Create a mine of pure energy that detonates three times, dealing lethal electric damage.
Major Augments
SCATTER: The Energy Mine will split into three mines that scatter and detonate one time each.
TURRET: Instead of a mine, deploy a turret that shoots at the nearest enemy.
CAROUSEL: Three Energy Mines will float around you, detonating when an enemy is nearby.
Minor Augments
FREQUENCY BOOST: Increase detonation count and duration of Energy Mine.
EXTRA CHARGE: Increase max charges by one.
SIREN: Energy mine now attracts nearby normal enemies for a short time.
Round-Based Zombies: Match Preparation
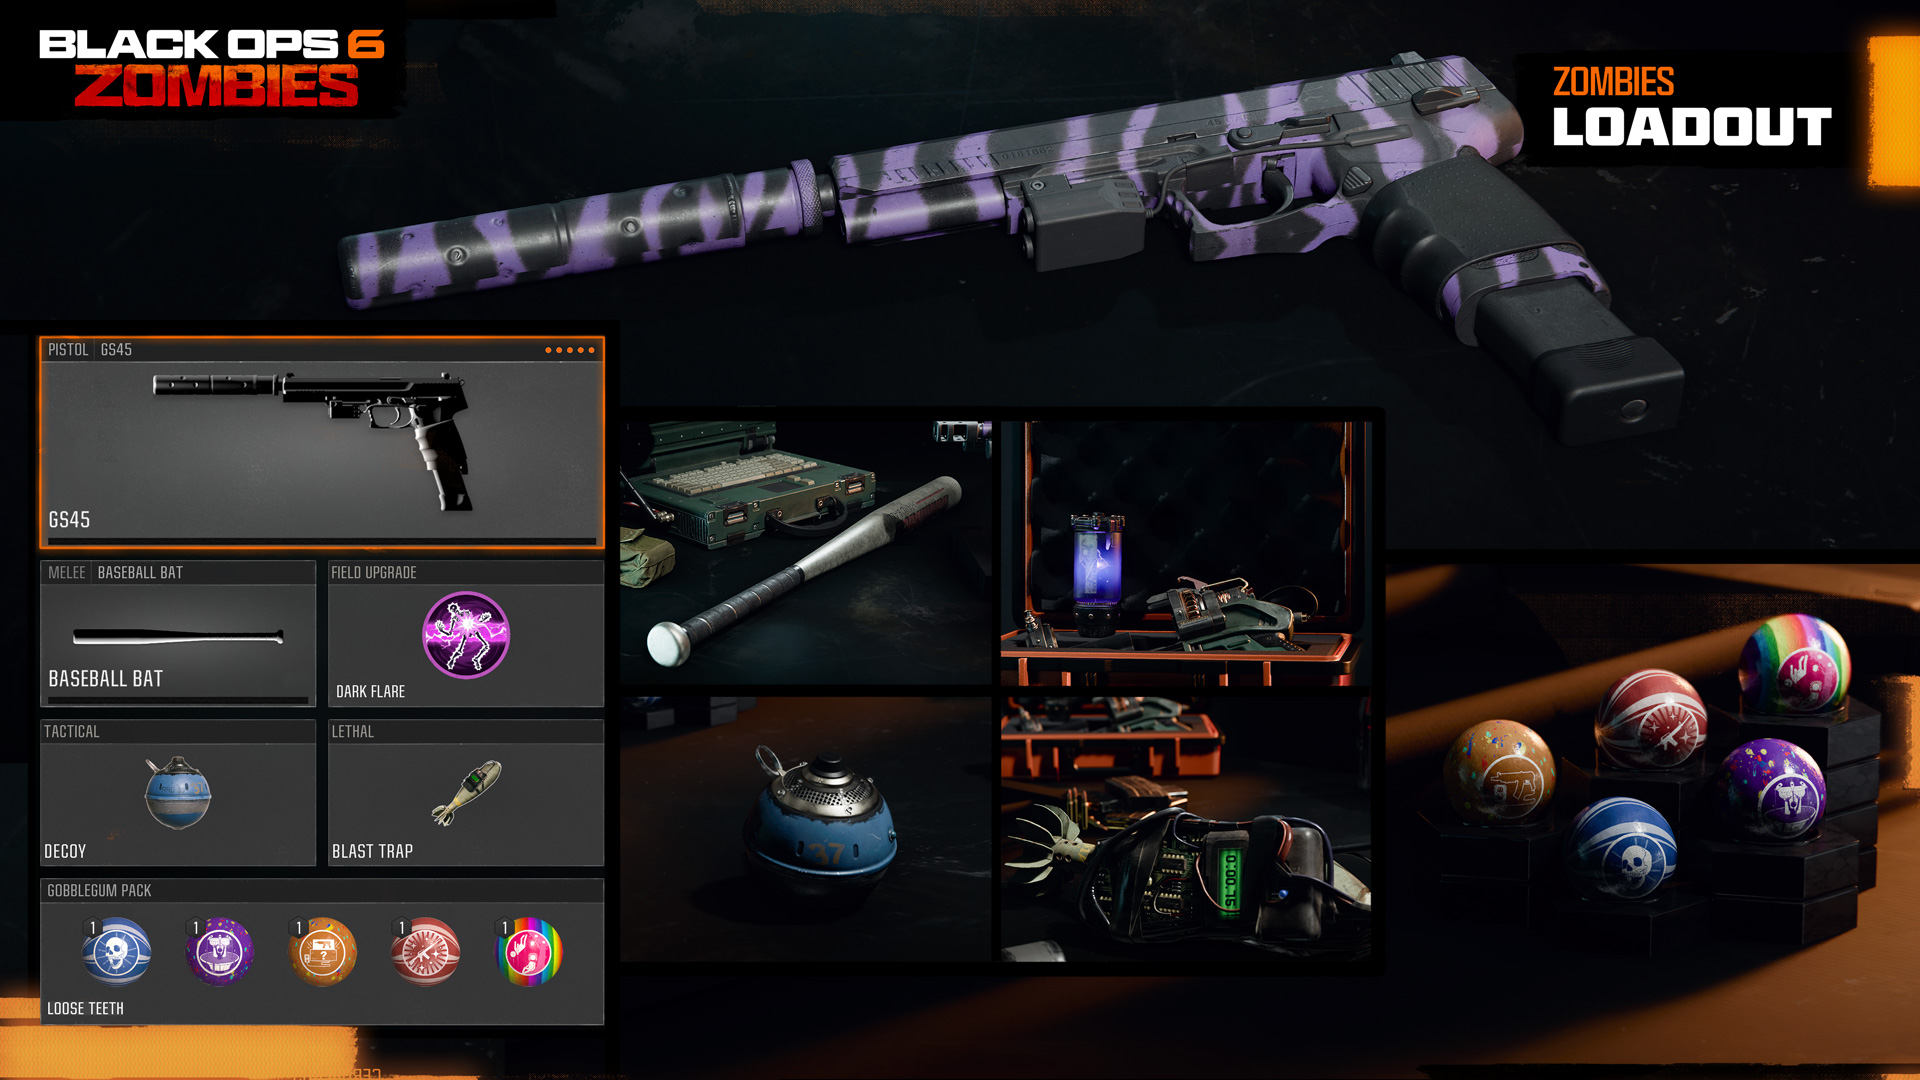
The Zombies Loadout (Updated)
Locate the Loadout Option in the Weapons Menu. It is here you’ll choose and save your Zombies Loadouts. Compared to Multiplayer, the Loadouts for Zombies are set up a little differently. The Zombies Loadout is comprised of the following:
- Weapon (Primary)
- Melee Weapon
- Field Upgrade
- Tactical
- Lethal
- GobbleGum Pack
Weapons (Primary or Secondary)
Choose the armament you wish to drop into a Zombies Match with. These can be Base Weapons, Builds, or Blueprints. Gunsmith is available for these weapons. Choose from the following weapon types:
- Assault Rifles
- SMGs
- Shotguns
- LMGs
- Marksman Rifles
- Sniper Rifles
- Pistols
- Launchers
Weapon (Melee)
Your second Loadout weapon is a close-quarters armament with no ranged ordnance. Gunsmith is available for this weapon (Cosmetics only).
Field Upgrade
Though they share the same name, Zombies Field Upgrades are distinct from those in Multiplayer, though they share the same cooldown and recharge mechanism. In Zombies, Field Upgrades are powerful devices that offer a chargeable elemental ability, followed by a cooldown period after each use when the Field Upgrade recharges, ready to be used again. You’ll earn faster recharges simply by eliminating enemies, not with the passage of time. Look for a complete list of Field Upgrades and the Augments you can fit to each of them, later in this Blog.
Tactical Equipment
These are limited-quantity items that range from healing to disorientation devices, designed to offer a non-lethal advantage in combat.
Lethal Equipment
These are limited-quantity items that harm enemies, usually via an explosion.
GobbleGum Packs
Crack your teeth as well as the skulls of the undead with a variety of custom GobbleGum Packs, based on your stored reserves of this killer candy! Pick a single Pack to bring with you; with each Pack containing five different types of single-use GobbleGums. During a match, you access these via a special confectionary machine that holds each GobbleGum in your pack and spits out one randomly once you interact with it. For more information on how this works, read more here. Look for a complete list of GobbleGums available at launch later in this Blog.
Weapons Detail Note: The Primary and Melee Weapons you can choose from, along with Gunsmith and Attachment Intel, is covered in the Weapons Detail Blog, available here. Additionally, you have an additional space to carry a second (non-Melee) weapon that can be sourced from ground loot, a Wall Buy, or the Mystery Box.
Mastery Badges Note: Almost every weapon and equipment in your Zombies Loadout – Weapon, Melee, Field Upgrade, Tacticals and Lethals – have their own Medal Challenge (with associated XP Reward), and all individual Equipment items have a specific set of Mastery Badge Challenges to complete. Consult the Launch Comms: Progression Blog for more Intel.
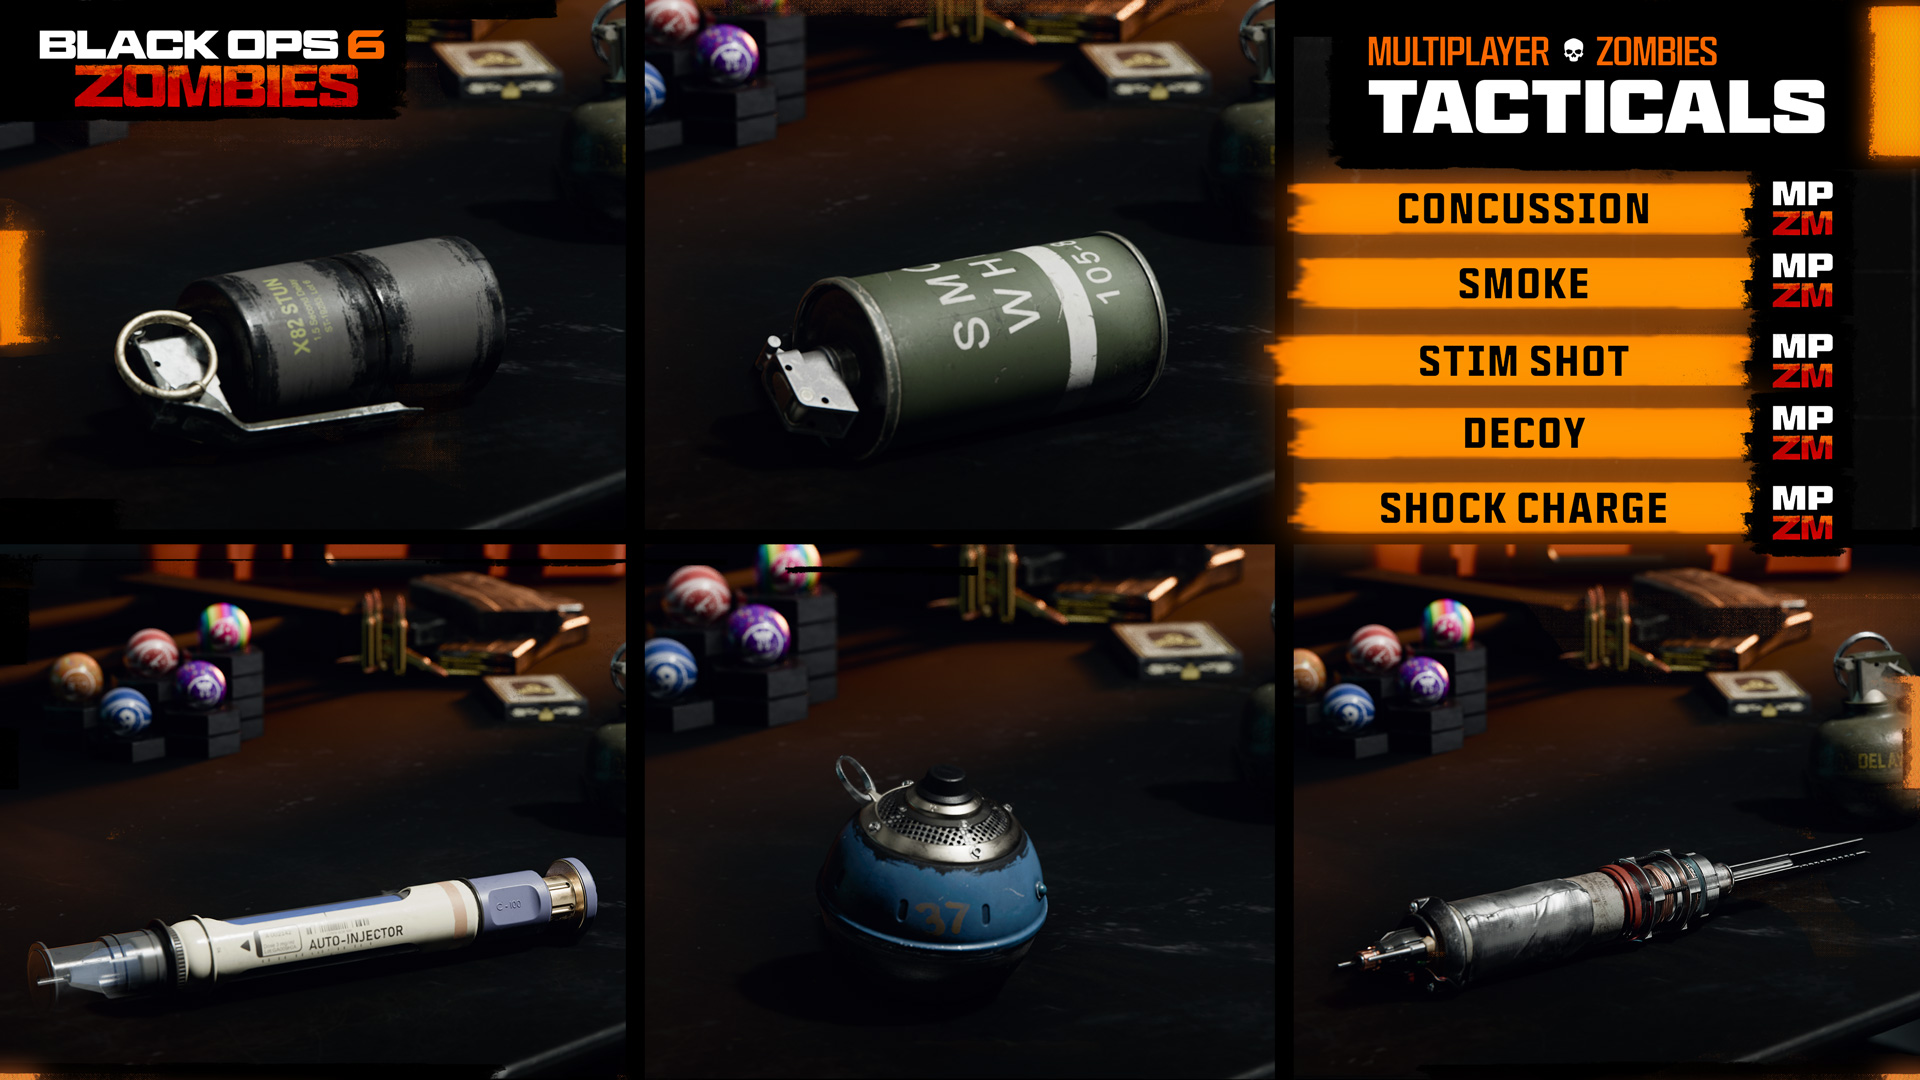
Loadout Overview: Tacticals (7)
Mastery Badges available for this Equipment Type
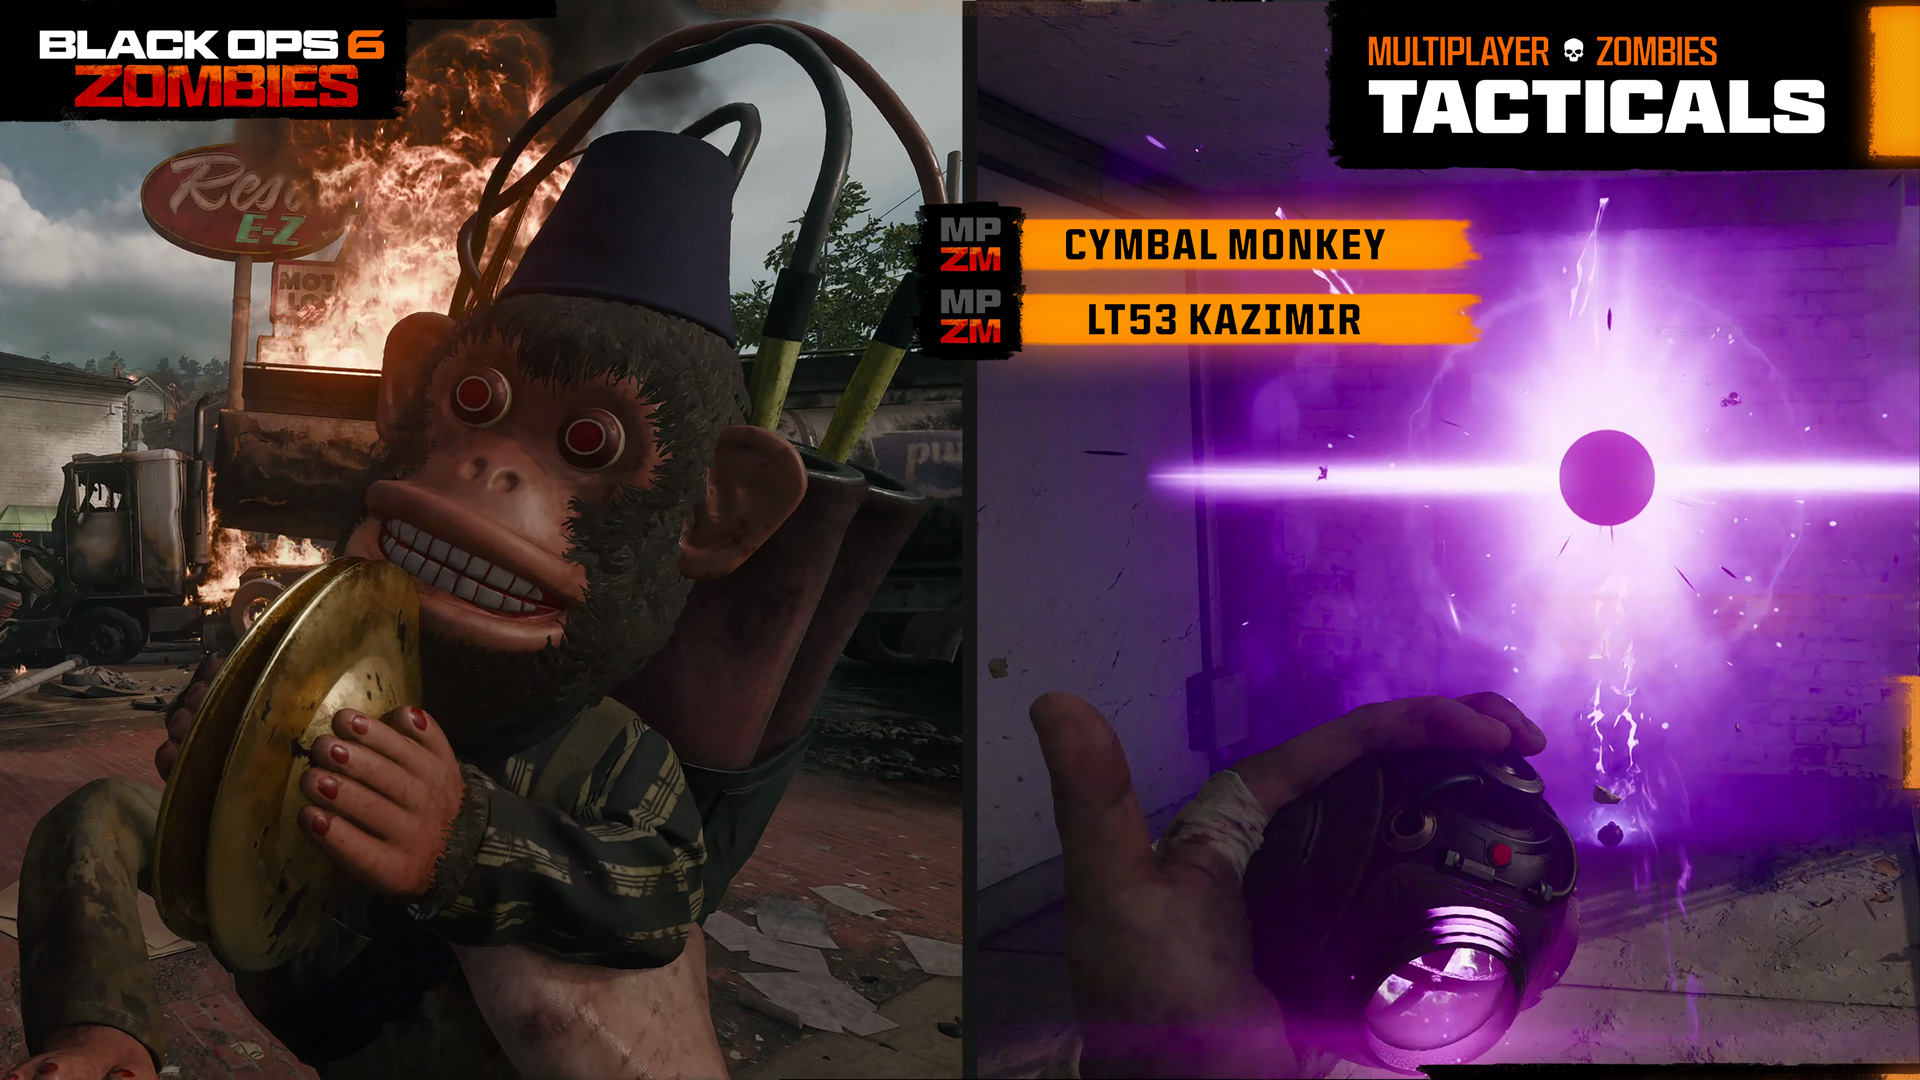
Accessing Tacticals Note: Your Loadout allows you to choose from one of five Tacticals, providing you’ve unlocked them by Player Level Progression. Tacticals can also be constructed in-game at a Crafting Table. Two additional Tacticals (Cymbal Monkey and LT53 Kazimir) are only accessible in-game via ground loot and the Crafting Table.
Progression: Tacticals Unlocks
Concussion Grenade (MP, ZM)
Available: Unlocked Immediately
Salvage Cost to Build (In-Game): 250
Grenade that slows victim’s movement and aiming.
Smoke Grenade (MP, ZM)
Available: Unlocked at Player Level 17
Salvage Cost to Build (In-Game): 500
Deploys a smoke screen that blocks vision and automated targeting systems.
Stim Shot (MP, ZM)
Available: Unlocked at Player Level 30
Salvage Cost to Build (In-Game): 250
Combat stim that heals wounds and refreshes Tactical Sprint.
Decoy Grenade (MP, ZM)
Available: Unlocked at Player Level 35
Salvage Cost to Build (In-Game): 500
Grenade that simulates footsteps and gunfire sounds to confuse enemies. Sticks to surfaces.
Shock Charge (MP, ZM)
Available: Unlocked at Player Level 42
Salvage Cost to Build (In-Game): 500
Electrical trap that sticks to surfaces and electrocutes enemies, stunning them.
Cymbal Monkey (ZM In-Game Only)
Available: Unlocked at Player Level 18
Salvage Cost to Build (In-Game): 1,000
Accessed via ground loot or a Crafting Table during a Match. Attracts zombies for a short duration before exploding.
LT53 Kazimir (ZM In-Game Only)
Available: Unlocked at Player Level 48
Salvage Cost to Build (In-Game): 1,500
Accessed via ground loot or a Crafting Table during a Match. Creates a small singularity that pulls in and kills enemies.
Loadout Overview: Lethals (8)
Mastery Badges available for this Equipment Type
Accessing Lethals Note: Your Loadout allows you to choose from one of eight Lethals, providing you’ve unlocked them by Player Level Progression. Lethals can also be constructed in-game at a Crafting Table.
Progression: Lethals Unlocks
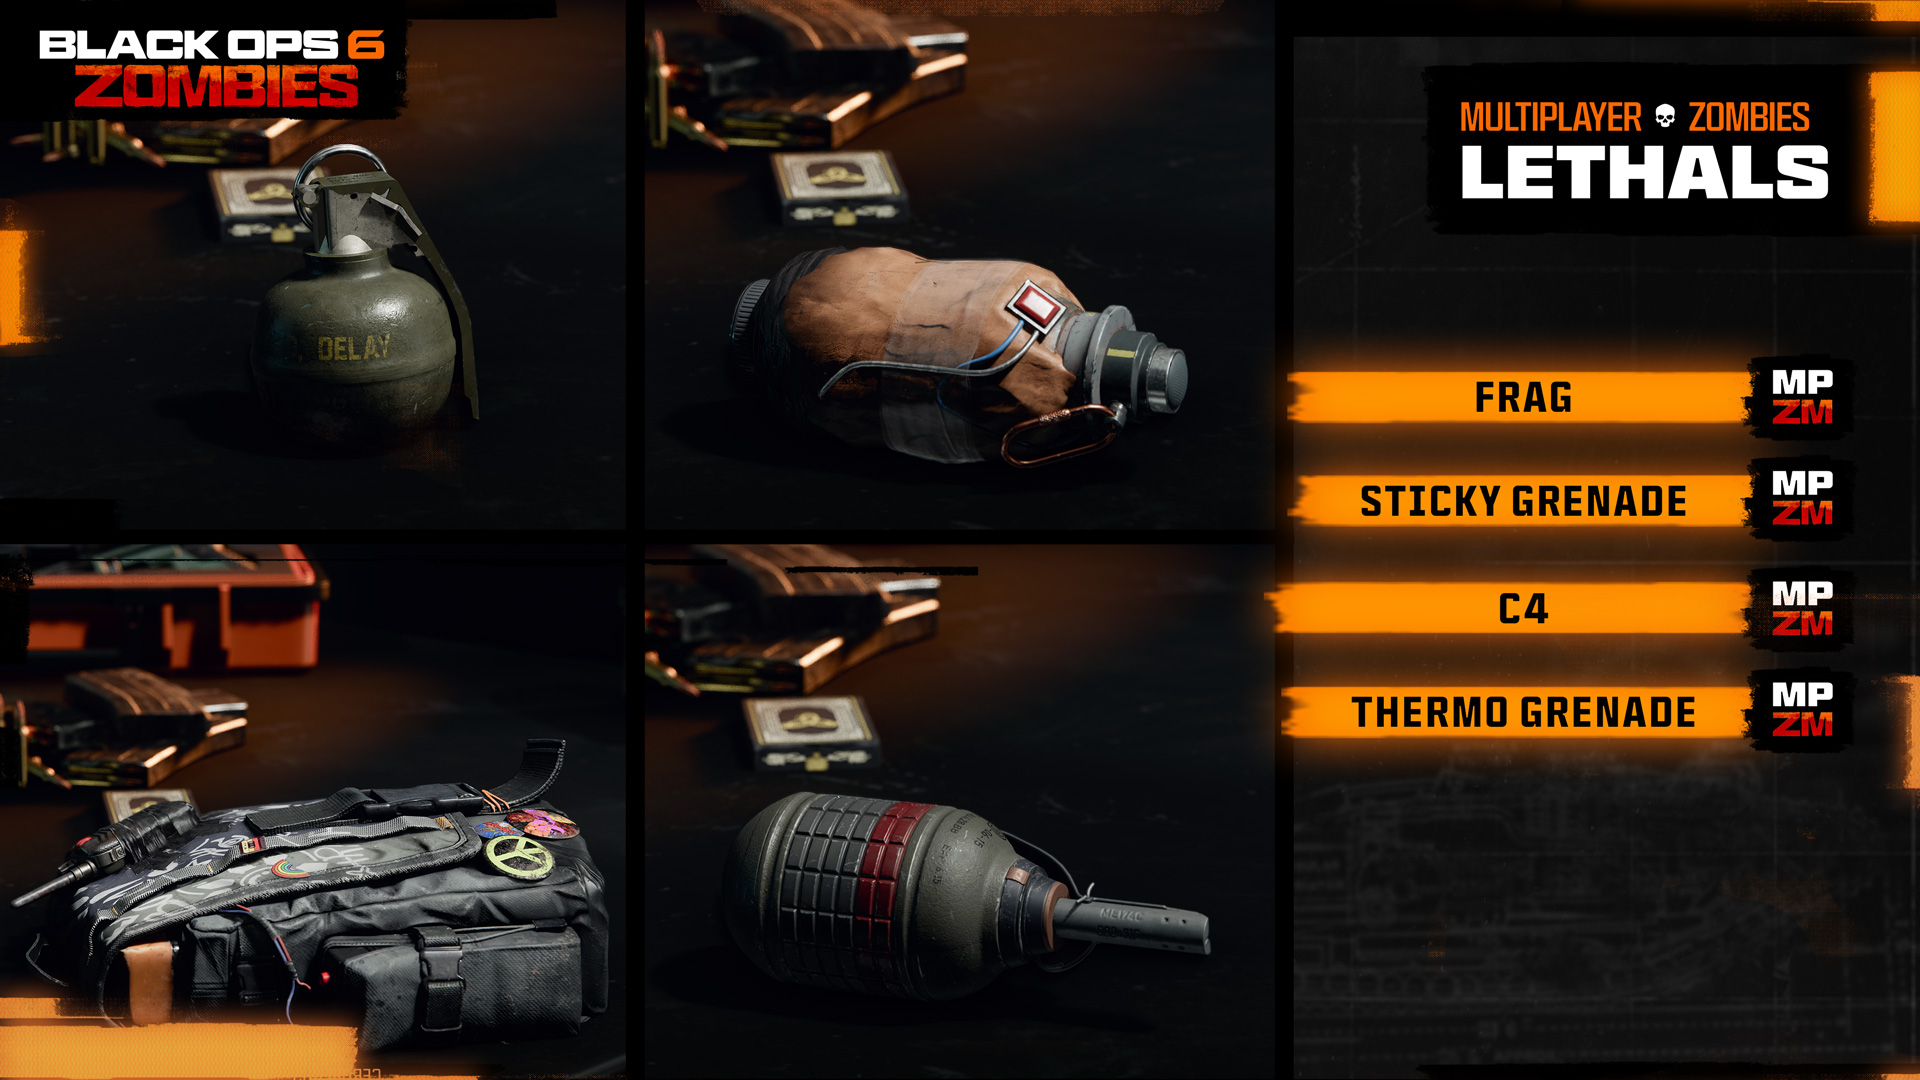
Frag Grenade (MP, ZM)
Available: Unlocked Immediately
Salvage Cost to Build (In-Game): 250
Cookable fragmentation grenade.
Sticky Grenade (MP, ZM)
Available: Unlocked at Player Level 9
Salvage Cost to Build (In-Game): 250
Reliable sticky grenade with a timed fuse.
C4 (MP, ZM)
Available: Unlocked at Player Level 14
Salvage Cost to Build (In-Game): 400
Sticky explosive with large damage radius. Detonate remotely with your Lethal Equipment Button. Double-tap your Interact Button for a quick detonation.
Thermo Grenade (MP, ZM)
Available: Unlocked at Player Level 21
Salvage Cost to Build (In-Game): 350
Creates a large fuel-air cloud that explodes after a duration.
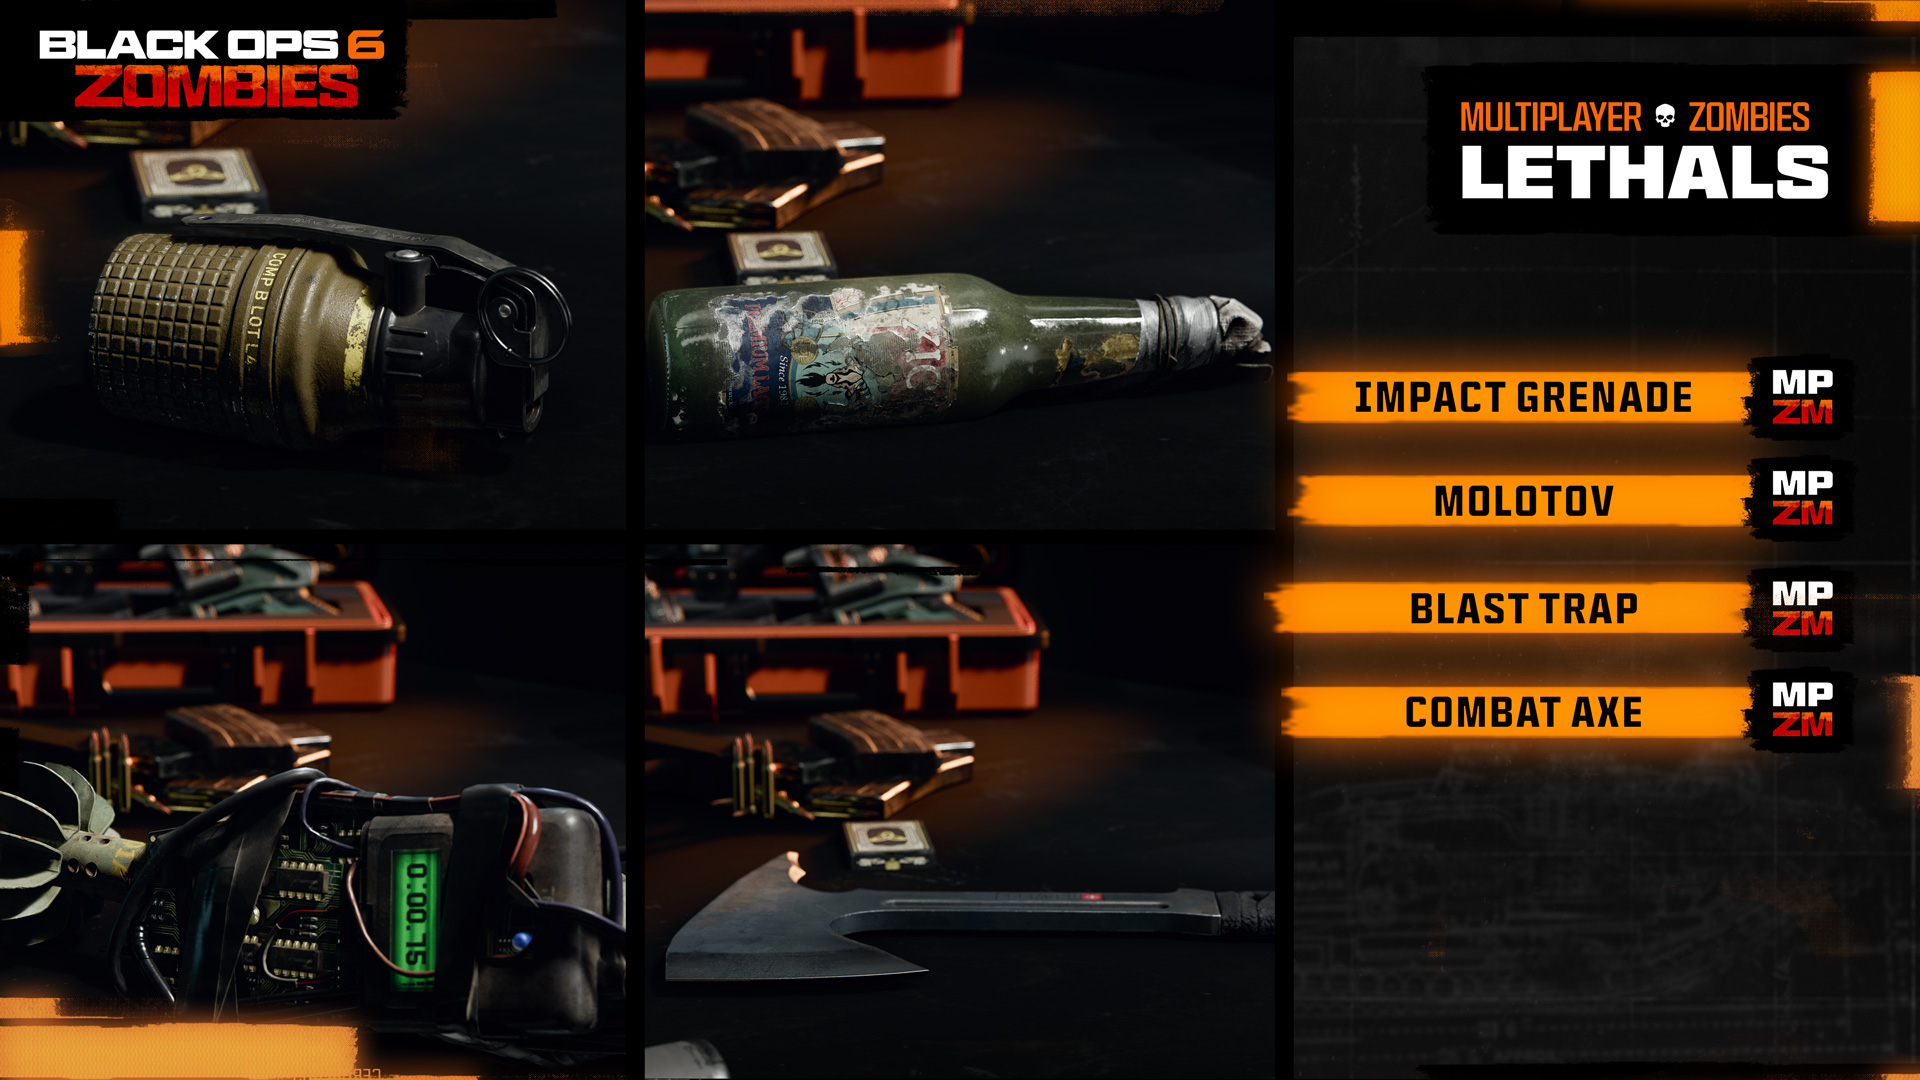
Impact Grenade (MP, ZM)
Available: Unlocked at Player Level 26
Salvage Cost to Build (In-Game): 350
Precision grenade that explodes on impact.
Molotov (MP, ZM)
Available: Unlocked at Player Level 32
Salvage Cost to Build (In-Game): 350
Thrown incendiary weapon creates a patch of flames.
Blast Trap (MP, ZM)
Available: Unlocked at Player Level 41
Salvage Cost to Build (In-Game): 350
Planted explosive device detonates when enemies come near.
Combat Axe (MP, ZM)
Available: Unlocked at Player Level 53
Thrown axe that kills enemies in one hit. Bounces off surfaces.
Support Equipment (Scorestreaks, Armor, Self-Revive) (ZM)
Mastery Badges available for this Equipment Type
Recap: Between bouts of undead culling during a match, access the Crafting Table and you’ll be able to spend Salvage to construct an impressive array of Support equipment, which also occasionally drops as ground loot. The following are available and are only available to use during the match you’re playing.
Available Support Equipment (ZM)
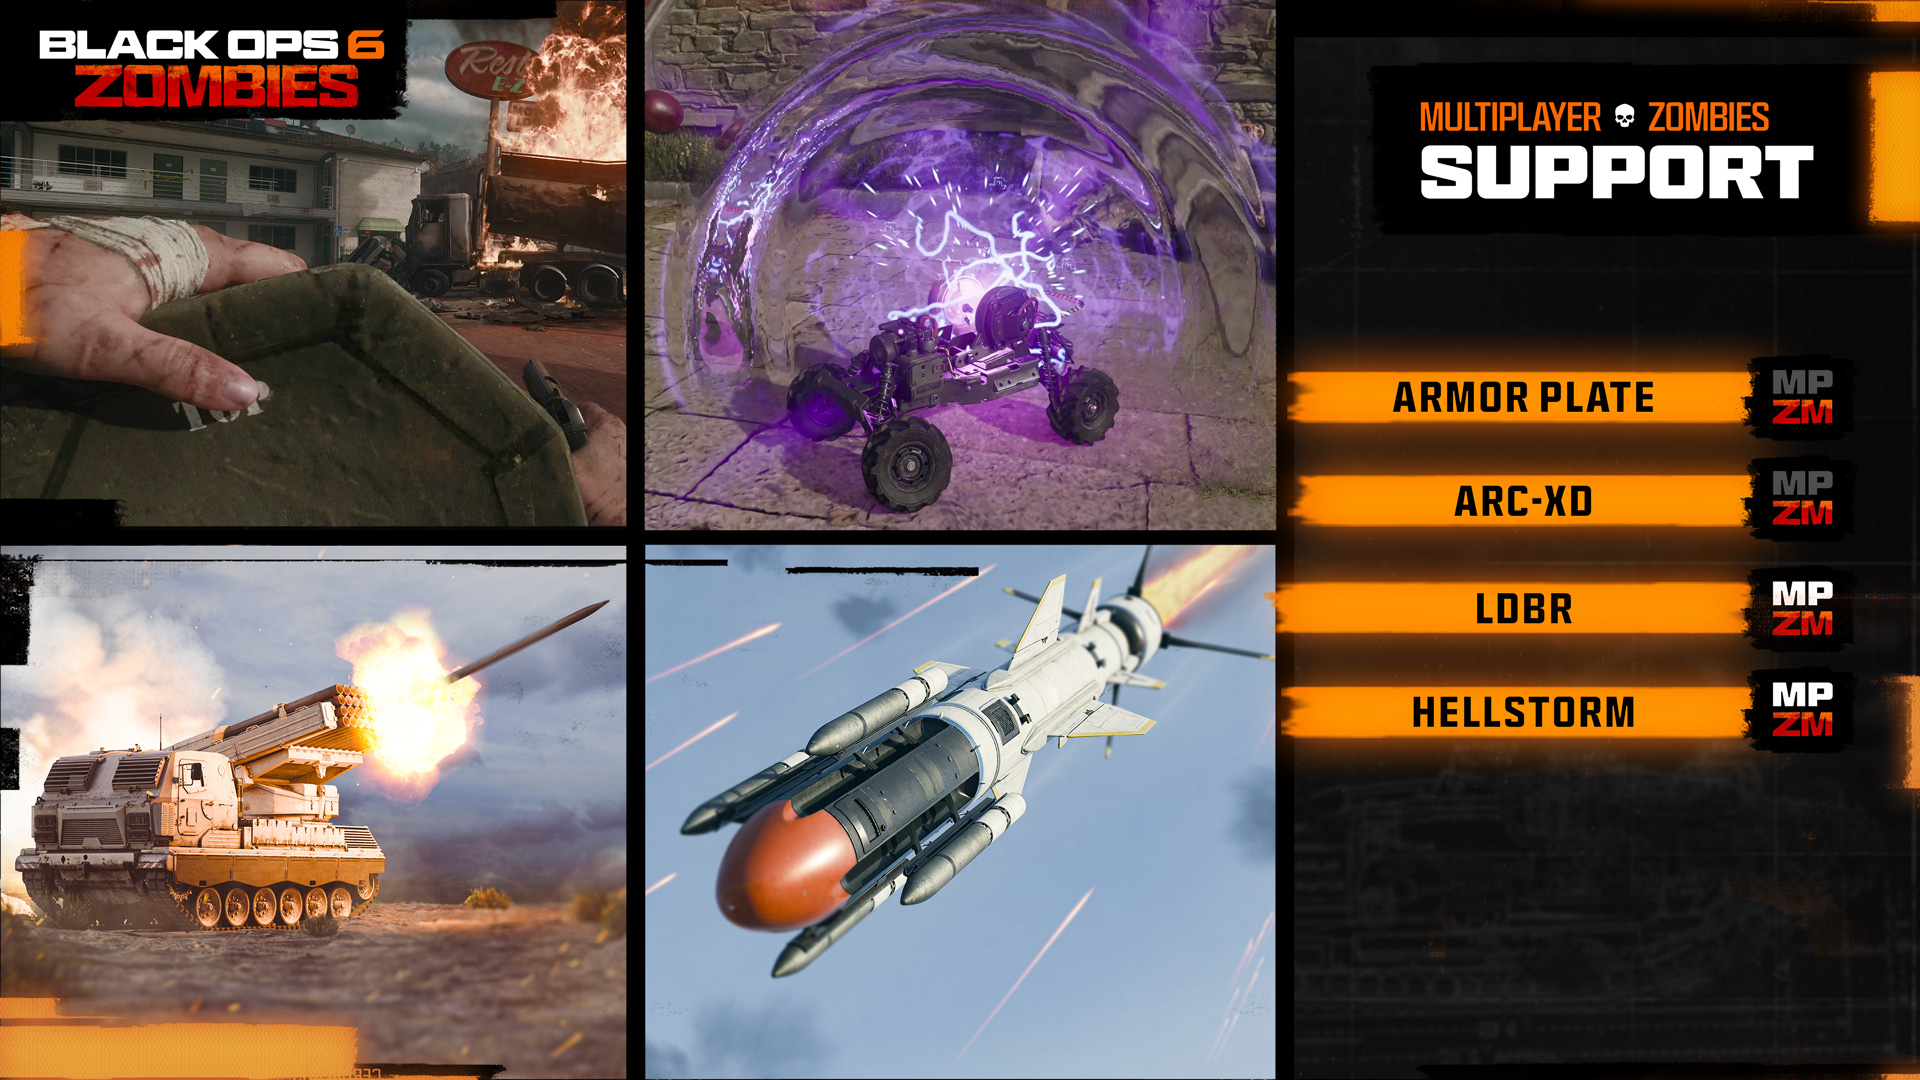
Armor Plate (ZM)
Available: Unlocked Immediately
Accessed: Unlocked In-Game, per Match
Salvage Cost to Build (In-Game): 50 per Plate
Refills Armor when used. Also available as ground loot. Note the Armor Wall Buys increase the number of plates you can carry from one to two, or three. Additional plates are crafted or looted from the ground.
ARC-XD (ZM)
Available: Unlocked at Player Level 5
Accessed: Unlocked In-Game, per Match
Salvage Cost to Build (In-Game): 1,000
Explosive RC car that emits small Aether Blasts
LDBR (ZM, MP)
Available: Unlocked at Player Level 21
Accessed: Unlocked In-Game, per Match
Salvage Cost to Build (In-Game): 1,250
Launch a missile bombardment in a targeted area for a duration.
Hellstorm (ZM, MP)
Available: Unlocked Immediately
Accessed: Unlocked In-Game, per Match
Salvage Cost to Build (In-Game): 1,250
Control a long-range missile with brake and boost capabilities and secondary missiles.
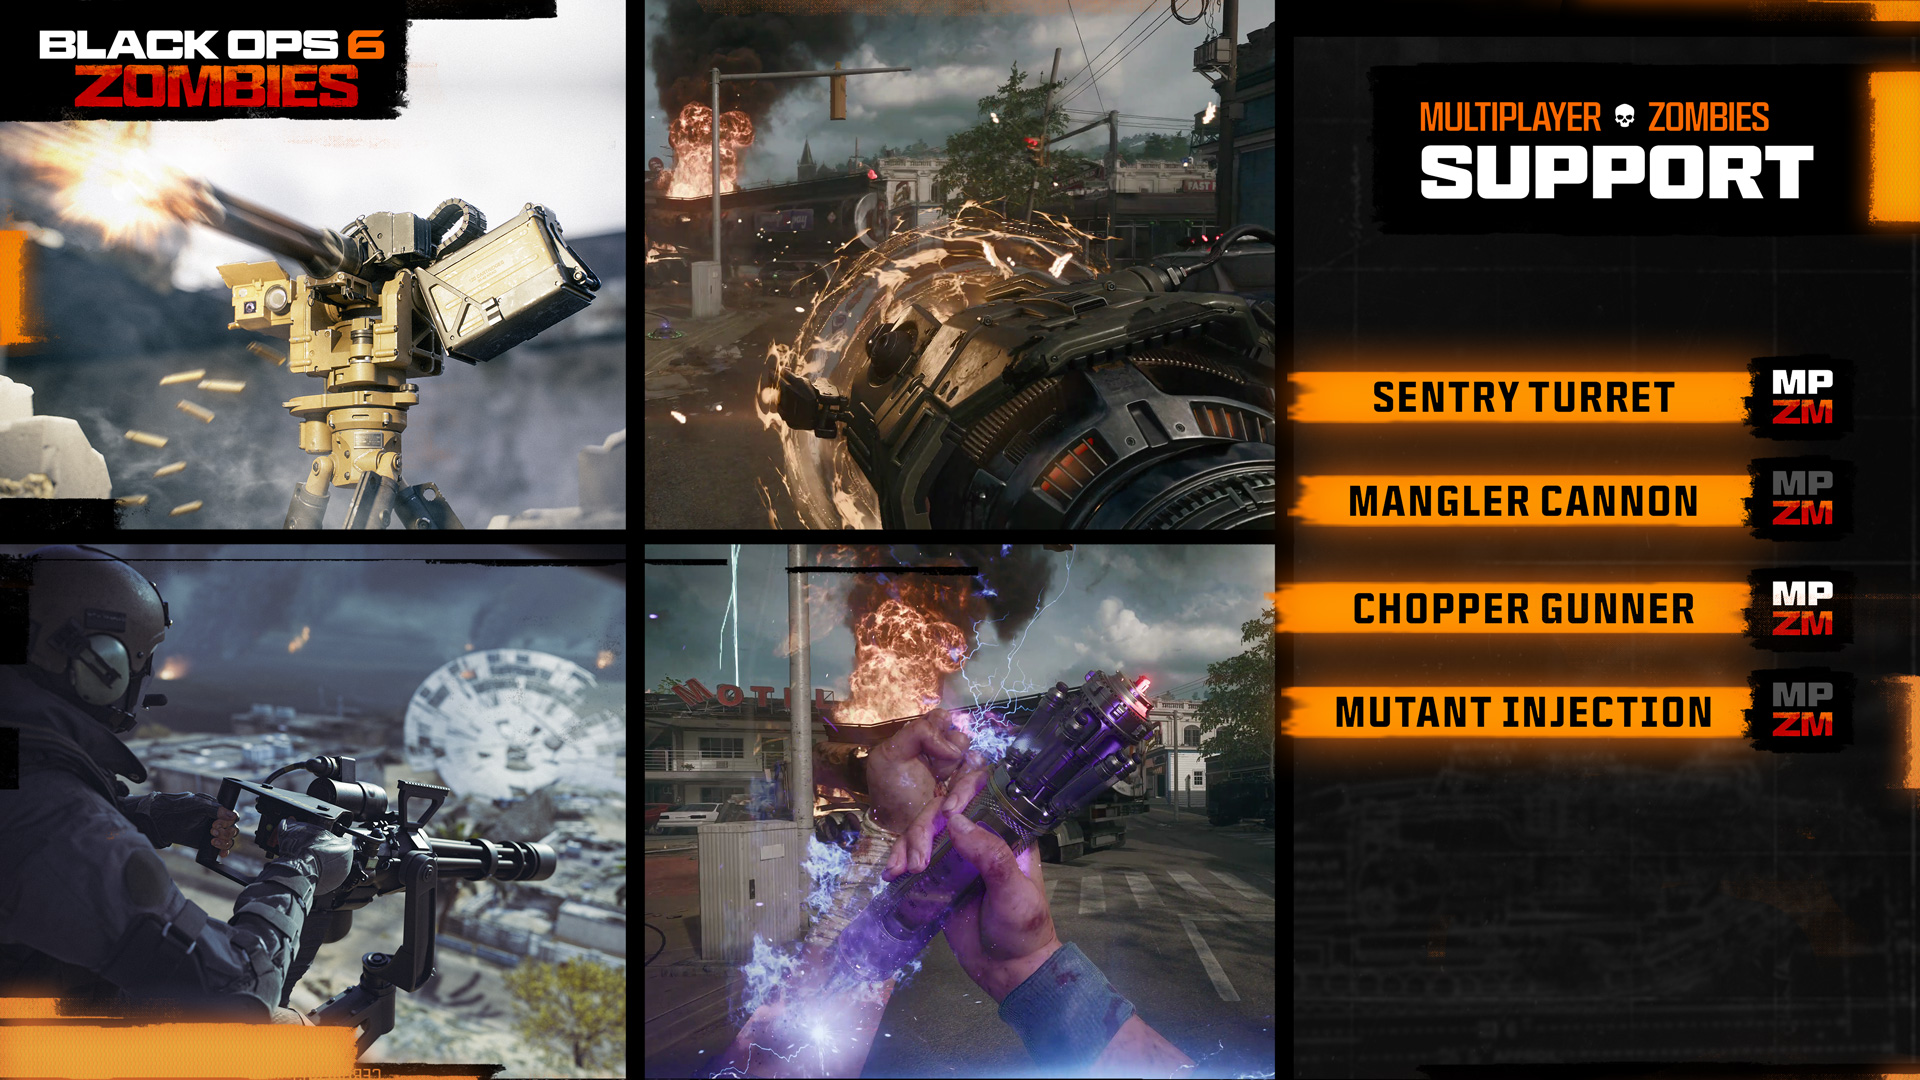
Sentry Turret (ZM, MP)
Available: Unlocked at Player Level 12
Accessed: Unlocked In-Game, per Match
Salvage Cost to Build (In-Game): 1,500
Automated turret that scans for and attacks nearby enemies in a forward-facing cone.
Mangler Cannon (ZM)
Available: Unlocked at Player Level 20
Accessed: Unlocked In-Game, per Match
Salvage Cost to Build (In-Game): 1,250
All the ballistic power of a Mangler, at your fingertips.
Chopper Gunner (ZM, MP)
Available: Unlocked at Player Level 45
Accessed: Unlocked In-Game, per Match
Salvage Cost to Build (In-Game): 2,500
Take control of the door gun turret on an assault chopper.
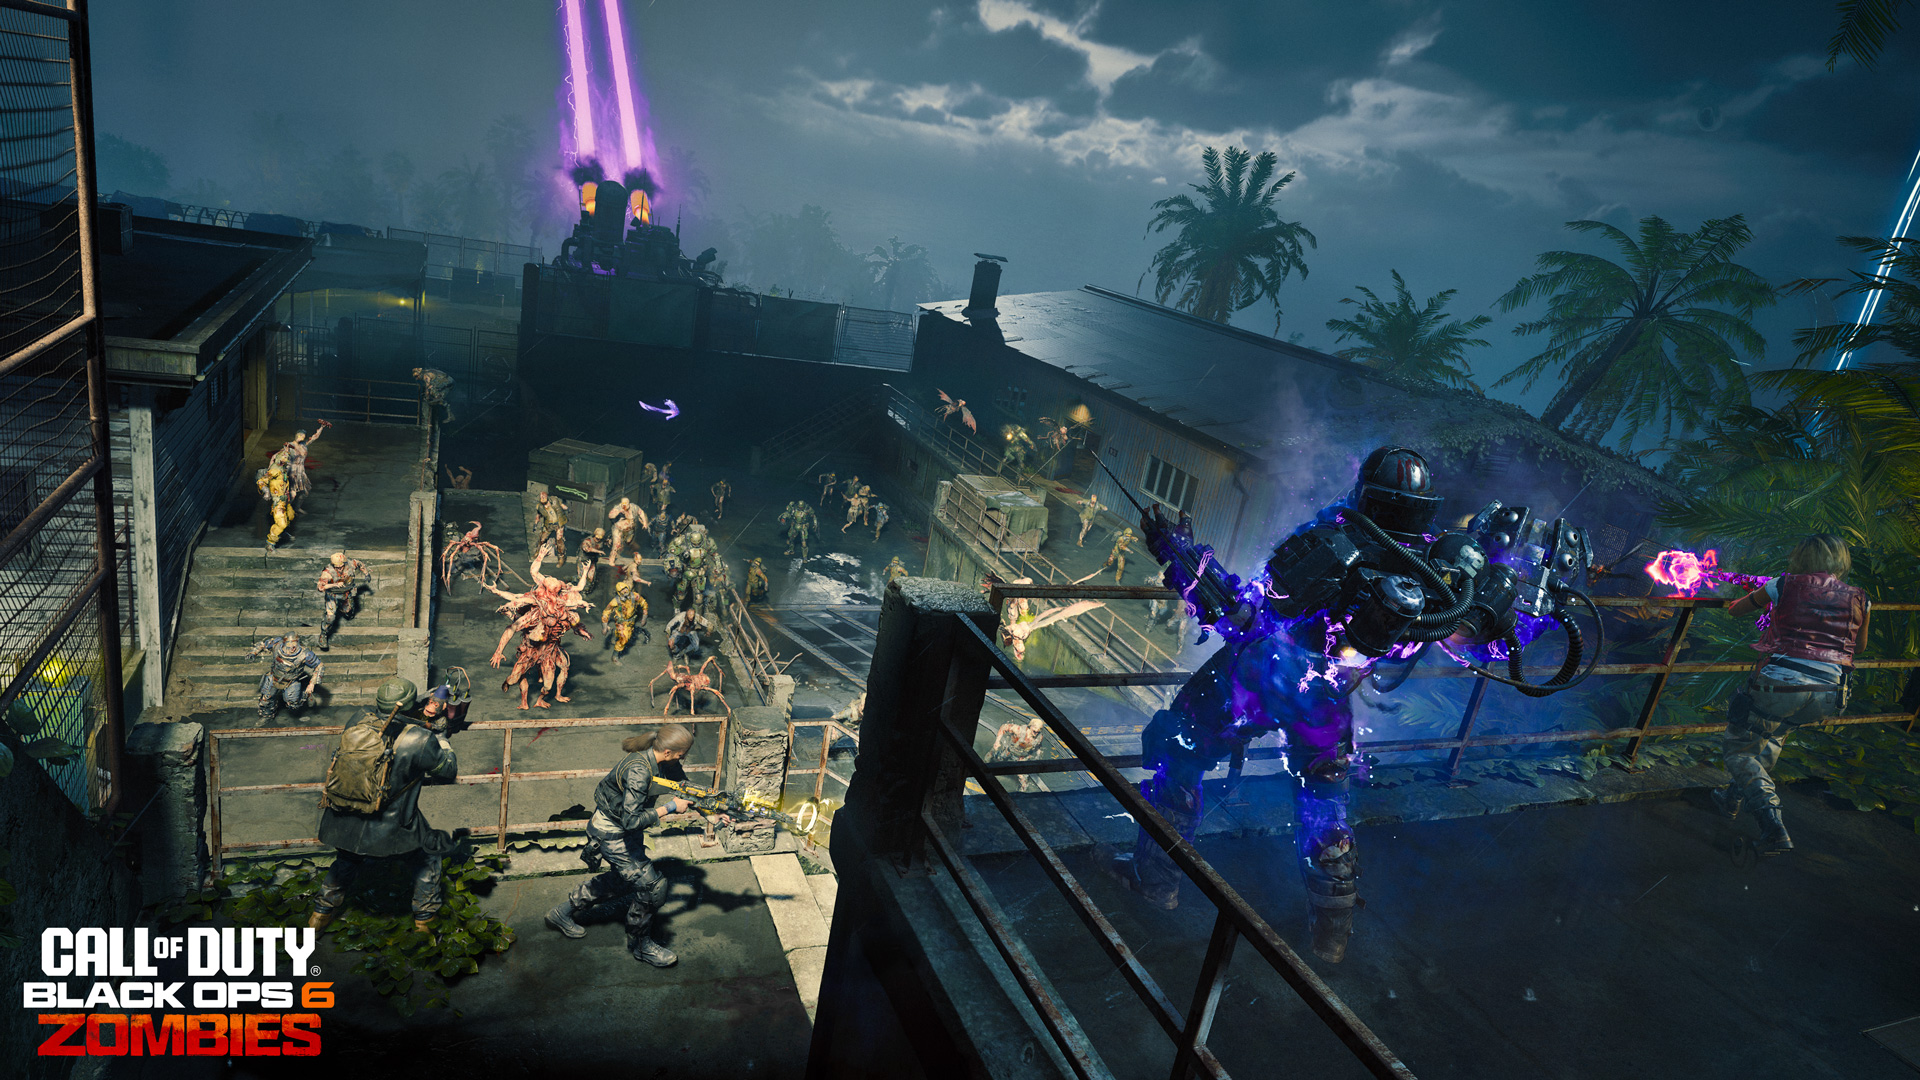
Mutant Injection (ZM)
Available: Unlocked at Player Level 39
Accessed: Unlocked In-Game, per Match
Salvage Cost to Build (In-Game): 2,500
Temporarily transforms you into a Mangler… with all the bells and whistles.
Self-Revive (ZM)
Available: Unlocked Immediately
Accessed: Unlocked In-Game, per Match
Salvage Cost to Build (In-Game): 1,500
Use when downed to revive yourself. Maximum of three craftable Self-Revives per Match.
GobbleGums: Launch Overview
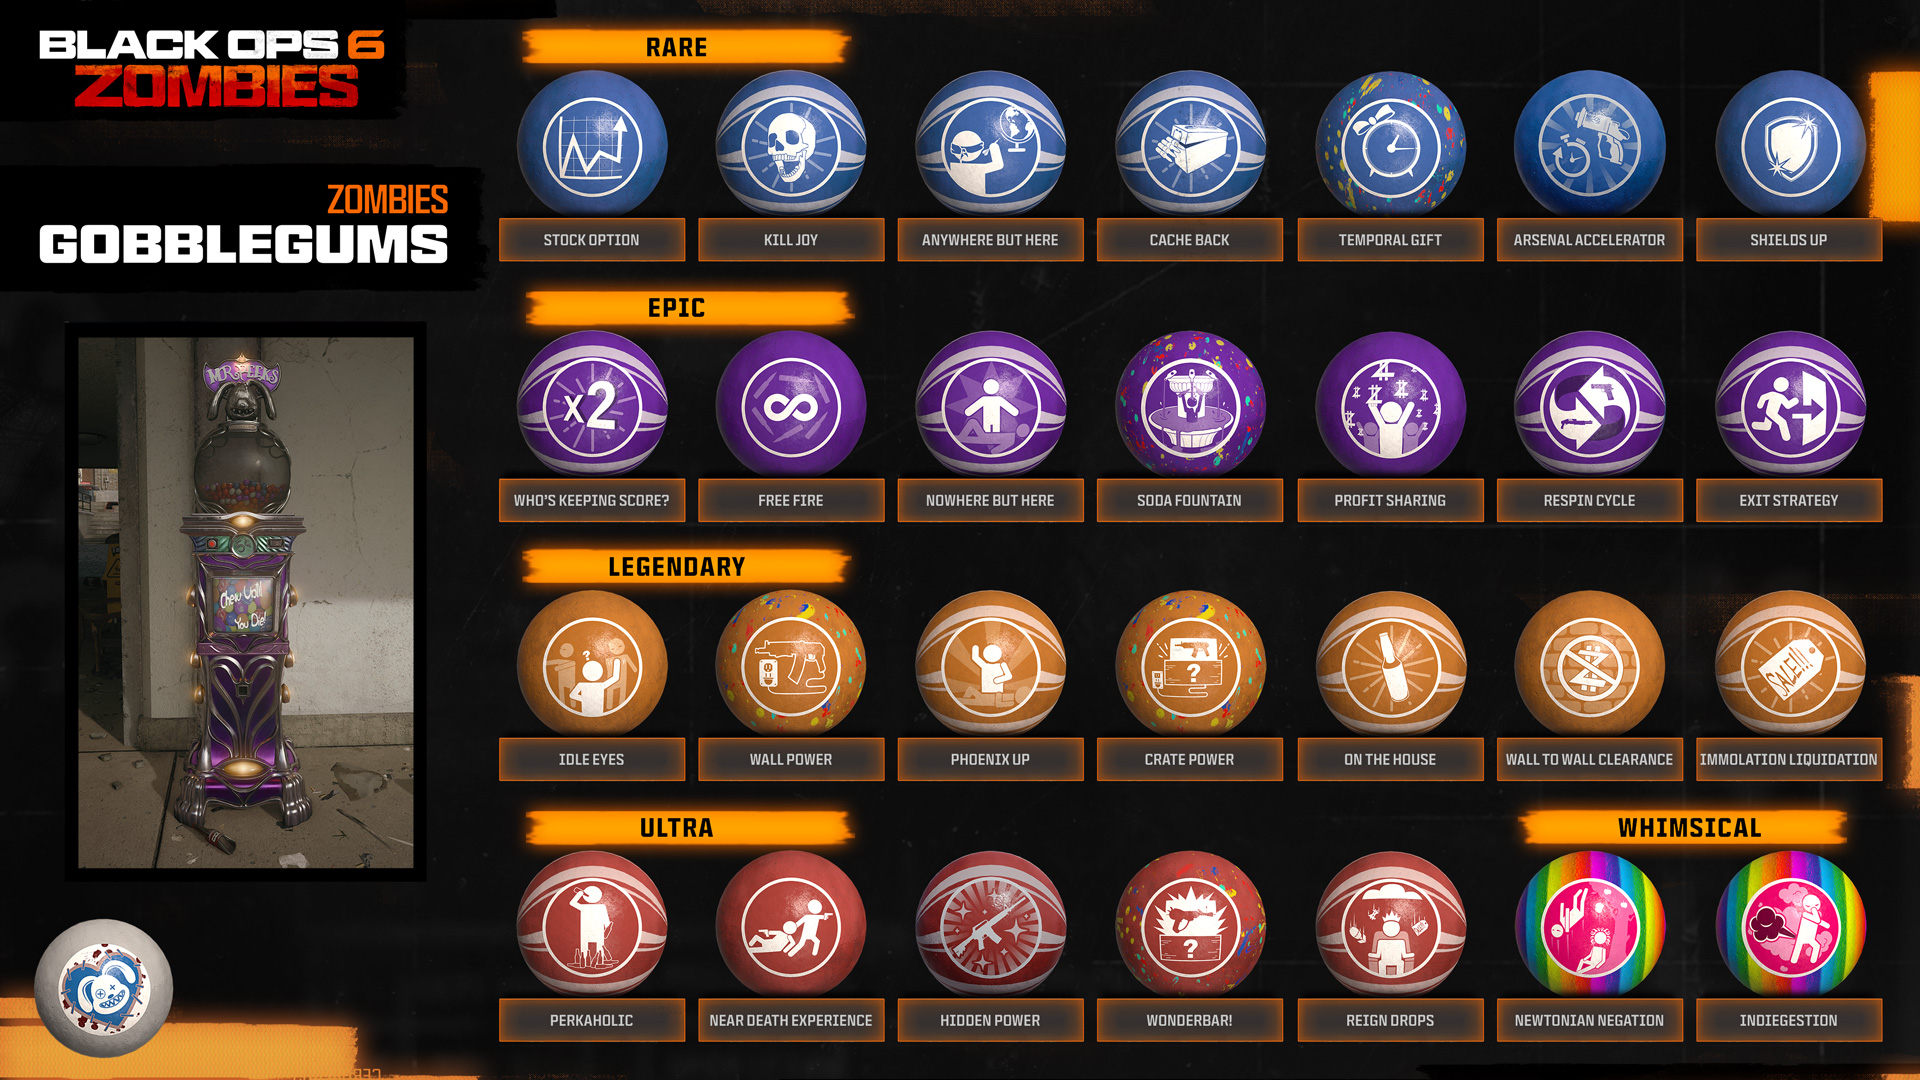
GobbleGum Rarity
Recap: GobbleGums come in a variety of rarities: Rare, Epic, Legendary, and Ultra, with the general rule that the higher the rarity, the more powerful the effect of the GobbleGum. There are also Whimsical GobbleGums, which produce amusing results that don’t typically affect gameplay.
Availability and Launch Variety
As discussed in previous blogs here and here, GobbleGums are single-use power-ups that are chosen and kept in your Loadout. Packs of five are brought into each match based on the GobbleGums you’ve unlocked and/or collected. Additional GobbleGums are earned in a variety of ways, including simply by playing Zombies and surviving rounds, or by Store purchase. Here it the complete list of all GobbleGums available to earn at launch:
Progression: GobbleGums Unlocks
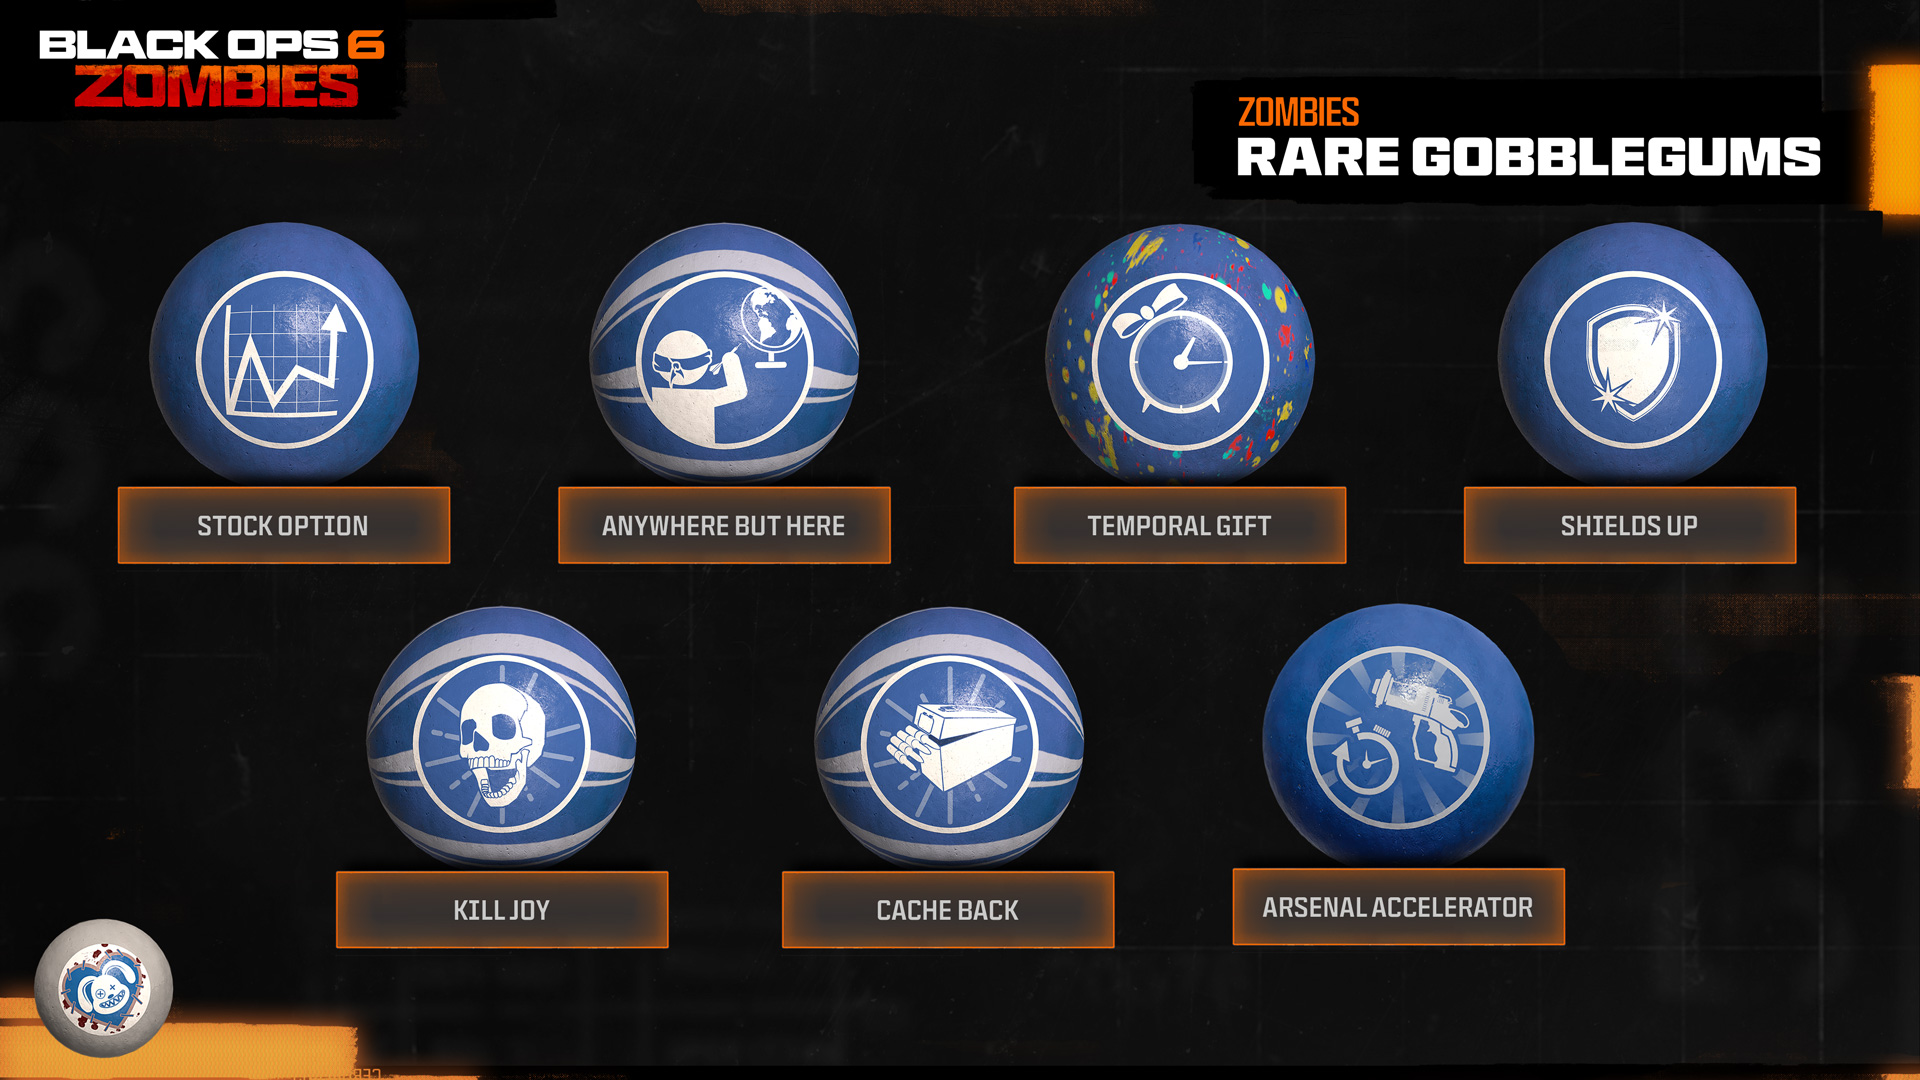
Stock Option
(Lasts one minute) Ammo is taken from the player’s stockpile instead of their weapon’s magazine.
Kill Joy
Spawns an Insta-Kill Power-Up.
Anywhere But Here!
Instantly teleport to a random location. A concussive blast knocks away nearby zombies.
Cache Back
Spawns a Max Ammo Power-Up
Temporal Gift
(Activates on Next Time-Based Power-Up) Power-Up lasts longer.
Shields Up
(Lasts three minutes) Armor is twice as strong.
Arsenal Accelerator
(Lasts five minutes) Charge the player’s Field Upgrade faster.
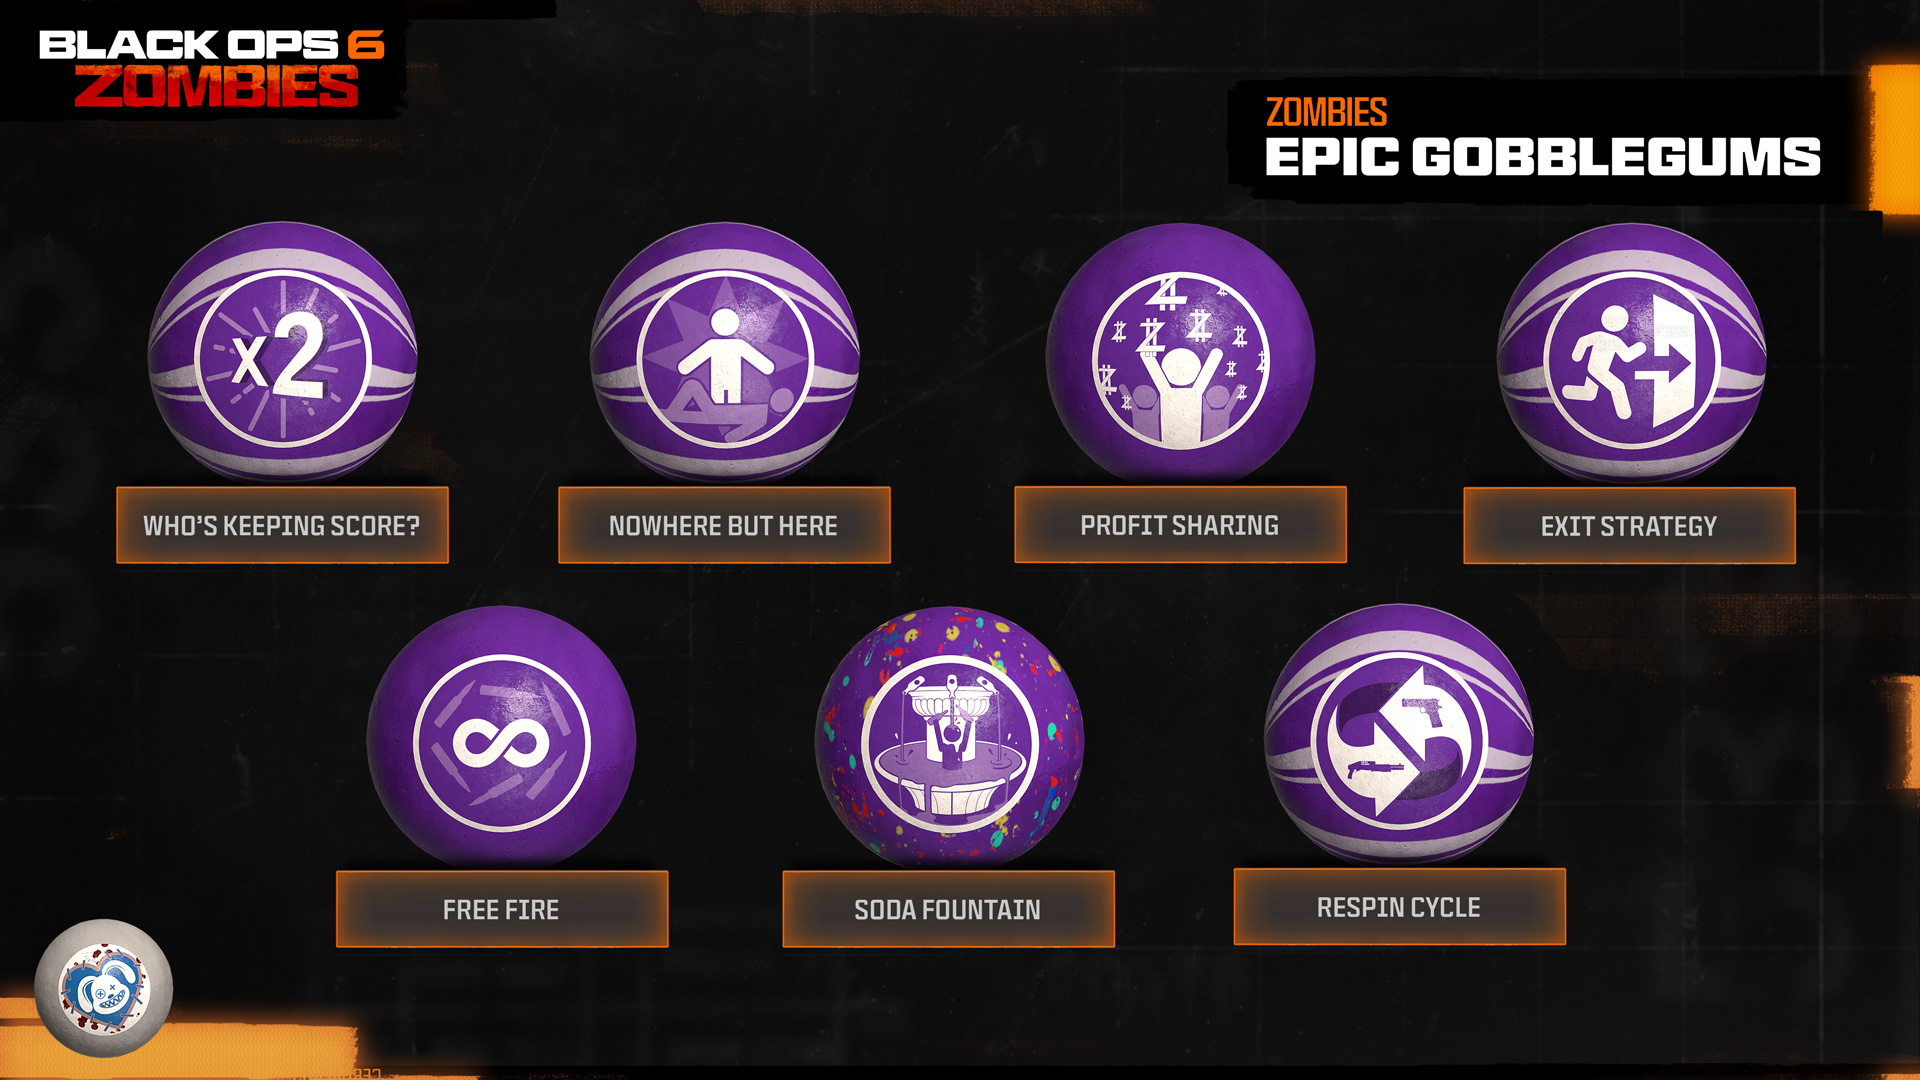
Epic GobbleGums
Nowhere But There!
Instantly teleport to a random downed player. Instantly revive nearby players.
Who’s Keeping Score?
Spawns a Double Points Power-Up.
Free Fire
(Lasts 60 seconds) Firing weapons consumes no ammo. Does not work with Wonder Weapons.
Soda Fountain
(Activates on Perk purchase) The next Perk purchased gives an additional random Perk.
Profit Sharing
(Lasts two minutes) A portion of the essence you earn is also received by nearby players and vice versa.
Respin Cycle
Re-spins the weapon in the Mystery Box after it has settled to one of equal or higher rarity.
Exit Strategy
Activate exfil vote immediately. Reduce zombie spawns during exfil.
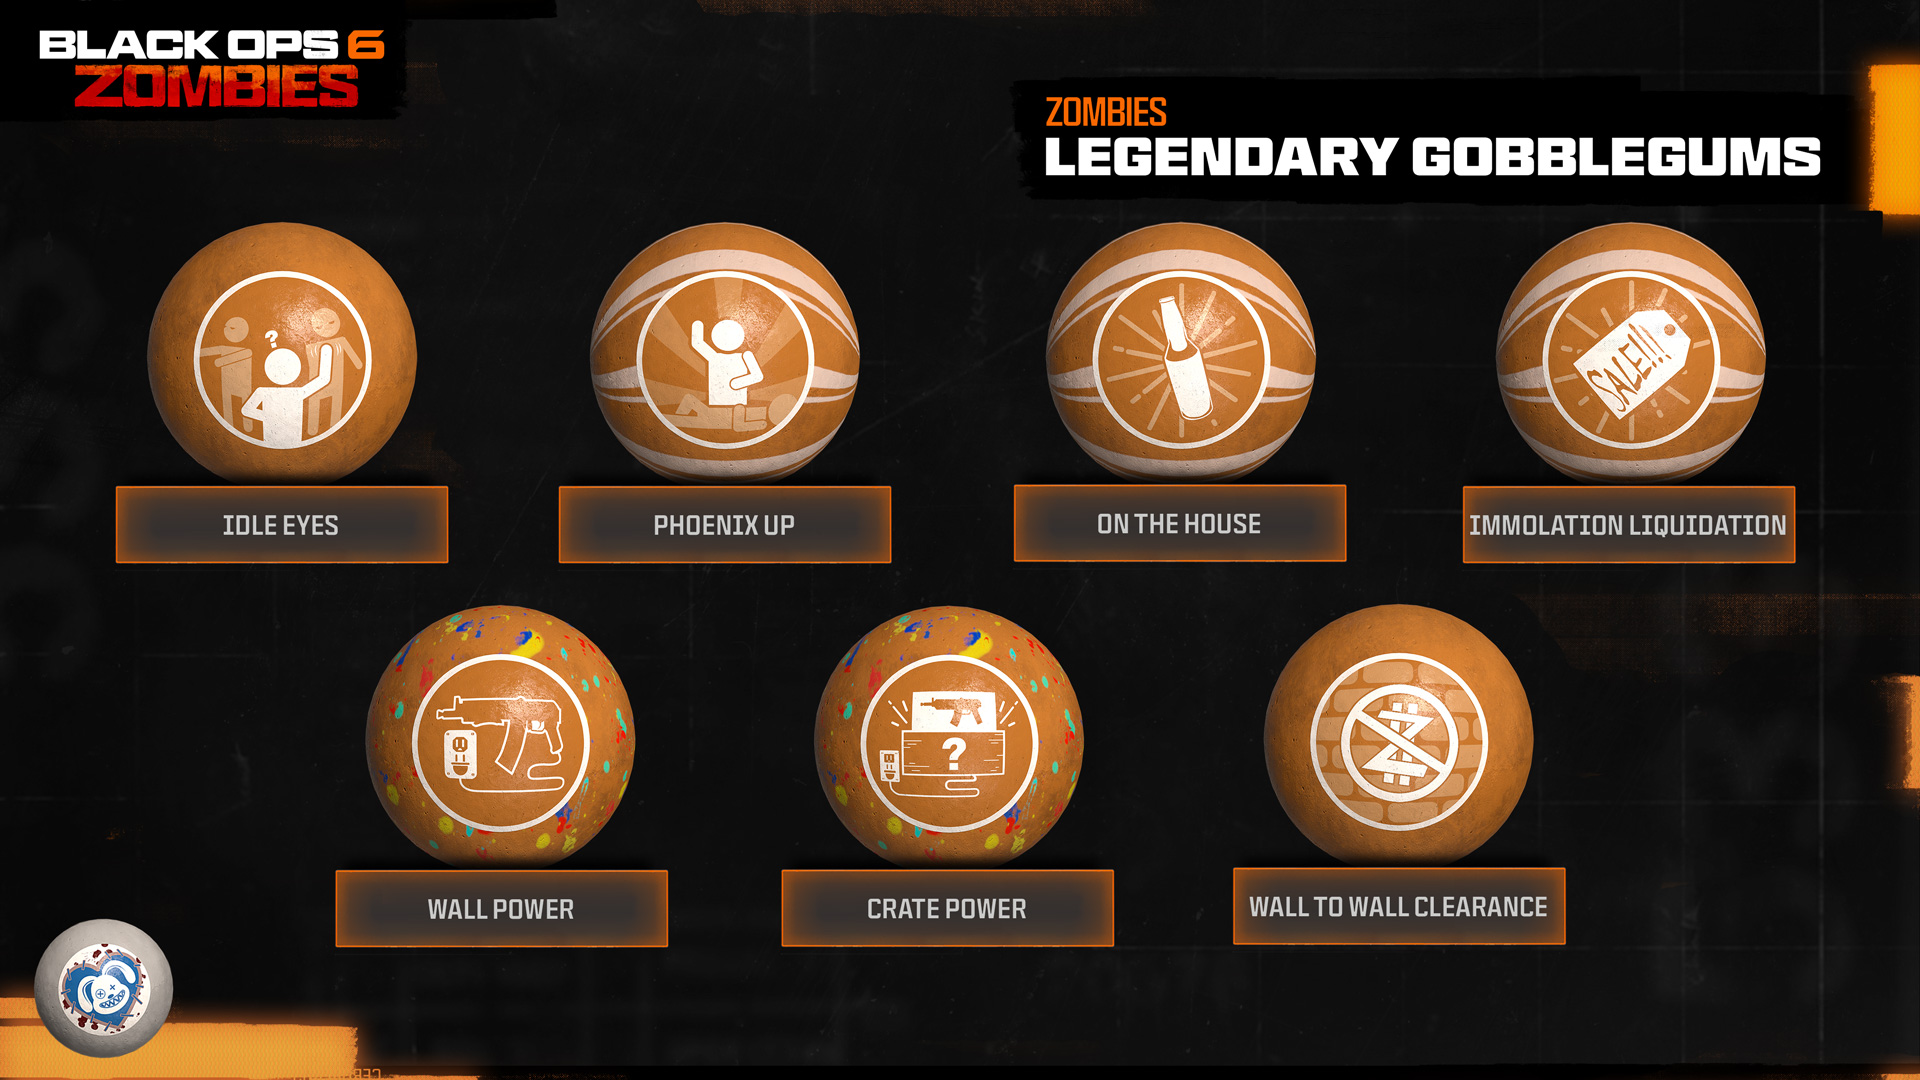
Legendary GobbleGums
Idle Eyes
(Lasts 30 seconds) All zombies ignore players and stand idle.
Wall Power
(Activates on Wall Buy) The next weapon bought off a wall comes Pack-A-Punched.
Crate Power
(Activates on Mystery Box spin) The next weapon taken from the Mystery Box comes Pack-A-Punched.
Phoenix Up
Revive all teammates and they keep their perks.
On the House
Spawns a Perk Can Power-Up.
Wall to Wall Clearance
(Lasts 30 Seconds) Wall Buys cost 10 Essence.
Immolation Liquidation
Spawns a Fire Sale Power-Up.
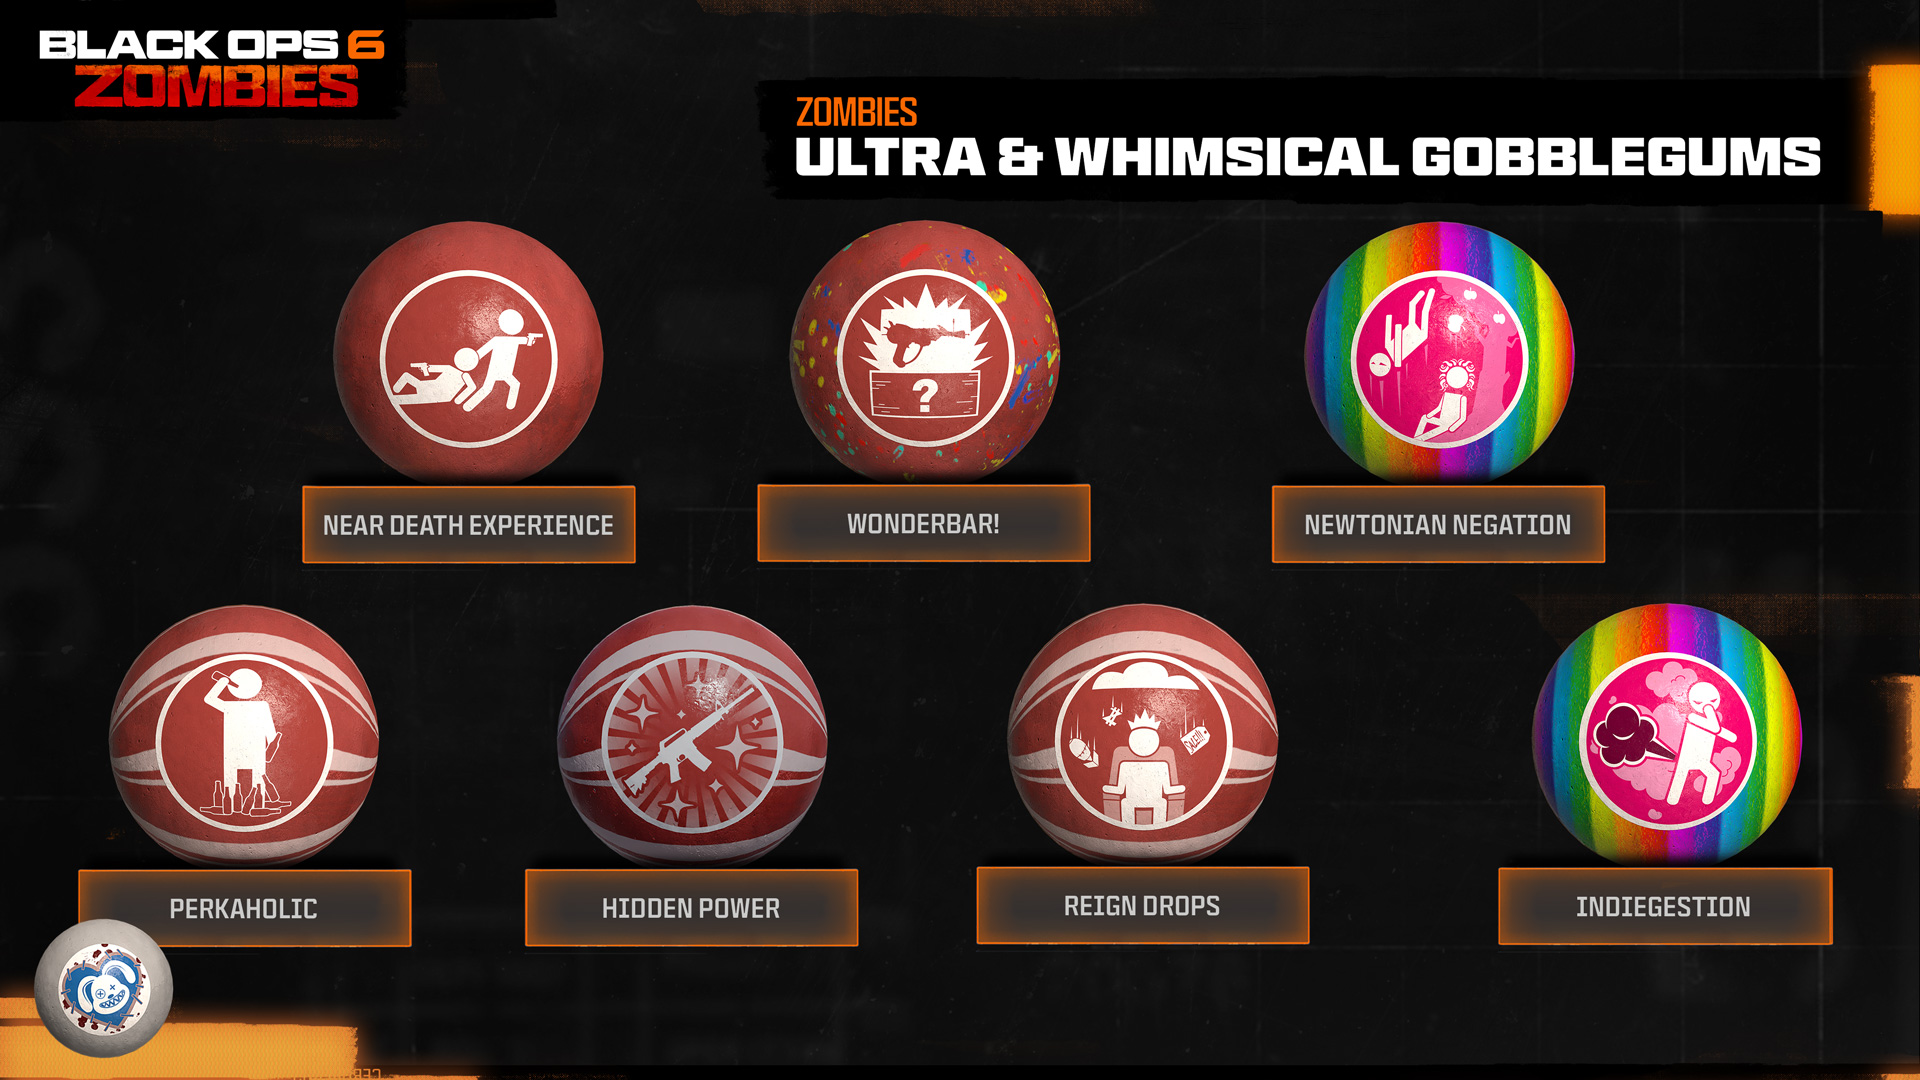
Ultra GobbleGums
Perkaholic
Gives the player all Perk-a-Colas in the map.
Near Death Experience
(Lasts three minutes) Revive or be revived simply by being near other players. Revived players keep all their perks.
Hidden Power
Upgrade your currently held weapon to Legendary rarity.
Wonderbar!
(Activates on next Mystery Box spin) The next weapon from the Mystery Box will be a Wonder Weapon.
Reign Drops
Spawns all the core Power-Ups at once.
Whimsical GobbleGums
Newtonian Negation
(Lasts three minutes) Zombies killed fall straight up.
Indiegestion
(Lasts three minutes) Zombies killed experience extreme flatulence.
Additional Access: Operators, Intel, and More!
Gathering all new and pertinent data, this section allows you to fully prepare for the forthcoming Zombies experience on October 25! Here’s what you need to know:
Pre-Game Menu Intel
Weapon Select: Gunsmith (Global System, Weapons Menu)
Build your optimal zombie-culling armament here, and then share it as a Global Weapon Build across Multiplayer and Call of Duty®: Warzone™ (at Season 01)! If you’ve built a weapon in a different mode (Multiplayer or Warzone), it will appear here along with all Attachments, both functional and cosmetic. You can then easily add it to your Loadout.
Weapon Select: Wonder Weapon (Weapons Menu)
Along with Gunsmith, Loadout, and Augments, any Wonder Weapons you may have previously unlocked, along with any associated Skins, are displayed here. This menu is simply for you to choose the preferred Skin for your Wonder Weapon, before obtaining it during a Match.
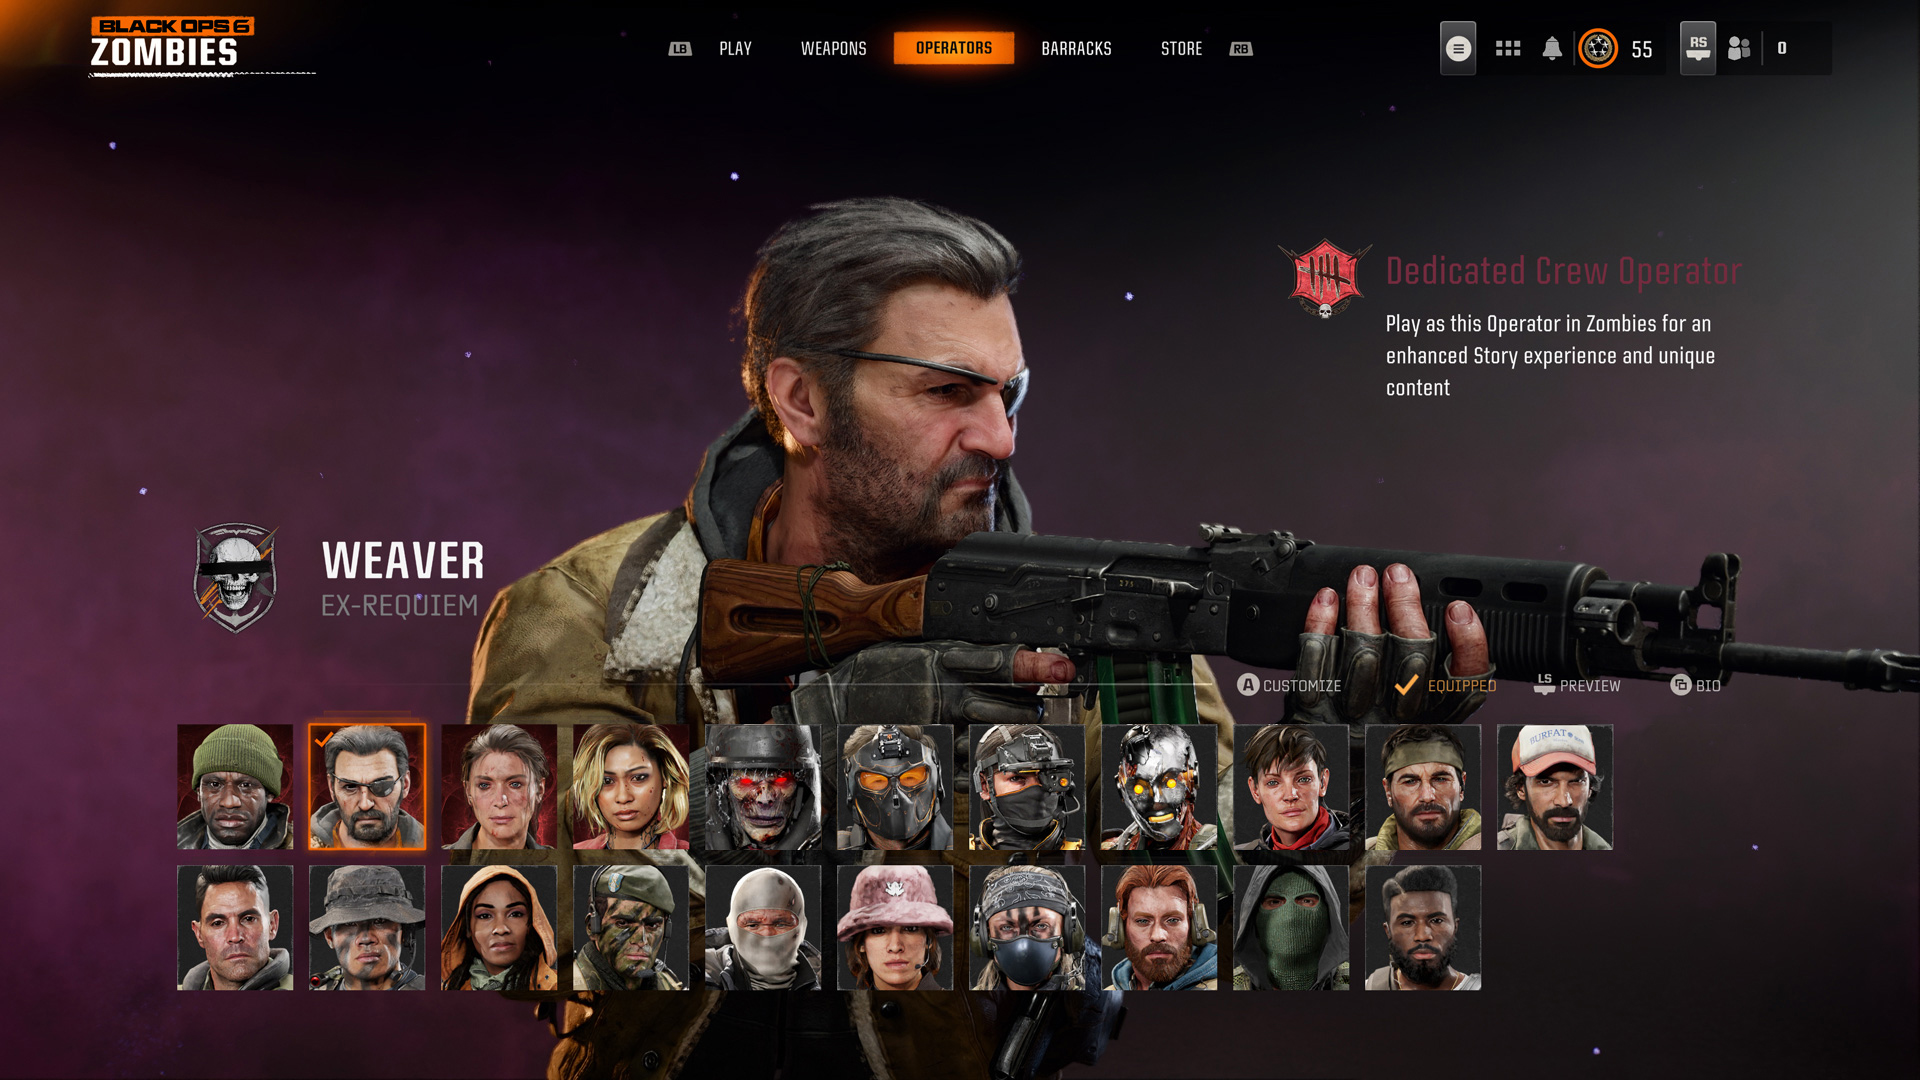
Operators Select: Dedicated Crew
The Operators Menu allows you to choose from every Black Ops 6 Operator, though the opposing factions present in Multiplayer (Rogue Black Ops and Crimson One) are not as critically important when facing horrific dimensional breaches. Therefore, expect a single Operator menu, with “Dedicated Crew Operators” (Grigori Weaver, Elizabeth Grey, Mackenzie “Mac” Carver, and Maya Aguinaldo) flagged. You are encouraged to play as one of these four characters in Zombies for an enhanced story experience and unique content. Consult the Launch Comms: Multiplayer Blog for biographies and unlock criteria for all Operators.
Barracks: Progression and Zombie Intel Access
Ensure you spend some time between matches in the Barracks Menu, as you’re able to confirm the following:
Progression: Your Player Level Progression is your main focus; unlocking levels 1-55 gradually allows access to all the different elements, items, power-ups, equipment and weaponry discussed in this blog. For example, you need to be level 11 to access Augment Research.
Challenges: Weapon Camos, Calling Cards, and Mastery Badges all have a substantial number of unlocks to undertake. Learn the techniques to unlock Weapon Camos, check all of your Calling Card Career, Hardened, Prestige, and Dark Ops Challenges, and track the Mastery Badges you’re unlocking for every weapon, Support Scorestreak, Lethal, Tactical, and Field Upgrade!
Customize: Ensure other players know exactly what you’ve unlocked during your time playing Zombies!
Zombie Intel: View the Audio Logs, Documents, and Artifacts you’ve discovered during your exploration of each Zombies map. Have you found everything? Need to listen or read intel again for clues to the Zombies storyline? Then this is the menu to come to!
Stats: View your Combat Record, Medal Collection, and check out your placement in the worldwide Leaderboard of Zombies players!
Progression Blog Note: Consult the Launch Comms: Progression Blog for full details on every aspect of the Barracks.
Black Ops 6: Unredacted Launch Comms Incoming!
Expect further critical intel to be unredacted in the coming days as we confirm additional launch content across Multiplayer and Zombies. Look for the following missives:
Launch Comms Blog 1: Multiplayer and More: Essential Intel on the Multiplayer Modes, Maps, Factions, and Operators Coming to Black Ops 6.
Launch Comms Blog 2: Zombies Mode Prep: Full Equipment, Power-Ups, Augments, GobbleGums, a Full Tour of Terminus and Liberty Falls, and Confirmed Launch Changes. You’re reading this blog now!
Launch Comms Blog 3: Weapons Hot: Primary, Secondary, and Melee Weapons Detail for Black Ops 6. Includes new details on the latest innovations across Gunsmith and Attachments.
Launch Comms Blog 4: Gear Up: Ensure you’re fully equipped for Black Ops 6 launch as we confirm all the launch Equipment (Tacticals, Lethals, Field Upgrades), Perks, Specialties, Wildcards, and Scorestreaks available.
Launch Comms Blog 5: Progression: Unlock your true potential as we detail the critical Player Level equipment you’ll need on day one, detailed intel on Classic Prestige and the available rewards, full info on Calling Cards, Reticles, and Mastery Badges Challenges. Plus: Are You Ready for a Deep Dive into the Weapon Camo System?


Stay tuned to GamingTrend for more Call of Duty: Black Ops 6 news and info!


